DIY Porch Decorations for Fall

Materials for a fall DIY
Courtesy of Midwest Life and Style

A DIY is more than just a fun project to take on for a weekend. A DIY gives you a sense of pride and accomplishment. And there’s no better time than the present. Here is a compiled list of some fall DIYs that will be sure to stand out on your front porch this autumn.


Pumpkin Doormat

Pumpkin Doormat
Courtesy of The Merry Thought

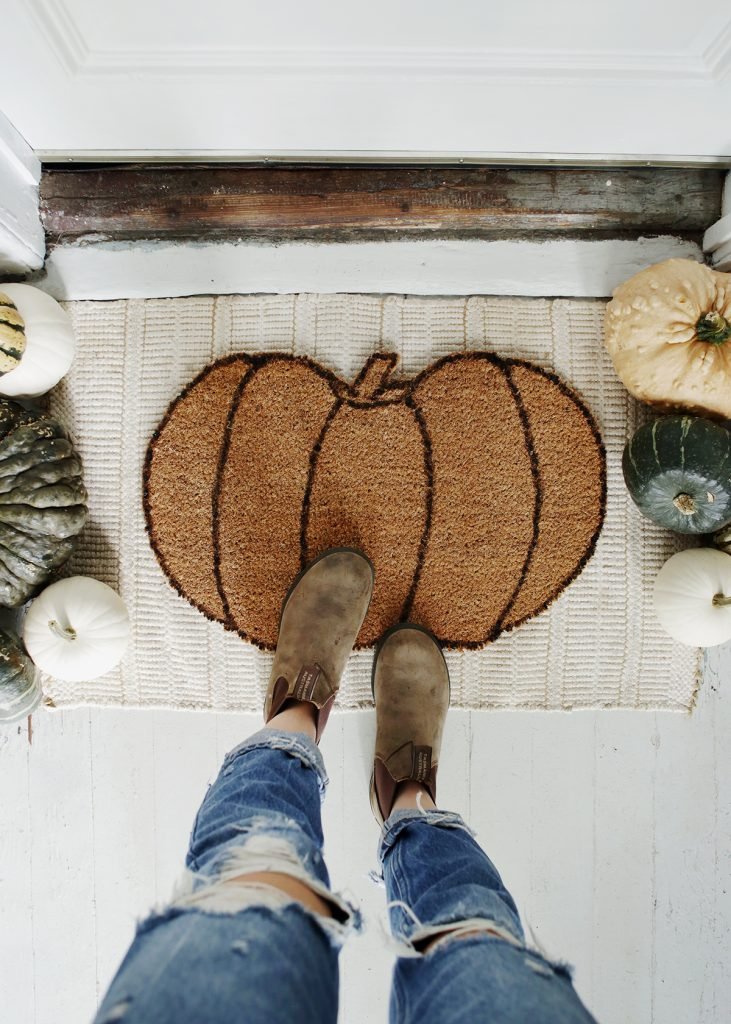
One thing every porch needs is a doormat. Despite its primary purpose of keeping dirt outside, it can also dress up your door. It’s one of the first things guests will see on your porch, so it’s best to make it welcoming and, in this case, festive! Check out this DIY pumpkin doormat to make this autumn.

Materials:

  • Doormat 
  • Pencil 
  • X-acto knife 
  • Scissors
  • Paint 
  • Paint Brush 

Instructions:

The first step to making this festive doormat is to flip it upside down so that the bottom of the mat is facing up. From here, you will sketch your pumpkin on the back of the mat. You can do this freehand or by using a reference photo. Once you’re happy with the drawn shape, take your X-acto knife and cut off the edges so that the mat is in its pumpkin shape. Then, you’ll flip the mat over, right side up, and clean up any messy edges with scissors. Finally, creativity comes in! Use your imagination and paint the mat. It can just be an outline of the pumpkin so the natural mat shows, or you can use any color that will match the rest of your porch décor.  

Mums in a Pumpkin Planter

Mums in a pumpkin planter
Courtesy of Simple Sojourns

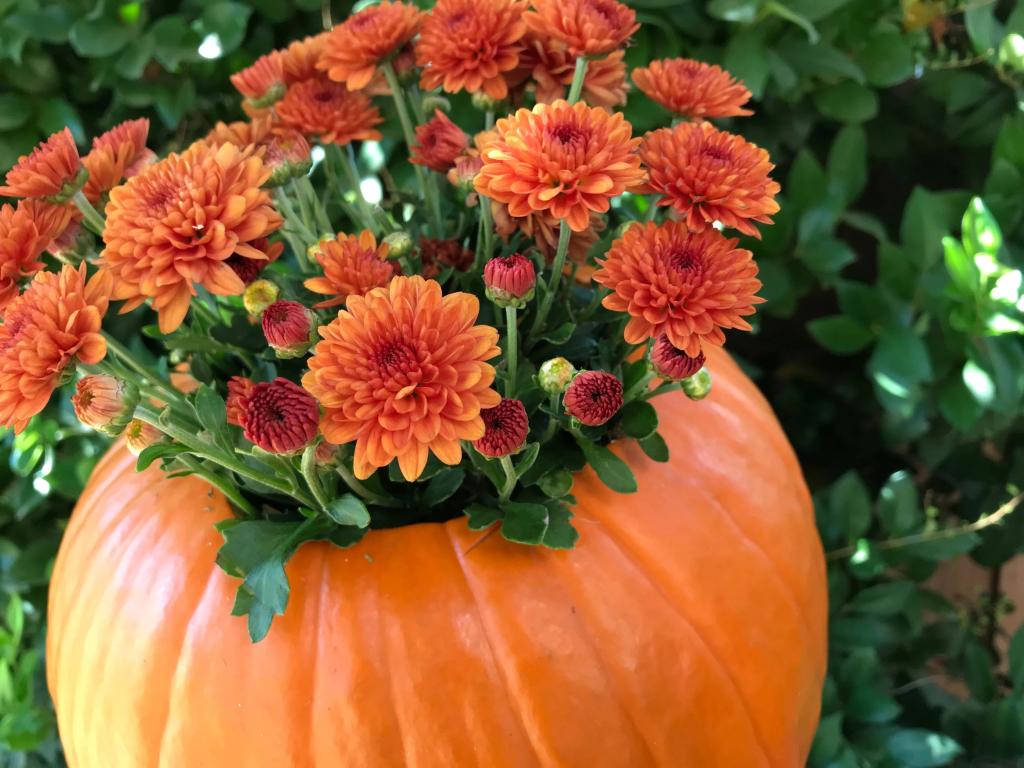
Chrysanthemums, also called mums, are a staple fall flower because of their vibrant red, orange, and yellow hues. Mums are sturdy flowers that will last throughout the fall season. One easy way to step up your mum game is to place them in a unique planter. What is more unique and autumnal than a pumpkin? Read these next steps on how to plant your mums in a pumpkin to dress up your flowers.

Materials:

  • A Mum 
  • A Pumpkin Large Enough for the Mum 
  • Knife 
  • Large Spoon 
  • Sharpie Marker
  • Potting Soil 
  • Ribbon 

Instructions:

Your first step for this planter is to select your pumpkin-chrysanthemum combination. There is little rhyme or reason here, so pick what you like! It can match your other porch decorations or simply complement them. The one rule is to make sure your mum and pumpkin are proportional to each other and that the mum can fit inside the pumpkin. To get started, remove the mum from its pot and set aside. From here, grab your pumpkin and draw a circle around the stem using the plastic planter from the mum as a stencil. Now, cut the top of the pumpkin open where you drew a circle.

Once open, take the time to remove the guts and seeds using a large spoon. With this step, you want to take out the majority, but whatever little bit is left will just be turned into fertilizer. Be sure to save those seeds for roasting! Next, add the soil into the pumpkin so that the bottom of the mum will sit an inch below the opening. Now, the fun part. Plant the mum into the pumpkin and water it. You can stop here or decorate it with ribbon. Be sure to water it every other day and enjoy your new planter! 

Autumn Leaf Archway

Fall archway on decorated porch
Courtesy of Macy.Blackwell on TikTok

This DIY is no small feat, but it makes a big impact. With this fanciful leaf arch, you will be the talk of the block. It may be a more time-consuming project, but it only has four materials you’ll need.

Materials: 

  • PVC Pipe
  • Chicken Wire
  • Garland 
  • Zip Ties

Instructions:

Build an arch with PVC pipe based on how big your arch needs to be to fit your porch. Attach three pieces of chicken wire to form the square arch shape with zip ties while ensuring it doesn’t stick out too far. Then, fill in with strands of garland, attaching with zip ties. The number of strands is dependent upon size. However, you will likely need at least 20. Continue to add until it is at your desired fullness. 

Pine Cone Door Hanger

Pine cone door hanger
Courtesy of Country Living

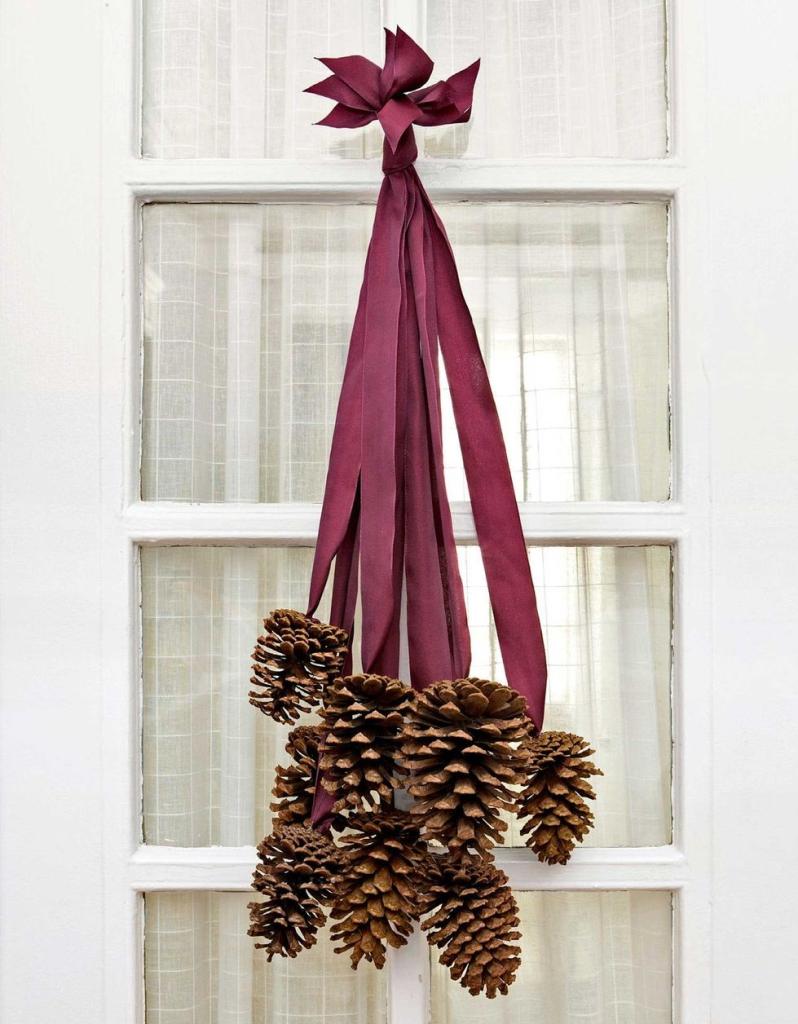
Wreaths are a porch necessity for all seasons. However, the trends are often changing on what kind of wreaths are becoming more popular. So, rather than a traditional round wreath, consider a hanging pine cone door hanger for this fall season. 

Materials: 

  • Pine cones, preferably real 
  • Eye-Bolt Screws
  • Ribbon 
  • Stapler

Instructions:

This DIY works best with natural pine cones you can scavenge from the forest or your front yard. First, take your pine cones and screw your eye bolts into their tops. Depending on your cones and screws, you might be able to do this by hand, or you may have to use a drill first. Screw it in until the eye hook touches the cone. Now, you have to visualize how the pine cones will lay. You will want them at staggered lengths rather than one bunch. So, lay out the pine cones at the varying lengths you want. Next, cut your ribbon to the desired length plus two inches for tying room for each pine cone.

Thread your ribbon through the eye hook, leaving one inch on the other side. Fold the inch onto the longer portion and staple them together to secure the pine cone. Repeat for all pine cones. From here, gather your ribbon-hung cones and lay them out how you visualized them. This is best done with the longest in the back and the shortest in the front. Once it looks how you like, staple all ribbons together near the top to make one hanging bunch. Now, cut the tops above the staple to make them even. Add a loop at the top with more ribbon, still stapling the two ends to the existing ribbon. Finally, use the remaining ribbon you have to decorate! You can add a bow near the top where the bunch will hang or at the top of each pine cone to add playful layers. 

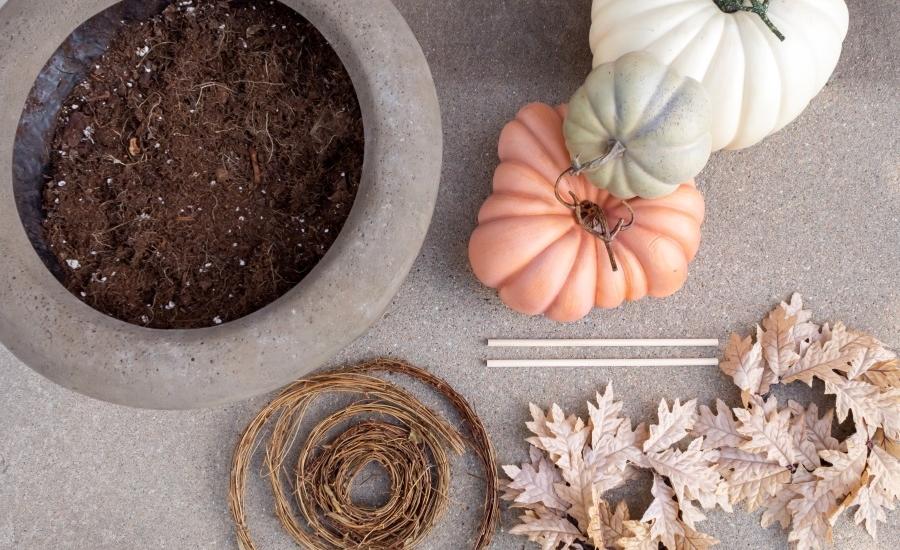
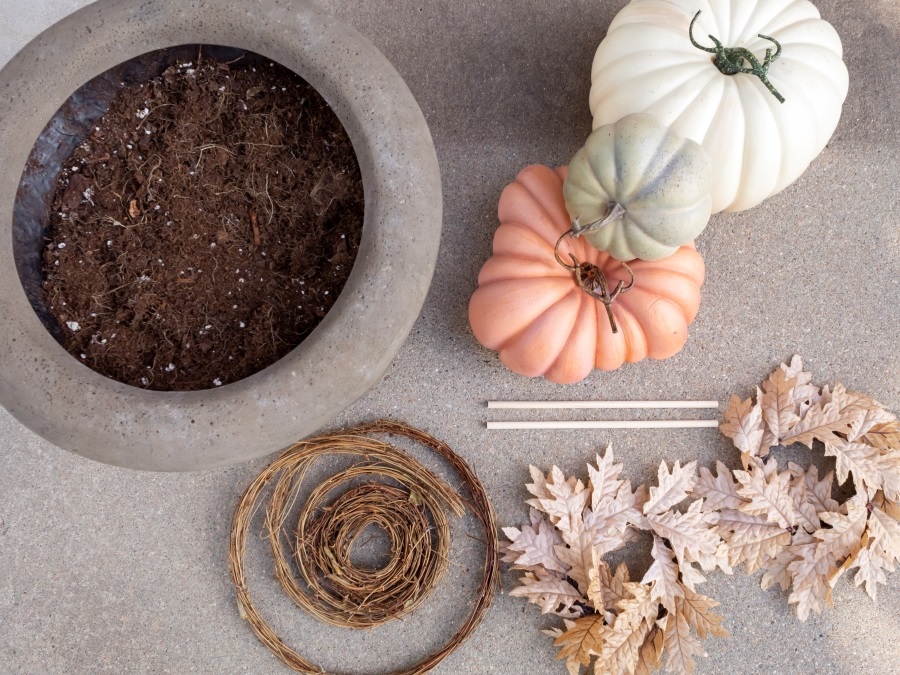
Three Pumpkin Stacked Topiary

Stacked pumpkin topiary
Courtesy of Midwest Life and Style

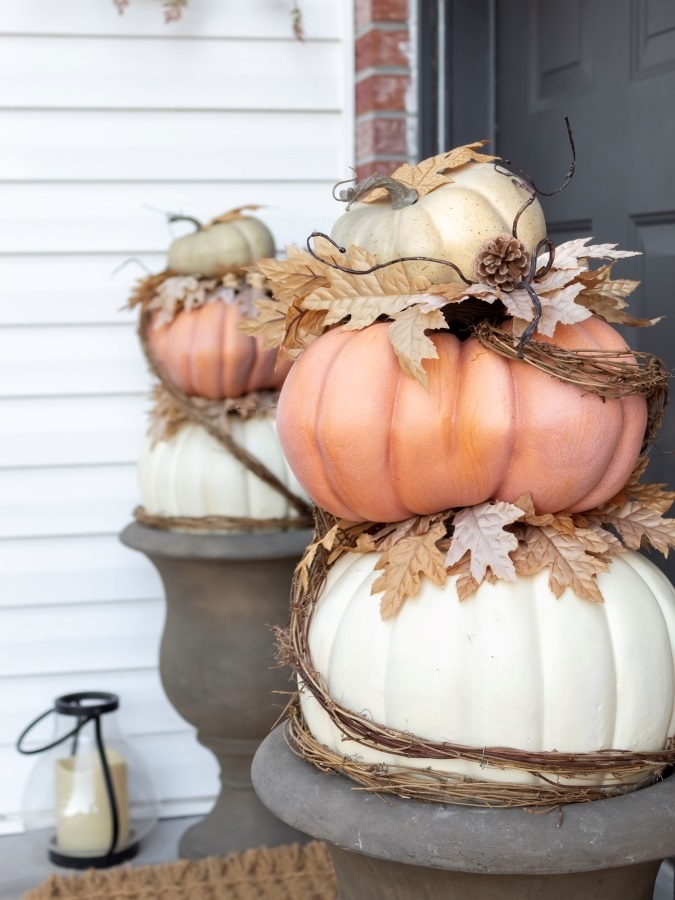
If that archway was a little too extravagant, try this DIY topiary. It will give a similar effect on a smaller scale. This is a perfect touch to a porch, especially for those who don’t have a green thumb. You can customize this project with different pumpkins, leaves, and garlands. You could even use jack-o-lanterns and spiderwebs for a Halloween theme

Materials: 

  • Urn Planters
  • Potting Soil 
  • Three Different Size Plastic Pumpkins
  • Wood Dowels 
  • Hot Glue Gun
  • Glue Sticks
  • Drill and Drill Bits 
  • Faux Fall Leaves
  • Grapevine Garland

Instructions: First, fill your planter with the potting soil. Next, you can begin preparing your pumpkins. Take the largest pumpkin and drill a hole in the bottom of it, big enough to insert the wooden dowel but not too large. You want it to fit snuggly on the dowel. Now, put the pumpkin dowel down into the soil. It’s time to add leaves! Remove the stem on the pumpkin simply by pulling or cutting it off. Then, use a hot glue gun to attach some leaves to the top of the pumpkin. You’ll want them to appear as if they’re lying on top of and falling off the pumpkin.

Now repeat! Drill another hole into the top of the bottom pumpkin so that it can hold the dowel of the next pumpkin. Drill and add the dowel to the second pumpkin, stack, add leaves, and do it a third time for the top pumpkin. Lastly, wrap the now-built topiary with grapevine garland to give it a rustic feel. Ta-da! New topiary! Make two and add them on each side of your door for a symmetrical effect.


Any of these DIYs are sure to impress. When you have guests over, and they ask, “Where did you get that?” You’ll be able to say, “Oh, I didn’t buy it. I made it!” It seems like an ideal conversation starter and something sure to boost your pride. Pick one out and work on it today!

   – Materials needed: A Mum, A Pumpkin (large enough for the Mum), Knife, Large Spoon, Sharpie Marker, Potting Soil, Ribbon.

   – Instructions: Cut the top of the pumpkin, remove the guts and seeds, add soil, plant the mum inside the pumpkin, and water it regularly.

   – Materials needed: PVC Pipe, Chicken Wire, Garland, Zip Ties.

   – Instructions: Build an arch with PVC pipe, attach chicken wire to form the arch shape, and fill it with strands of garland using zip ties.


   – Materials needed: Pine cones (preferably real), Eye-Bolt Screws, Ribbon, Stapler.

   – Instructions: Screw eye bolts into the tops of pine cones, arrange them at staggered lengths, attach ribbons to the eye hooks, staple them together, and create a hanging bunch with the pine cones.

   – Materials needed: Urn Planters, Potting Soil, Three Different Size Plastic Pumpkins, Wood Dowels, Hot Glue Gun, Glue Sticks, Drill and Drill Bits, Faux Fall Leaves, Grapevine Garland.

   – Instructions: Fill the planter with potting soil, drill holes in the pumpkins, insert wooden dowels, add leaves to the pumpkins with a glue gun, stack the pumpkins, and wrap the topiary with grapevine garland for a rustic touch.

Tabletop Centerpiece Ideas

Photo courtesy of My Domaine

When hosting guests at your lake house, creating a beautiful centerpiece can do wonders for your space. But instead of buying an expensive decoration, you can easily create a DIY centerpiece that shows off your creativity and personal style. If you’re seeking ideas for a sophisticated dining table aesthetic, we’ve got you covered.

The Tin Can Succulents

Photo courtesy of Balcony Garden Web

Designing your centerpiece around plants is a great way to foster a biophilic aesthetic in your home. Especially with succulents, you can add greenery to your home in a stress-free way. These plants are low-irrigation, making them super easy to care for. Add a few upcycled tin cans, a tray filled with decorative rocks, and you’re all set.

The Leafy Greens

Photo courtesy of Southern State of Mind Blog

To create a nature-based centerpiece, you don’t need to look further than your own backyard. Using various clippings of leaves from your lakeside property, you can create a beautiful centerpiece that evokes a natural aesthetic. Quick to assemble, you can replace your foliage every so often with new hand-picked plants. For an extra unique flair, try adding some lemons and limes to the base of the vase. It’s also a great opportunity to dig in your craft basket for a beautiful ribbon to wrap around the vase.

The Candle Corner

Photo courtesy of Liz Marie

Nothing evokes a sense of warmness, comfort, and overall hygge quite like a collection of candles. Rather than arranging candles sporadically in various corners of your house, try compiling them to create an elegant centerpiece for your table. This DIY idea from Liz Marie’s blog features a pottery tray with wood bead garland, topped with nine pillar candles of varying heights. The combination of various materials such as wood figures, a ceramic plate, and a woven tray table creates a dynamic look.

The Fruity and Delicious

Don’t underestimate the decorative power of that fruit bowl sitting in your kitchen. With the right amount of creative touch, fruit bowls can make lovely tabletop centerpieces. For a pristine look, get a smooth, white, or silver bowl with a wide base. Then, pair jewel-toned fruits with a variety of sizes but with similar coloring. For example, plums and pomegranates complement each other well, with their dark reddish shades. For a more interesting look, you can also pair it with florals from your garden.

The “I Want Candy”

Photo courtesy of Pinterest

Want to create a good-looking centerpiece with a whimsical touch? Try filling a glass jar with Hershey’s Kisses wrapped in silver. While unconventional, this idea creates a fun and inviting atmosphere, and the silver wrappers create a cohesive, shiny look that goes with any lake house aesthetic. The best part? Your guests will always have a sweet treat to munch on. 

Of course, these are just a few ideas. When it comes to creating your own centerpieces, the options are endless. Use whatever materials are at your fingertips — greenery, used mason jars, fruit, flowers, craft paper — and get creative! Your interior design style is personal, and it’s all about cultivating the right look for you!

5 DIY Planters For Your Lake House

Photo courtesy of Chelsea Foy via HGTV

Incorporating foliage into your lake house is a trend that’s not slowing down. As a key piece of biophilic design, houseplants show off your love for nature and evoke a calming atmosphere in your space. It’s also incredibly satisfying to watch your plants evolve from seeds to fully-fledged plants. Plus, studies show that having a green thumb can boost your mental health. A win for both aesthetics and well-being!

Besides choosing your specific plants, an equally important task is picking a planter. As the container for your soil, a good planter can make or break an entire look. But if you aren’t satisfied with the clay-colored ceramic planters from the nursery, a high-quality planter can come with a big price tag. Instead, try the do-it-yourself experience! Today, we’re featuring these five easy DIY planters for your lake house. With these step-by-step guides, you’ll be hooked on houseplants in no time!

Faux Concrete Planters

Photo courtesy of Average But Inspired

Due to the popularity of concrete planters, they can be quite expensive. However, with the DIY route, you can achieve a sophisticated look with a low price tag. With these instructions from Average But Inspired, you’ll be surprised at how simple it is to convert plastic serving bowls into an elegant planter with a modern look. A layer of stone-texture spray paint will give your guests the illusion of real concrete.

Colorful Outdoor Wall Planters

Photo courtesy of A Kailo Chic Life

There’s no better way to decorate a tall outdoor fence than with hanging plants. These colorful wall outdoor planters from A Kailo Chic Life add an expressive pop of color to your backyard, reflecting a sense of whimsy and fun that characterizes the lake lifestyle. To create these simple designs, all you need are metal wall planters (from a home goods store like Joann’s or Home Depot), craft or spray paint, and permanent adhesive vinyl.

Tile Planters

Photo courtesy of Pillar Box Blue

Ceramic squares of tile aren’t just for bathroom floors! They can also make durable, decorative DIY planters for your lake house. Just head over to a home goods store, pick out a design you like (the Moroccan style repeated patterns make particularly attractive), and heat up some hot glue. Just follow these instructions from Pillar Box Blue for a more detailed guide!

Beer Can Planter

Photo courtesy of Make Something Mondays

We all know that relaxing by the lake with a refreshing, seasonally appropriate beer is a hallmark of lake life. But don’t throw away those empty cans just yet, especially if they feature a unique design. By following these instructions from Make Something Mondays, you can create crafty, artistic-looking planters for succulents. These are a perfect addition to any end-table on a boat dock lounge area.

Fabric Planters

Photo courtesy of A Beautiful Mess

Tired of wearing old tye-dyed t-shirts as your lakeside loungewear? No need to toss them or give them away — simply upcycle them into fun DIY planters. Just some scissors, thread, and a little time twisting fabric is all you need. Although you can use any T-shirt color, a tye-dyed look is more fun for a sunroom, front porch, or playroom at your lakehouse to add a color pop and homemade aesthetic. Follow these instructions from A Beautiful Mess for more details. 

DIY planters are a great way to show off your personal style, enhance your interior decor, and get plenty of compliments from your guests. If you’re interested in crafting for your lake house, keep following along on the Lake Homes blog for more DIY content!

DIY Dried-Flower Crafts

Photo courtesy of Design Sponge

On the Lake Homes Realty blog, one of our most popular DIY posts is about brightening your lake home with dried flowers. Repurposing withered blooms can spruce up your home in a simple yet sophisticated way while adding a touch of biophilic design. Although hanging dried flowers create an elegant look (it’s incredible what you can do with a little twine and hairspray), it isn’t the only option for your lake home. This week, we’re thinking outside the box. There are many ways to incorporate dried flowers into your crafting projects, including decor, utilities, and accessories. From wall art to coasters, you can’t go wrong with these DIY dried-flower crafts.

Pressed-Flower Monograms

Photo courtesy of DIYS.com

Once flowers begin to dry, pressing them is a great idea to preserve the natural colors. This involves using a book or another heavy object to push the remaining moisture out of flowers so the flat pieces can be used to create a design. These framed monograms made from delicate dried flowers add an element of creativity to your lake home. Plus, they’re easy to DIY. Check out this video for the instructions.

Dried-Flower Terrarium

Photo courtesy of The Smart Local

Need a new centerpiece for your table? Or a flowery decoration for your mantle? This simple, DIY dried-flower craft is a perfect addition to your lake home. The geometric glass container with a stylish brushed metal accent will add a contemporary feel to your living room. All you need are dried flowers and sand to complete the look. At Afloral.com, you can get the full tutorial.

Dried-Flower Sachets

Photo courtesy of DIYS.com

While driving to your remote lake house, you’re spending plenty of time in the car. And nothing is worse than an unpleasant smell on a long road trip. Rather than buying an air freshener from the gas station, try using some leftover dried flowers to create these beautifully scented sachets. You’ll need a few other materials, such as wax molds, but this elegant end product is well worth the effort. Hearth & Vine’s blog features more detailed instructions on these DIY dried-flower sachets.

Dried-Flower Bath Salts

Photo courtesy of Almost Makes Perfect

Looking to repurpose those dried roses you’ve been saving? Mix in some Epsom salts, sea salt, baking soda, and essential oils for a decadent bath-salt mixture. Using this tutorial from Almost Makes Perfect, you’ll be able to make dozens of batches at once. Besides treating yourself to a bubble bath at the lake, these bath salts also make excellent gifts!

Floral Phone Case

Photo courtesy of LotusWei

For this craft, all you need is a clear phone case. You can even coordinate the color of your phone to compliment the flowers you choose. To create this easy DIY phone case, as outlined by LouisWei, just take a few dried flowers and press them on the inside of a clear phone case. Then, snap it onto your phone and — voila! For a more involved version, check out these instructions that incorporate a clear resin to hold the dried flowers in place.

Dried-Flower Coasters

Photo courtesy of Frankie Magazine

When dining at your lake house, these coasters are the perfect accessory to showcase your connection to nature. Plus, the brushed metal and glass look is fresh and stylish. Ideal for a friend who loves the lake, they make an easy and thoughtful gift. You can even pick their favorite flowers to use in your coaster creation.

Pressed-Flower Lanterns

Photo courtesy of A Practical Wedding

During the pandemic, we’ve become experts at hosting guests outdoors. When gathering friends around a fire pit, this collection of DIY dried-flower lanterns evokes an elegant ambiance. Especially around dusk, this soft lighting will bring out a sense of warmth at your lake house. To create them, you need pressed flowers and greenery, wax paper, a cutting board, and an iron. These instructions from A Practical Wedding will help guide you! 

We hope these crafts inspire you to put those dried flowers to use this spring!

2020 Outdoor Furniture Design Trends For Your Lake Home

navy and white coastal theme - outdoor furniture decor inspiration lake house
Photo courtesy of Martha Dayton Design.

With Spring quickly approaching, revamping your lake house decor might be on your mind. Of course, warmer weather means hosting family and friends on your outdoor patio, and as such, you may be wondering if your current outdoor furniture is sufficient or if it’s time for an upgrade. If this is you, we’ve got you covered with the outdoor furniture design trends of 2020.

Leaders in the outdoor furniture industry such as Brown Jordan, Sunbrella, and Summer Classics have all shared their cutting-edge insights about these trends on their respective blogs. We’ve synthesized the top trends from these companies’ reports and are here to share with you the latest color, material, product, and design trends for the year. We hope these inspire you to get started on redecorating your outdoor area at your lake home!

Color Trend – Say Goodbye to Saturation

While bright, bold colors were in style a few years ago, the theme that’s been emerging over the past few years is color-infused neutrals. Rather than aiming to wow your guests with bright neon pillows, you’ll instead find that fabric trends are headed in a more muted direction.  These faded shades create a softer look that complements the outdoor furniture’s material, rather than overshadowing it.

neutral wicker patio farmhouse style - southern living decor inspiration
Photo courtesy of Southern Living Magazine.

To highlight this trend, Brown Jordan named Peche (French for “Peach”)– a dusty pink color, similar to rose gold– the color of the year in 2019. This color has also featured prominently in 2020 designs. Of course, peche is not the only neutral color that’s trending this year. Blue, especially a bluish-gray color called chambray, is still a classic, can’t-go-wrong color for pillows and cushions. Further, luxury umbrella retailer Shadowspec has named dark green as another trending color in 2020. Especially at a lake house where grass and trees abound, featuring green fabrics in your outdoor designs creates a look cohesive with nature.

Material Trend – Create Texture Variety

This year, don’t be afraid to mix different materials when it comes to your outdoor furniture. Whether you’re combining a concrete dining table with wicker seats or a teak sofa with an aluminum end table, the goal is to evoke an exciting, textured look. However, it’s best to be cautious about which materials you choose to combine. To avoid a junky, haphazard situation, start by focusing on two elements and exploring different combinations.

lake house boat house - outdoor furniture decor inspiration
Photo courtesy of John Bessler.

Currently, some of the most popular products in 2020 are natural materials such as wood and wicker. Lucky for lakeside dwellers, these materials fit seamlessly with the shoreline in your backyard. They also create an exciting sense of texture that already exists in nature. Another popular content to mix into your designs this year is concrete. On its own, concrete appears strictly industrial. However, when combined with contrasting materials like fabrics and wood, it takes on a more dynamic look.

Product Trend – In Keeping with Comfort

The trend of outdoor kitchens has been on the rise for the past decade, and there are no signs of this trend slowing down. As lake homeowners continue to host gatherings in their outdoor kitchens, whether it’s a small family get-together or a large party of guests, furniture manufacturers have kept up by creating large dining tables to accommodate the lifestyle of entertaining. This way, every guest can have a comfortable seat at the table.

daybed hayneedle summer - outdoor furniture decor lake house
Photo courtesy of Hayneedle.

Based on this trend as well as other popular products, it’s clear that comfort is the name of the game in 2020. Luxury furniture retailer Summer Classics lists barrel chairs as a new outdoor furniture trend this year. These chairs, designed with a broad, curved back rather than a traditional box frame, are made for ultimate relaxation. If you’re looking to dive right into the comfort theme of 2020, consider investing in a daybed. Hayneedle, an online home furnishings retailer, names daybeds as one of the top outdoor furniture trends this year. What better place to relax and take a nap than on a plush daybed surrounded by your beautiful lakefront property?

Design Trend – Stick to Simple

modern luxurious sofa outdoor inspiration
Photo courtesy of Summer Classics.

Quoted in the luxury lifestyle magazine Arizona Foothills, the chief brand curator for Brown Jordan notes that furniture with modern, clean lines is the trend for 2020. This simplistic style has been recently popular in interior decorating, and now, it’s making its way to outdoor designs as well. High-end retailer Summer Classics agrees, and they have incorporated this style into their 2020 collections Elegante and Claro. Both of these lines showcase unembellished elegance, underscoring the beauty of a simple, linear design. Additionally, Shadowspec names minimalism as a big outdoor furniture trend in 2020.  Especially in the outdoor space of a lake house, choosing a minimalistic style will beautifully blend with your natural surroundings rather than overshadowing them.

We hope these 2020 outdoor furniture trends give you inspiration for your lake house designs. The use of stylish color and content will add fashion to your home and your life!