Throughout the past several years, one of the biggest trends in interior design has been bringing the outdoors in. Oftentimes, this takes shape through incorporating nature-inspired furniture such as driftwood, adding biophilic elements to your living room, and using wallpaper tones that resemble the outdoors. However, visuals are not the only way to create a natural feel in your home. One often-overlooked way to “bring the outdoors in” is through scent. Besides the pleasant ambiance, lighting candles has other health benefits such as stress relief, memory stimulation, and mood improvement. But before you rush to your local Bath and Body Works, consider creating a DIY candle for a craft project and an amazing scent, rolled into one. Check out these lake-inspired DIY candles for recipe recommendations!
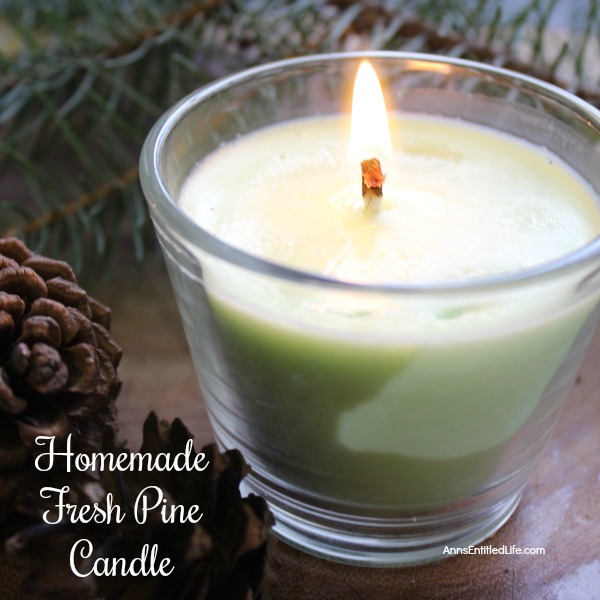
This candle recipe comes from Ann’s Entitled Life, a blog full of crafts, cocktails, gardening, and travel tips. Just in time for the holidays, a DIY fresh pine candle is the perfect project. Whether you wrap it up as a gift to yourself or another person, you’ll enjoy creating a smell reminiscent of a beloved evergreen.
Materials:
2 cups of soy wax
1 candlestick
1 large nonstick pot
Wooden spoon
Chopstick, woodstock, pencil
1 crayon (any color) or candle dye
10 drops of pine essential oil or wintergreen essential oil
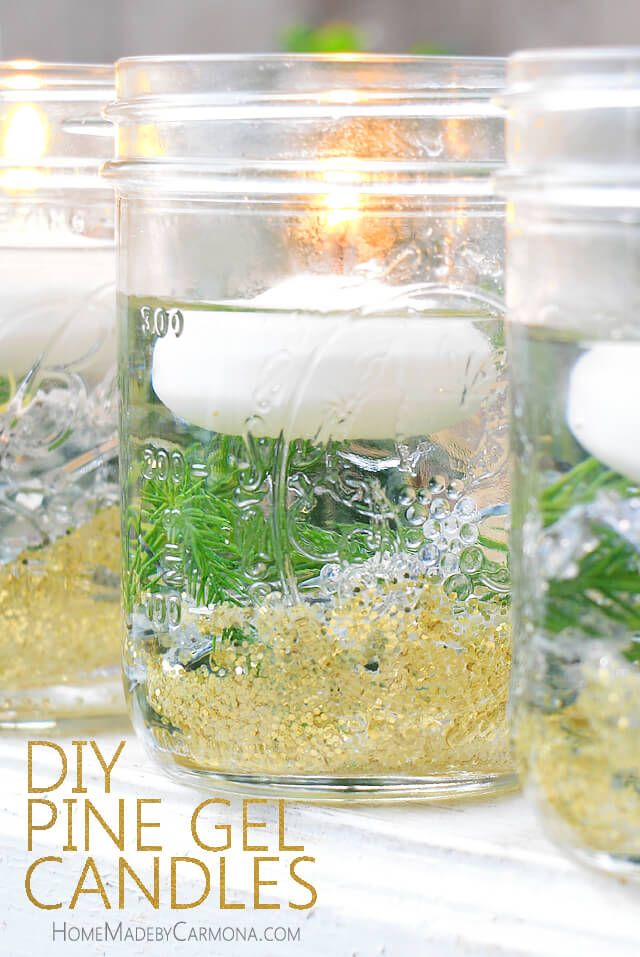
Another take on the traditional floating candle, this DIY Pine Gel Candle recipe by Home Made by Carmona perfectly captures the lake vibe with sprigs of pine and festive pieces of garland. You can further enhance the outdoor feel in your lake home by opting for pine-scented floating candles. Using gel instead of water allows for longer burn time and makes it easy to transport or ship— perfect for gifts! Have other lake ideas for your gel candles? No problem! You can easily customize this with items found around your lake, such as acorns, pine cones, pebbles, etc.
Possibly the easiest candlemaking method out there, this recipe by Sugar & Charm requires only oil, a cotton wick, and a bottle. Everything else is customizable based on your personal preference. Even though the recipe doesn’t call for it, you can add your choice of essential oils to infuse the air with lake scents.
If you’re into modern aesthetics, you can use a simple jar, add your “lake” ingredients to your oil and wick setup, and you’re good to go. If vintage is more your style, take out Grandma’s old perfume bottle or one you found while thrifting, load it with your favorite ingredients, then top it off with oil before adding the wick.
Materials:
Small glass jars
A light oil such as olive or sunflower oil
Cotton wicks with fasteners (or floating wicks)
Decorative touches (think cinnamon sticks, dried oranges, cranberries, and rosemary)
Bonus: DIY Floating Lake Candle
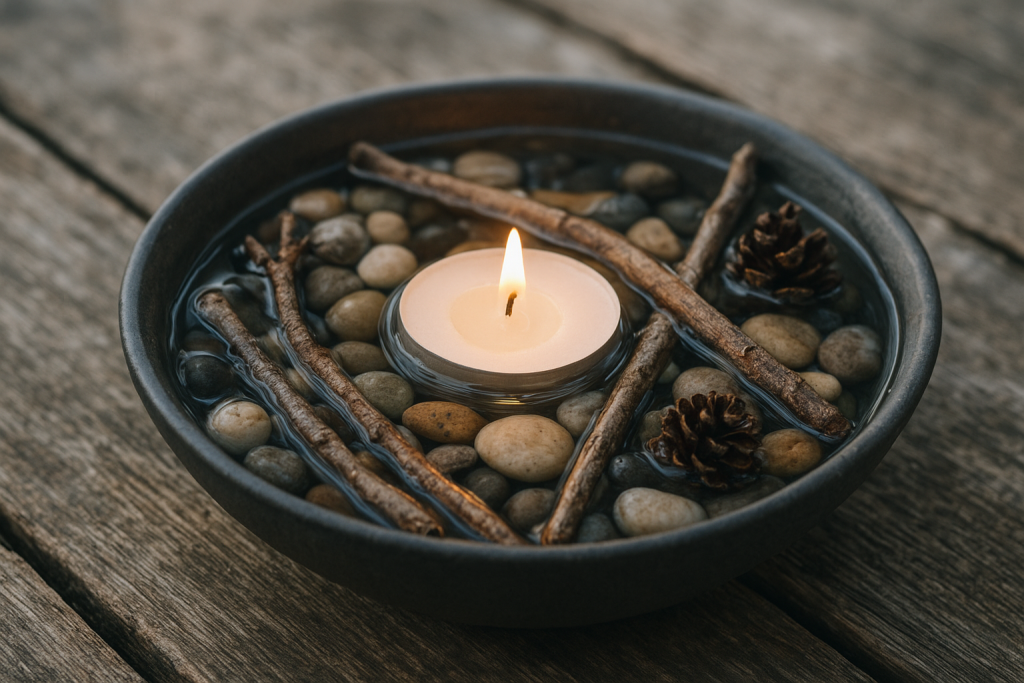
Okay, for those of you who prefer the route that requires the least amount of effort (not judging), this one’s for you. Have tea lights or floating candles lying around? Great! Now, grab a bowl and add your foraged items from the lakeside (i.e., pebbles, moss, twigs, etc.), then fill it up with water. If you’re going for the biophilic look, using a stone bowl is ideal. However, if you’re looking to maximize the glow of the candles, go with a glass bowl. It’ll also put your lake items on full display. There you have it. Your very own indoor lake display with glowing candles!
Materials:
A large bowl
Scented tea lights or floating candles
Lake-inspired decorative items
Water
Directions: Arrange your decorative items in the bowl. Add water to the bowl. Now, place your candles in the bowl.
We hope these lake-inspired DIY candles motivate you to create your own!
This article was originally published on November 13, 2021.
For lake homeowners, spring means getting back outside to experience the joys of lake living. It also means tackling those home improvement projects you’ve been putting off until the weather warms up. But almost every DIYer knows the feeling of diving headfirst into a project before realizing it’s going to take a lot more time than you planned. It can leave you feeling deflated without the sense of accomplishment you had hoped for.
No worries. We’ll ease you into this slowly with a few quick yet high-impact projects you can accomplish over a weekend. Some of these ideas are more labor-intensive than others, so take your pick and choose one you know you can complete. Who knows? You might even be game to try another one next weekend. Happy home improvement!
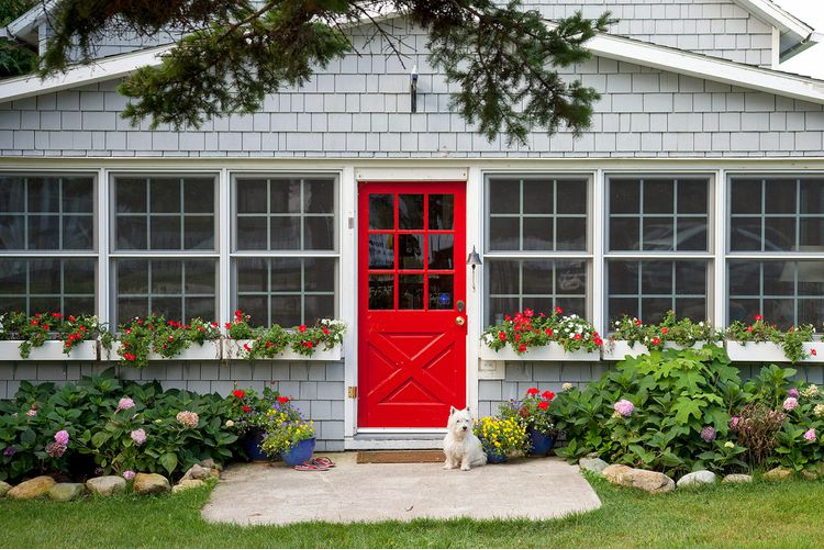
Start with the obvious and spruce up your curb appeal with an eye-catching front door. This bright cherry-red hue pops against a fresh green landscape adorned with potted plants and flowers. Window boxes brimming with white and red blooms complement the vibrant color palette while enhancing the exterior façade. You can easily do a complete makeover of the entrance to your lake home over a weekend. Don’t forget to include exterior lighting and updated hardware for your new door. A small stone walkway or a new welcome mat can also make a big impression, creating an inviting ambiance for your guests.
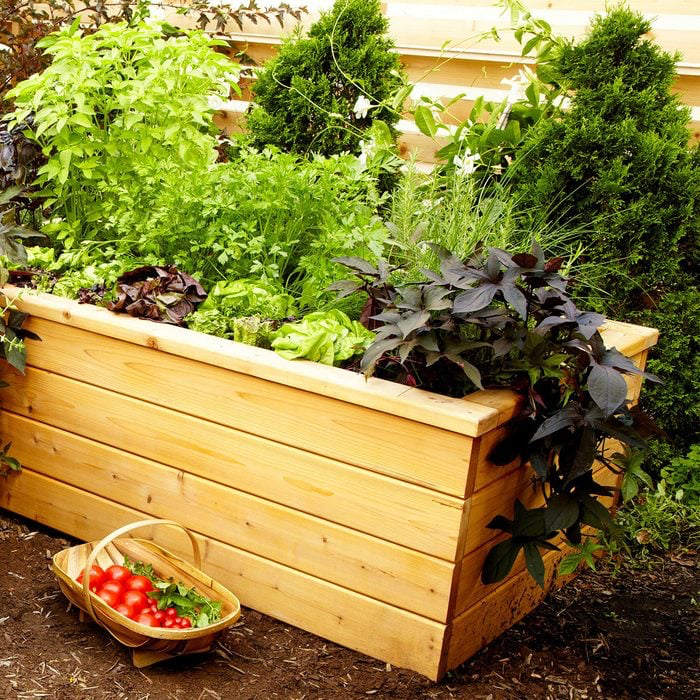
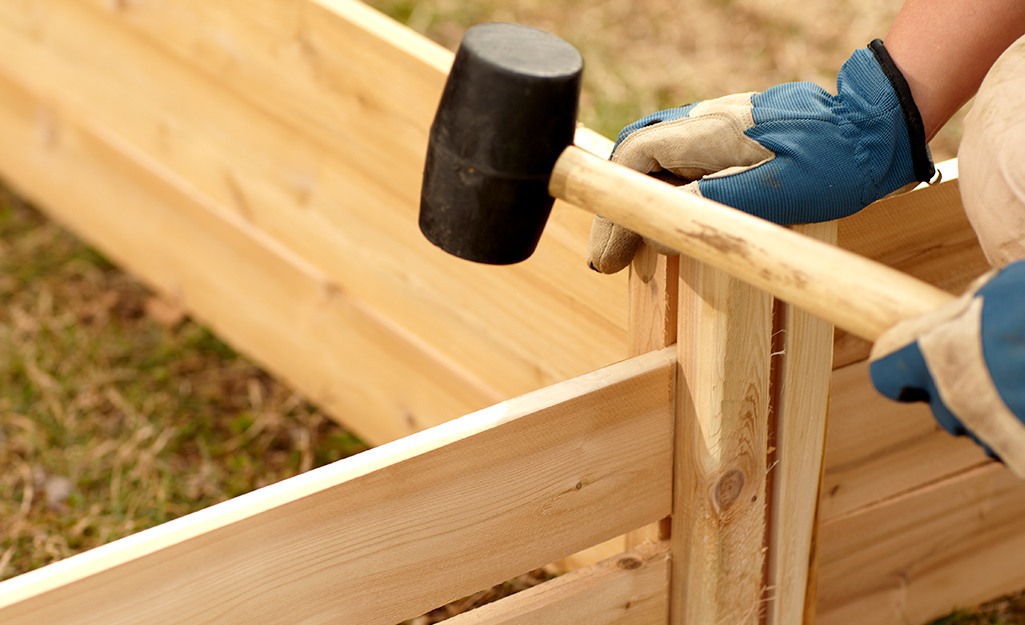
If you’re feeling ambitious, you won’t mind the extra time and effort required for this weekend home improvement project. And if you love fresh vegetables, you will reap the benefits this garden delivers for many months to come. This raised garden bed is made of beautiful cedar and incorporates a perforated drainpipe that stores and distributes water as needed. With this ingenious design, you will save water while growing your favorite vegetables—or flowers. Once the work is done, the fruits of your labor will be well worth it! For a list of required tools and instructions, visit Family Handyman.
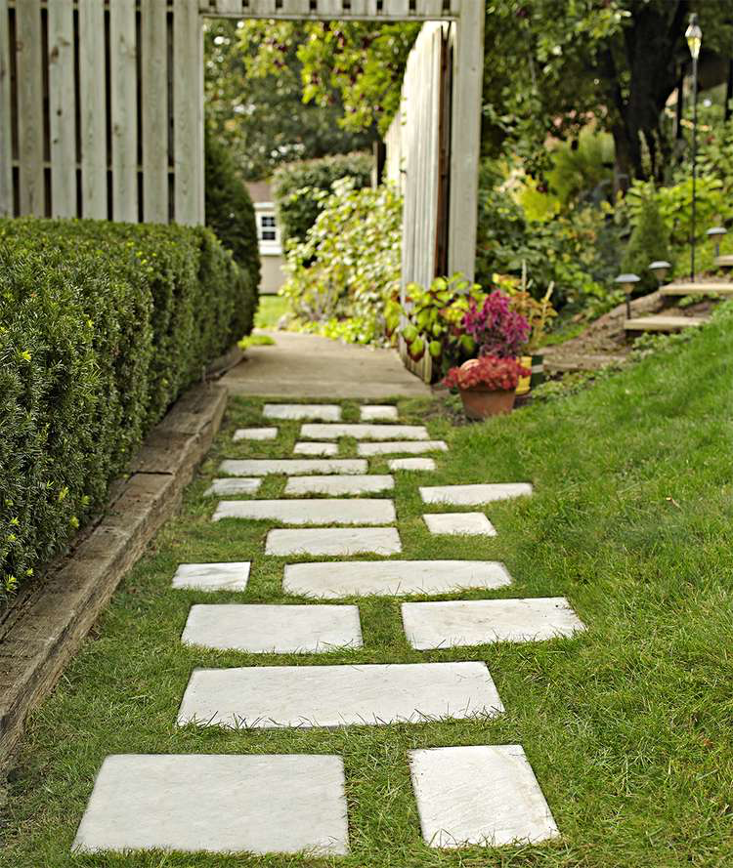
This multi-functional stone walkway provides a beautiful accent for your outdoor living space while still allowing rainwater to seep into the soil. But the best part is that you can complete this home improvement project in about two hours. These easy-to-install pavers protect your grass from foot traffic and provide a dry, stable surface you can walk on when entertaining outside. They are also flat enough to the ground that your lawn mower can roll right over them. Create your own look with a random pattern of square and rectangular pavers for a crisp, modern aesthetic. Visit Better Homes & Gardens for tips and instructions.
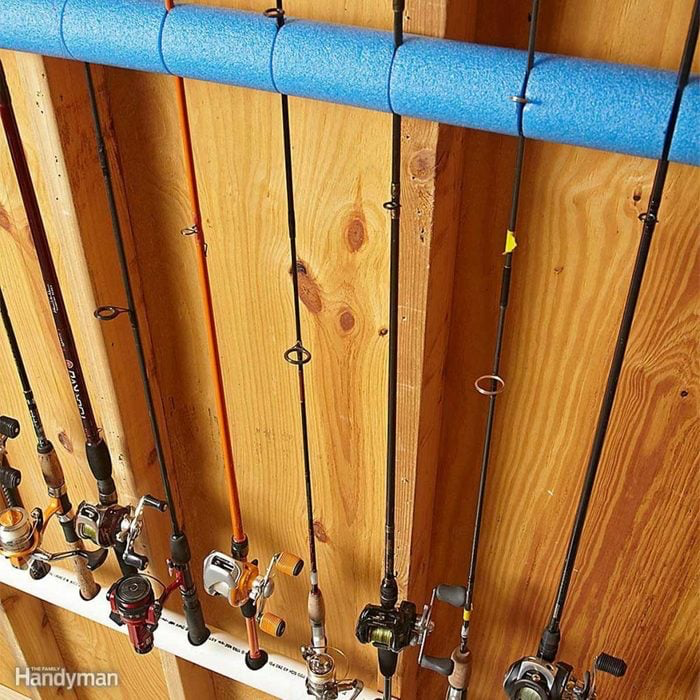
If you live at the lake, chances are you or someone in your family loves to fish. But fishing rods can be awkward to store and easily get tangled if you stash them haphazardly. Why not create a designated place in your garage or storage area to organize your fishing gear and get it off the floor? This brilliant garage storage system requires just a few household tools, a foam swimming pool noodle, and some 3-inch PVC pipe. Just follow these simple instructions—and voila!
Drill 1-inch holes spaced every 4 inches in the PVC pipe.
Use a utility knife to cut slits in the foam noodle, spacing them 4 inches apart.
Line up the pool noodle on the wall so that at least two of the slits sit over studs.
Pull slits apart, slide in a fender washer, and screw the noodle to the wall with 2-inch screws.
Screw the PVC pipe to the wall beneath it at a comfortable height and insert your fishing rods.
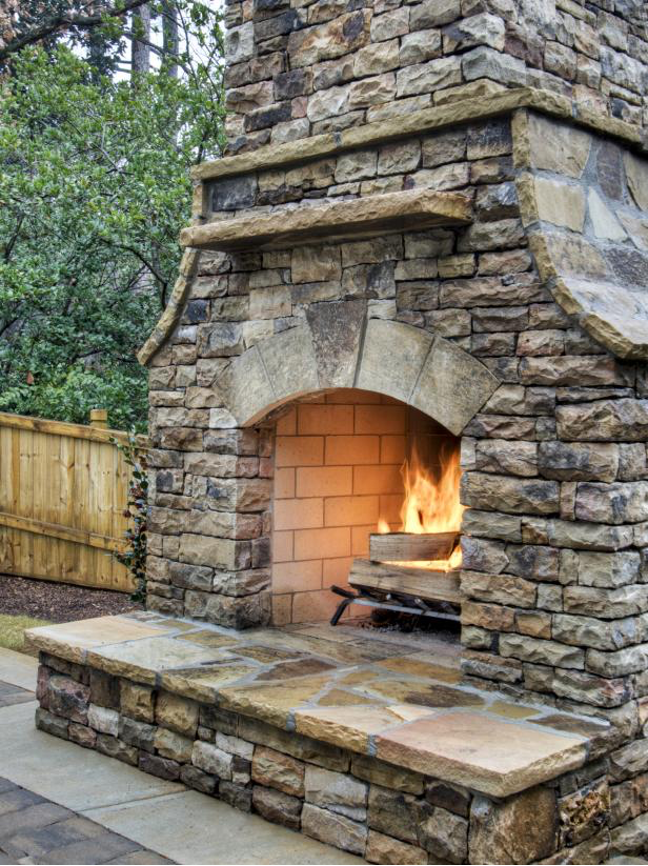
This outdoor stacked stone fireplace requires a bit more patience, time, and grit, but if you have some experience with concrete and mortar—and some extra help—you can conquer this project over a long weekend. Once you’re finished, you’ll enjoy crackling fires by the lake for years. This eight-step project takes you from creating a design and a concrete foundation to installing the stacked stone and attaching the chimney cap. Visit HGTV for instructions, a list of the materials, and a helpful two-minute video offering tips and inspiration.
From organizing your garage and building a workbench to resurfacing your driveway and installing an outdoor deck, here’s wishing you success in all your DIY weekend projects at the lake!
A DIY is more than just a fun project to take on for a weekend. A DIY gives you a sense of pride and accomplishment. And there’s no better time than the present. Here is a compiled list of some fall DIYs that will be sure to stand out on your front porch this autumn.
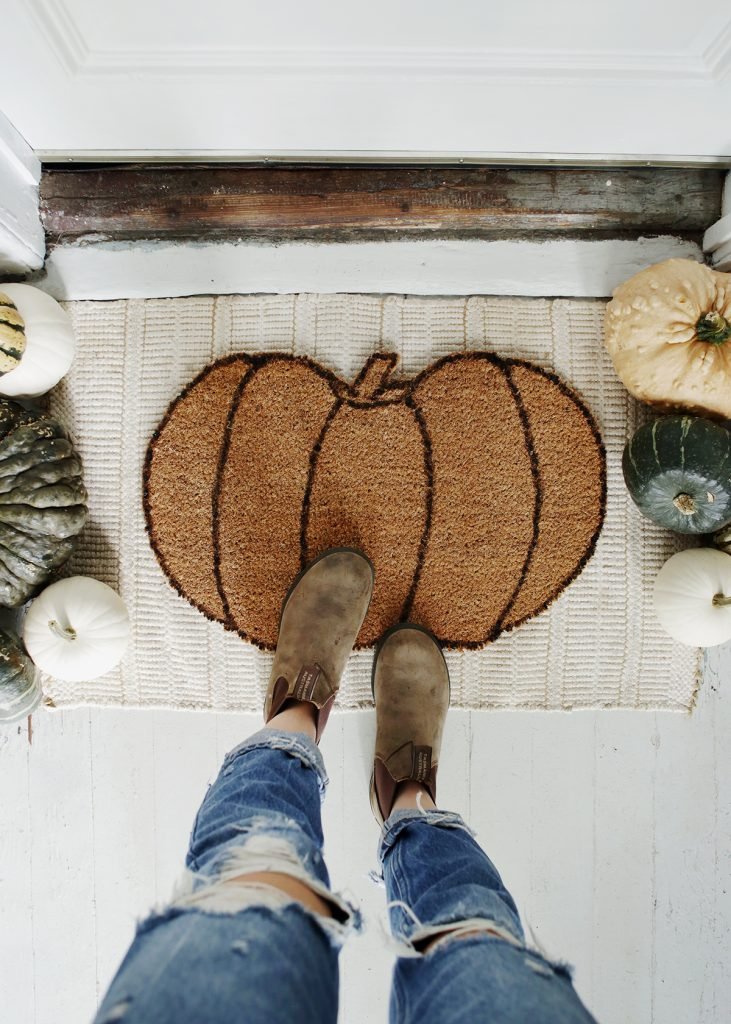
One thing every porch needs is a doormat. Despite its primary purpose of keeping dirt outside, it can also dress up your door. It’s one of the first things guests will see on your porch, so it’s best to make it welcoming and, in this case, festive! Check out this DIY pumpkin doormat to make this autumn.
Materials:
Doormat
Pencil
X-acto knife
Scissors
Paint
Paint Brush
Instructions:
The first step to making this festive doormat is to flip it upside down so that the bottom of the mat is facing up. From here, you will sketch your pumpkin on the back of the mat. You can do this freehand or by using a reference photo. Once you’re happy with the drawn shape, take your X-acto knife and cut off the edges so that the mat is in its pumpkin shape. Then, you’ll flip the mat over, right side up, and clean up any messy edges with scissors. Finally, creativity comes in! Use your imagination and paint the mat. It can just be an outline of the pumpkin so the natural mat shows, or you can use any color that will match the rest of your porch décor.
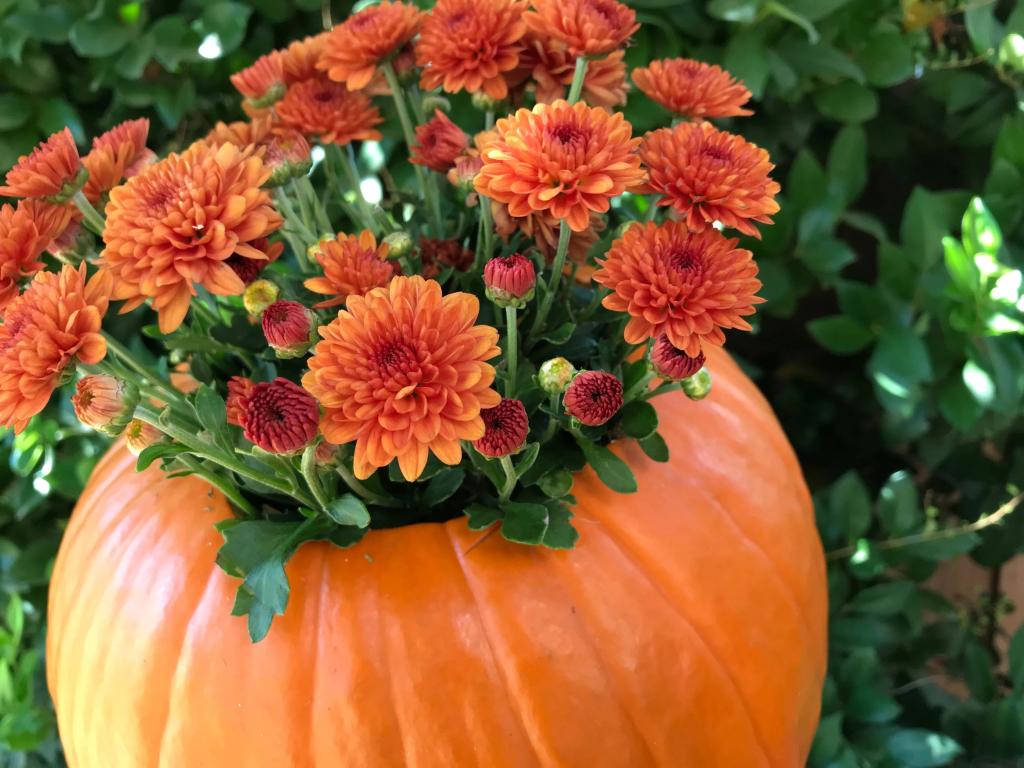
Chrysanthemums, also called mums, are a staple fall flower because of their vibrant red, orange, and yellow hues. Mums are sturdy flowers that will last throughout the fall season. One easy way to step up your mum game is to place them in a unique planter. What is more unique and autumnal than a pumpkin? Read these next steps on how to plant your mums in a pumpkin to dress up your flowers.
Materials:
A Mum
A Pumpkin Large Enough for the Mum
Knife
Large Spoon
Sharpie Marker
Potting Soil
Ribbon
Instructions:
Your first step for this planter is to select your pumpkin-chrysanthemum combination. There is little rhyme or reason here, so pick what you like! It can match your other porch decorations or simply complement them. The one rule is to make sure your mum and pumpkin are proportional to each other and that the mum can fit inside the pumpkin. To get started, remove the mum from its pot and set aside. From here, grab your pumpkin and draw a circle around the stem using the plastic planter from the mum as a stencil. Now, cut the top of the pumpkin open where you drew a circle.
Once open, take the time to remove the guts and seeds using a large spoon. With this step, you want to take out the majority, but whatever little bit is left will just be turned into fertilizer. Be sure to save those seeds for roasting! Next, add the soil into the pumpkin so that the bottom of the mum will sit an inch below the opening. Now, the fun part. Plant the mum into the pumpkin and water it. You can stop here or decorate it with ribbon. Be sure to water it every other day and enjoy your new planter!
This DIY is no small feat, but it makes a big impact. With this fanciful leaf arch, you will be the talk of the block. It may be a more time-consuming project, but it only has four materials you’ll need.
Materials:
PVC Pipe
Chicken Wire
Garland
Zip Ties
Instructions:
Build an arch with PVC pipe based on how big your arch needs to be to fit your porch. Attach three pieces of chicken wire to form the square arch shape with zip ties while ensuring it doesn’t stick out too far. Then, fill in with strands of garland, attaching with zip ties. The number of strands is dependent upon size. However, you will likely need at least 20. Continue to add until it is at your desired fullness.
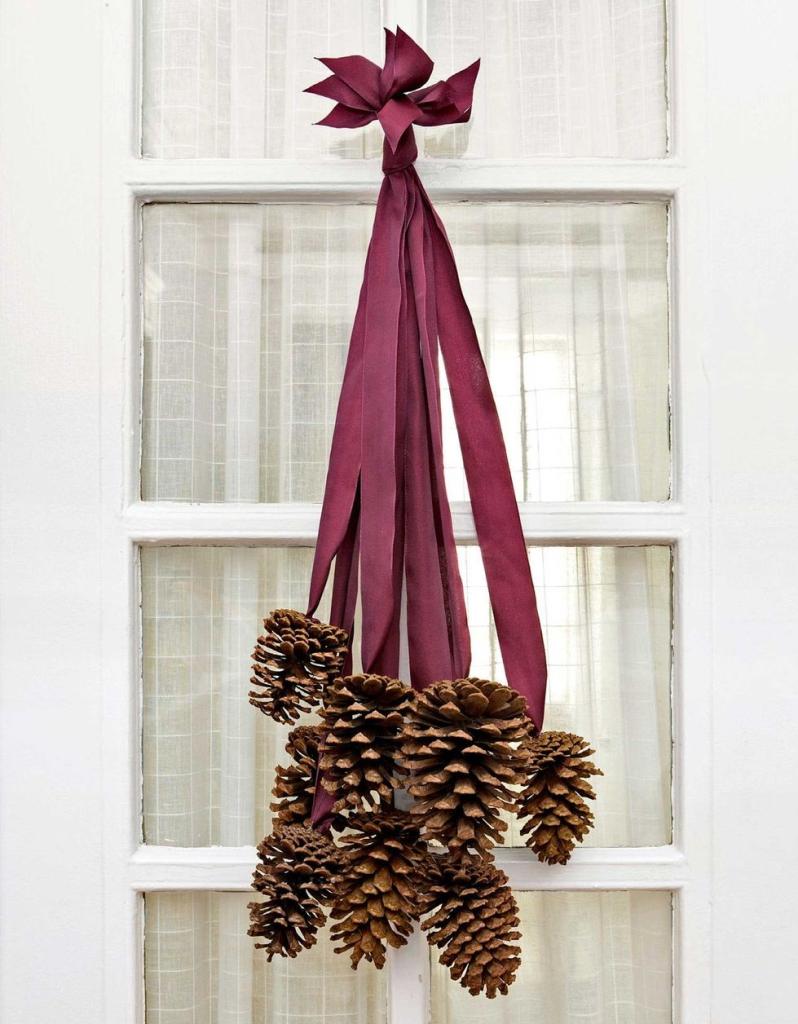
Wreaths are a porch necessity for all seasons. However, the trends are often changing on what kind of wreaths are becoming more popular. So, rather than a traditional round wreath, consider a hanging pine cone door hanger for this fall season.
Materials:
Pine cones, preferably real
Eye-Bolt Screws
Ribbon
Stapler
Instructions:
This DIY works best with natural pine cones you can scavenge from the forest or your front yard. First, take your pine cones and screw your eye bolts into their tops. Depending on your cones and screws, you might be able to do this by hand, or you may have to use a drill first. Screw it in until the eye hook touches the cone. Now, you have to visualize how the pine cones will lay. You will want them at staggered lengths rather than one bunch. So, lay out the pine cones at the varying lengths you want. Next, cut your ribbon to the desired length plus two inches for tying room for each pine cone.
Thread your ribbon through the eye hook, leaving one inch on the other side. Fold the inch onto the longer portion and staple them together to secure the pine cone. Repeat for all pine cones. From here, gather your ribbon-hung cones and lay them out how you visualized them. This is best done with the longest in the back and the shortest in the front. Once it looks how you like, staple all ribbons together near the top to make one hanging bunch. Now, cut the tops above the staple to make them even. Add a loop at the top with more ribbon, still stapling the two ends to the existing ribbon. Finally, use the remaining ribbon you have to decorate! You can add a bow near the top where the bunch will hang or at the top of each pine cone to add playful layers.
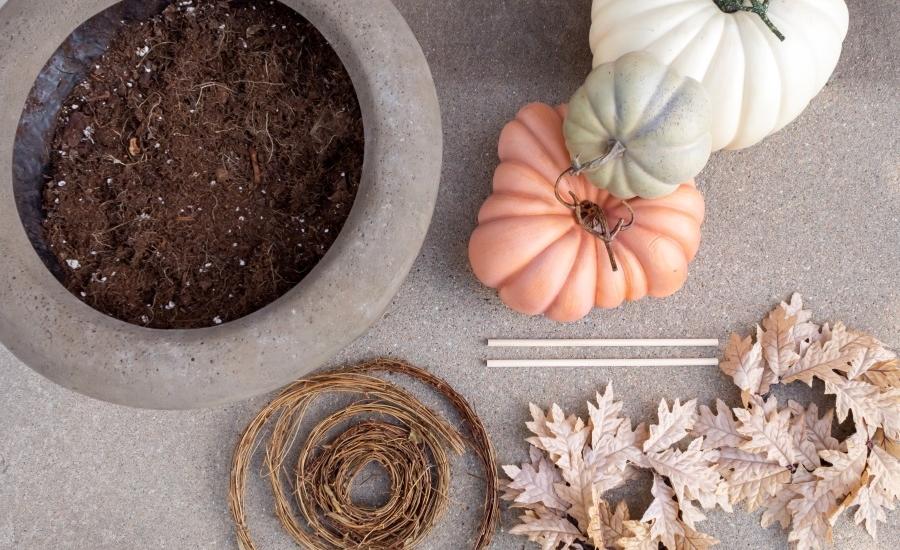
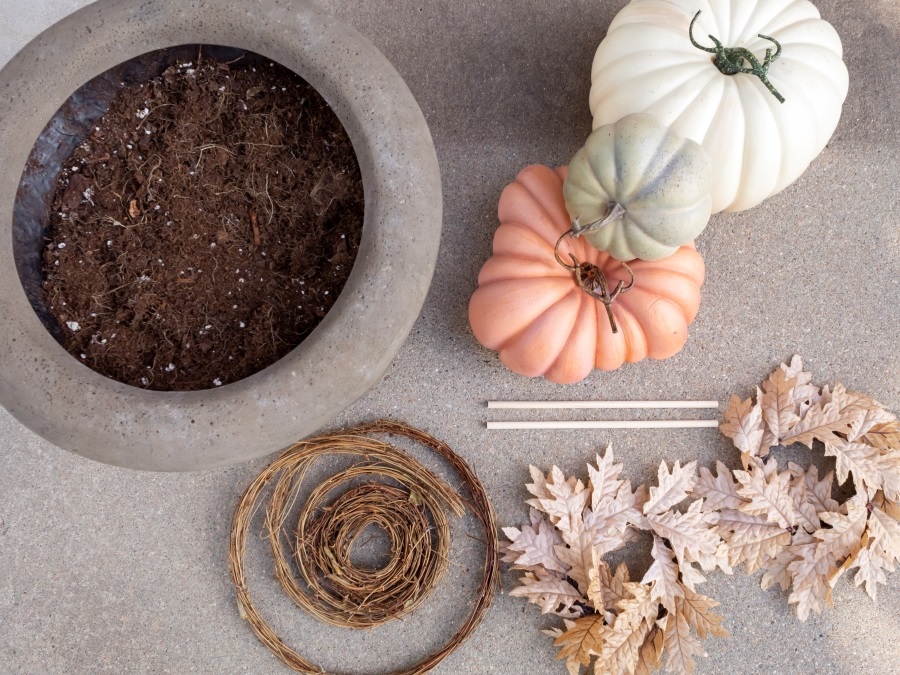
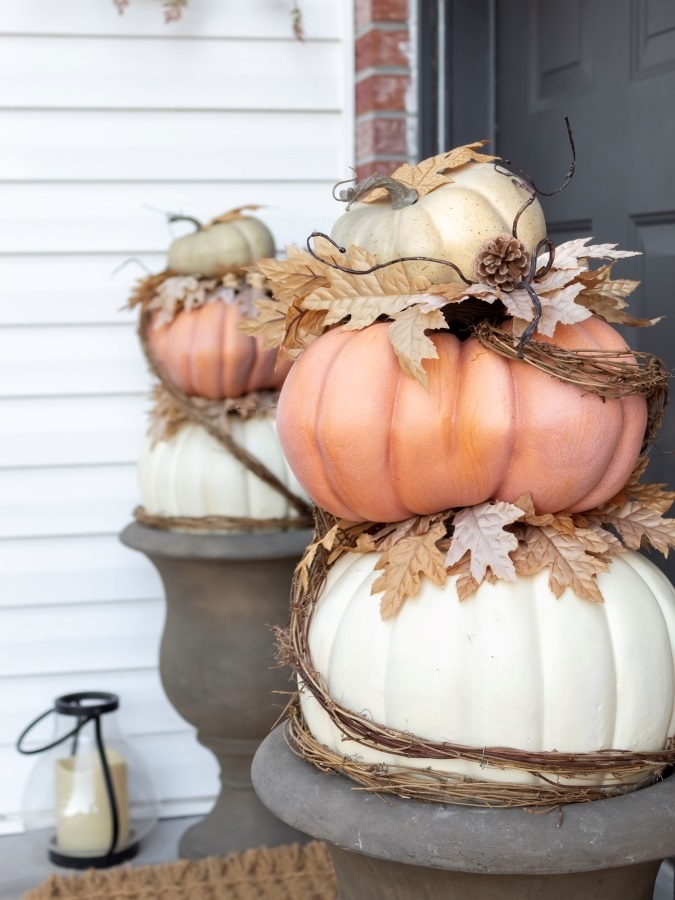
If that archway was a little too extravagant, try this DIY topiary. It will give a similar effect on a smaller scale. This is a perfect touch to a porch, especially for those who don’t have a green thumb. You can customize this project with different pumpkins, leaves, and garlands. You could even use jack-o-lanterns and spiderwebs for a Halloween theme.
Materials:
Urn Planters
Potting Soil
Three Different Size Plastic Pumpkins
Wood Dowels
Hot Glue Gun
Glue Sticks
Drill and Drill Bits
Faux Fall Leaves
Grapevine Garland
Instructions: First, fill your planter with the potting soil. Next, you can begin preparing your pumpkins. Take the largest pumpkin and drill a hole in the bottom of it, big enough to insert the wooden dowel but not too large. You want it to fit snuggly on the dowel. Now, put the pumpkin dowel down into the soil. It’s time to add leaves! Remove the stem on the pumpkin simply by pulling or cutting it off. Then, use a hot glue gun to attach some leaves to the top of the pumpkin. You’ll want them to appear as if they’re lying on top of and falling off the pumpkin.
Now repeat! Drill another hole into the top of the bottom pumpkin so that it can hold the dowel of the next pumpkin. Drill and add the dowel to the second pumpkin, stack, add leaves, and do it a third time for the top pumpkin. Lastly, wrap the now-built topiary with grapevine garland to give it a rustic feel. Ta-da! New topiary! Make two and add them on each side of your door for a symmetrical effect.
Any of these DIYs are sure to impress. When you have guests over, and they ask, “Where did you get that?” You’ll be able to say, “Oh, I didn’t buy it. I made it!” It seems like an ideal conversation starter and something sure to boost your pride. Pick one out and work on it today!
– Instructions: Flip the doormat upside down, sketch a pumpkin shape on the back, cut the edges to create the pumpkin shape, flip it back, and paint the pumpkin with your desired design
– Instructions: Screw eye bolts into the tops of pine cones, arrange them at staggered lengths, attach ribbons to the eye hooks, staple them together, and create a hanging bunch with the pine cones.
– Materials needed: Urn Planters, Potting Soil, Three Different Size Plastic Pumpkins, Wood Dowels, Hot Glue Gun, Glue Sticks, Drill and Drill Bits, Faux Fall Leaves, Grapevine Garland.
– Instructions: Fill the planter with potting soil, drill holes in the pumpkins, insert wooden dowels, add leaves to the pumpkins with a glue gun, stack the pumpkins, and wrap the topiary with grapevine garland for a rustic touch.
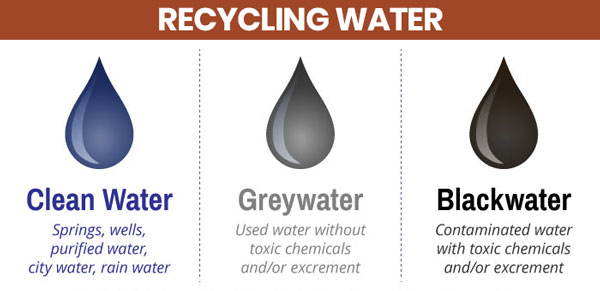
When thinking of lake houses, visions of blue-green waters, sparkling with sunlight, may come to mind. The concept of greywater is probably last on the list. Although this isn’t the type of water that draws us to the lake lifestyle, it’s necessary to learn about as a lake homeowner who wants to stay sustainable. With more people using greywater systems, the demand for freshwater reduces, relieving the pressure on global water resources. To help you become more informed, we’ve consulted experts in the field to cover all the basics of greywater systems.
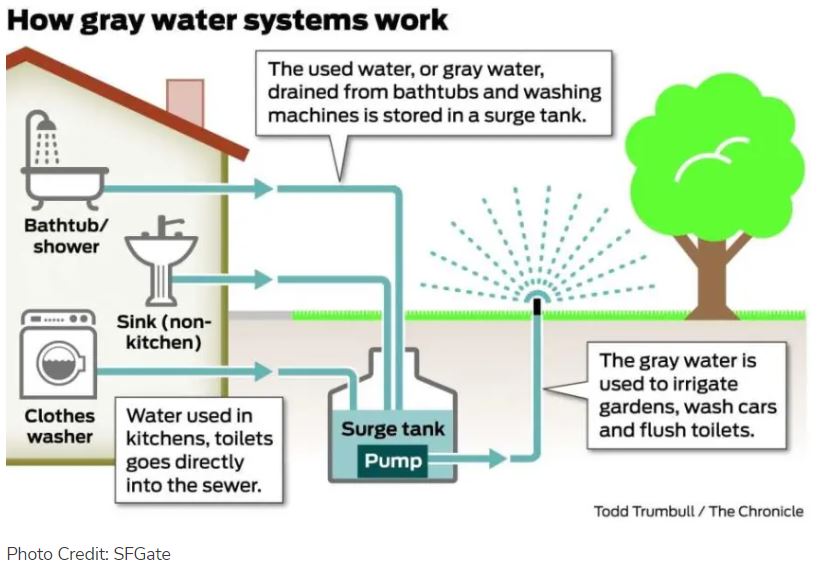
Ever wonder what happens to the water you use for showering, washing dishes, and doing laundry? A greywater system is a plumbing system that allows you to recycle this water. After installing one in your home, this wastewater gets reused in sinks, toilets, and showers. Volodymyr Barabakh, co-founder and director of the Chicago-based real estate development company, Fortress Home, adds: “Greywater systems filter out water to make sure that water has been contaminated with bodily fluids is not reused in the home.” As such, your recycled water won’t be contaminated when it’s reused.
Let’s start with the simplest solution — a bucket. Also known as a manual refill system, this is the simplest greywater system solution that requires little skill. Rick Hoskins, founder of Filter King explains, “Instead of letting your greywater disappear down the drain, put it in the bucket. When the bucket is full, take it into the garden and water your flowers.”
Another option is a greywater diversion device (GDD). This automated system redirects the water away from the drain and into the garden. Depending on the location, it can be powered either with pumps or gravity. Of the two, the gravity pump system is the most simple. Of course, this process assumes that your house is atop a downward slope. By contrast, a pump system is much more expensive. Usually installed within a home or underground, they rely on mechanical or electric pumps to transport water to the desired location.
Finally, a Greywater Treatment System (GTS) is the most complex option. This system could be likened to having your own private water treatment plant. Rick adds, “The greywater is purified to the point where you could use it for surface-level irrigation.”
The cost of a greywater system will depend on the type of system you choose. Volodymyr says, “Gravity-based greywater systems can be relatively cheap, starting at $800 for materials if you were to do it yourself. Getting it installed professionally will probably cost around double this, so $1500.” By contrast, pump systems cost much more. It’s not uncommon for these to cost anywhere between $5,000 and $15,000. The most expensive choice is the GTS system, which would be at least $10,000 out of pocket.
What Should Lake Homeowners Know about Greywater Systems?
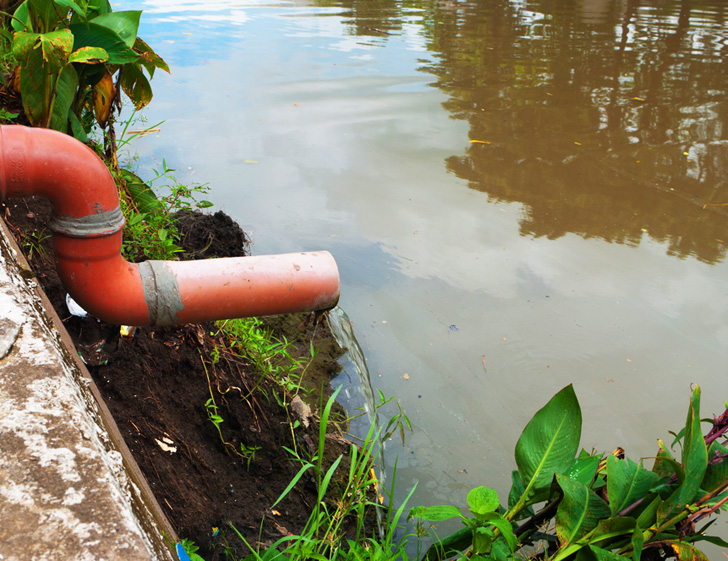
Being a lake homeowner comes with additional considerations when it comes to greywater. First and foremost, you’ll want to keep the lake contaminant-free. Rick comments, “Graywater should not be released into lakes and rivers. The nutrients in greywater, which plants love, are pollutants in freshwater. If you produce more greywater than you need, add a switch that lets you easily send the excess down the drain.” Additionally, constructed wetlands can help create a filter between your irrigation zone and the lake.
At Lake Homes, we’re all about sustainability! Recycling used water from your lake house is one of the best ways to give back to your garden. We hope this information helps get you started!
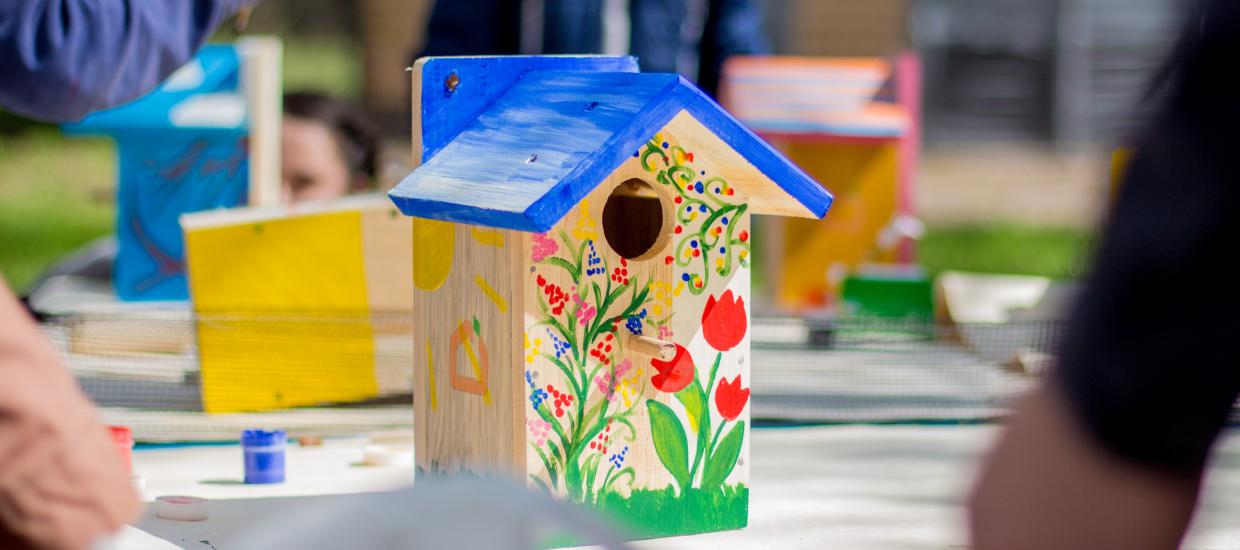
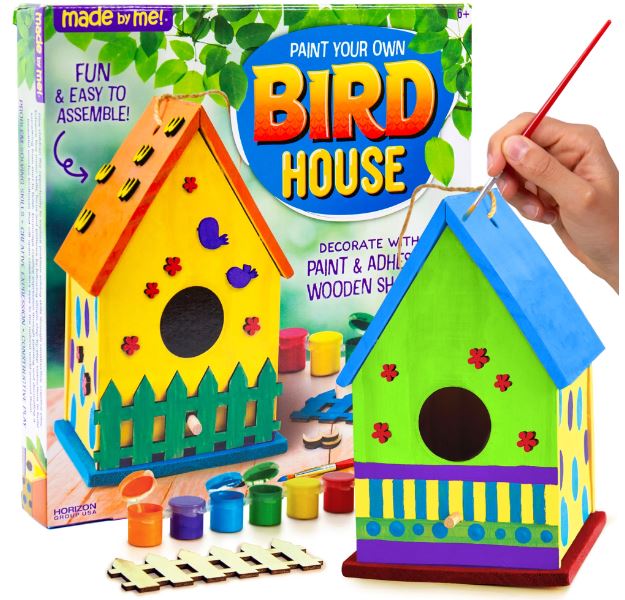
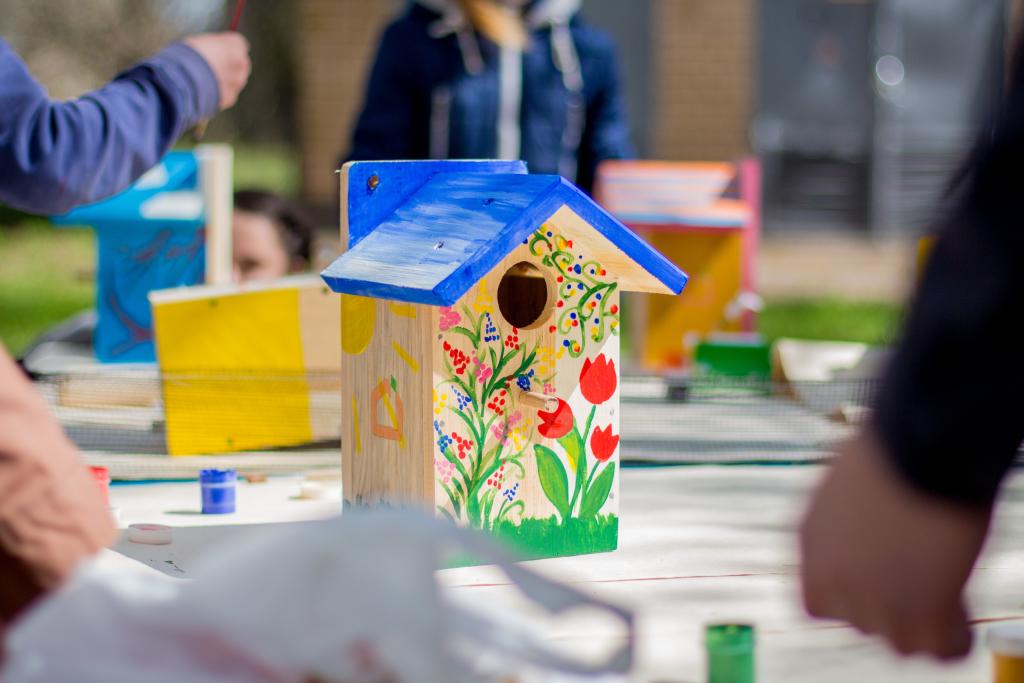
Having a birdhouse (or several) in your backyard is an excellent way to attract birds to your lake house. Plus, creating your own birdhouse can be a fun DIY craft activity for you and your family. But if you’re not an expert woodworker, what should you do? Luckily, there are several birdhouse-making toolkits available on the market. With these kits, you can get all the fun of building your own birdhouse and none of the stress. With most being kid-friendly and a few more upscale choices, check out our top five recommendations!
This Beetle & Bee Birdhouse Kit from Toysmith is a fun, highly-rated craft project. The simple, straightforward design requires easy assembly without hardware requirements, perfect for kids ages 5 and up. It also includes a paintbrush to add fun designs to your birds’ new nesting place at the lake.
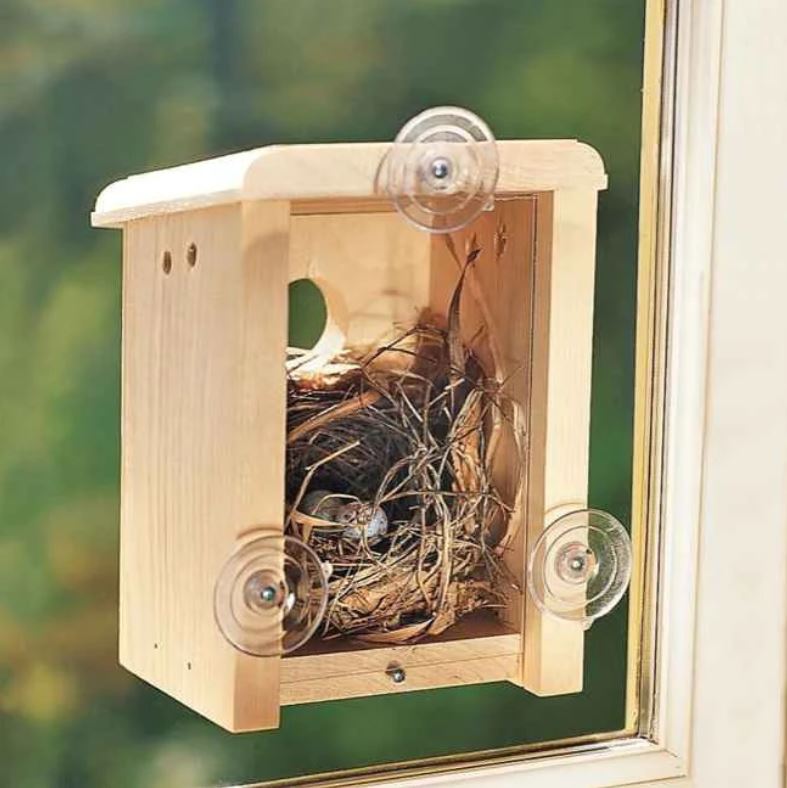
This window view birdhouse kit allows you to get a close-up view of birds who visit your lake home. Made of natural Eastern white pine, this small birdhouse is made of durable, high-quality wood that’s built to last. In addition to its wooden parts, the kit comes with two suction cups for mounting onto your window. Just install the birdhouse onto the window, ideally one with curtains or blinds so birds won’t be distracted. Then, just watch birds flock to your hand-built home while you lounge in the living room!
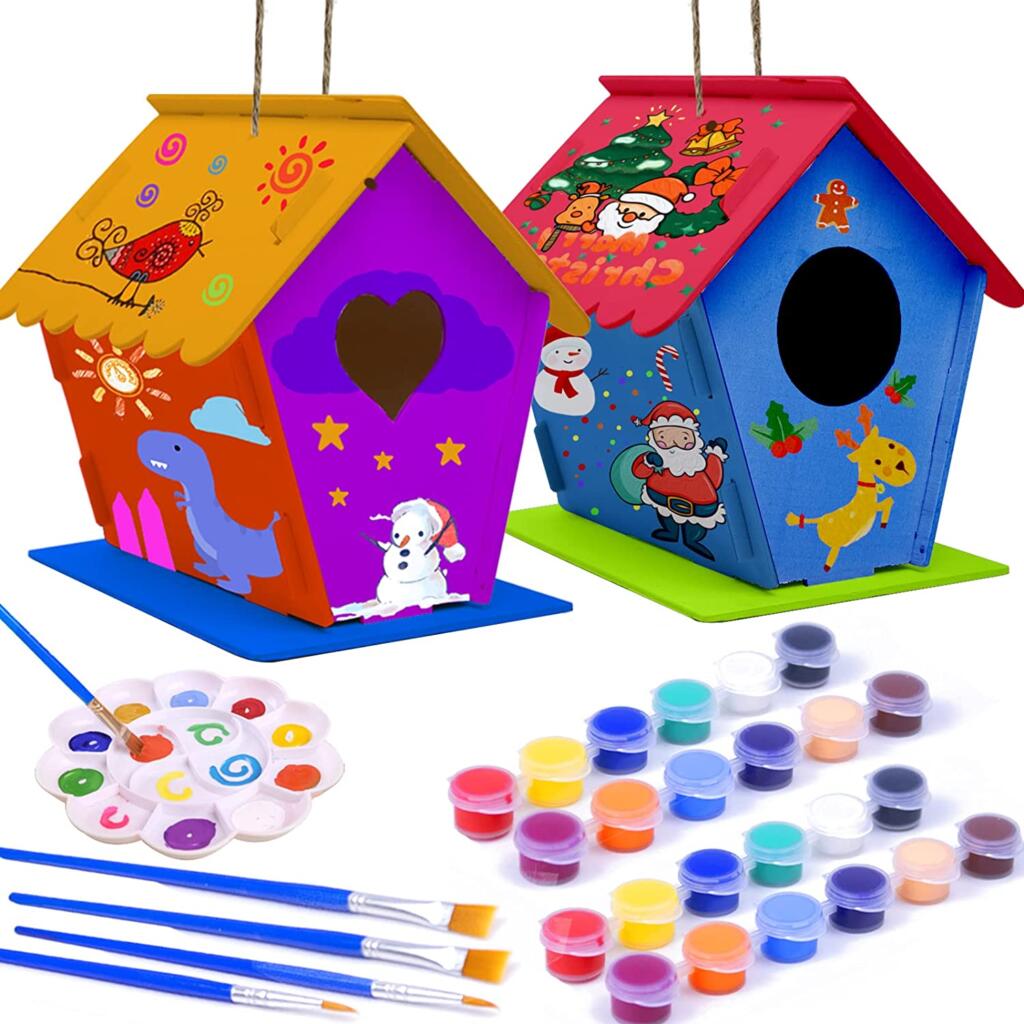
Why limit your backyard to just one birdhouse? The Hapray DIY Birdhouse Kit comes with four unassembled birdhouses. With the wooden materials, Bplus glue, and string, you have everything you need included in this kit. These birdhouses are made of high-quality plywood which is both non-toxic and eco-friendly. Now for the most fun part — it also comes with several 12×2 paints, plus a painting palate so you can mix colors to your heart’s content. With cons of colors and plenty of wood, you’ll add a bright, playful feel to your backyard.
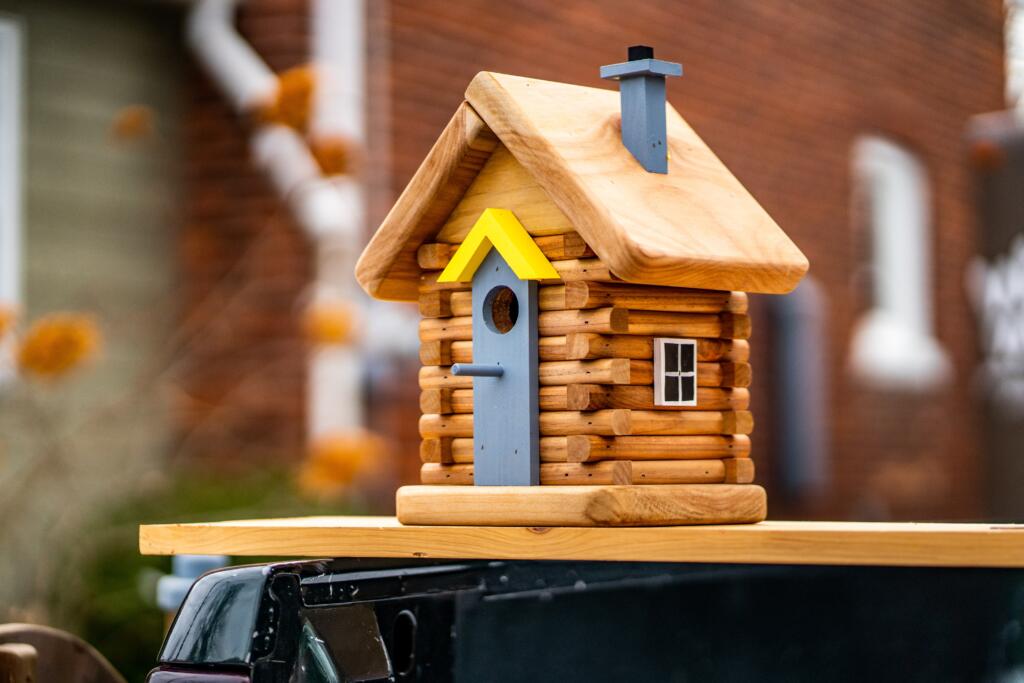
For a more upscale option, check out this Scout Regalia Birdhouse Kit. Made of laser-cut birch plywood, it’s durable and made to last through the years. In addition to the wooden pieces, this kit also includes a paracord for hanging, as well as clear assembly instructions. Once you’ve put it together, there are several options for styling such as staining, clear coating, painting, or covering it in birdseed. Unlike many other birdhouse kits, this one has a more open-air design, making room for a wide variety of bird species.
This Made By Me Birdhouse is a perfect project for you and your kids at the lake. Easy to build, it comes with pre-cut wooden pieces and glue — no required tools needed. The kit also includes six paint colors, as well as little wooden accessories. Whether your birdhouse is lined with a green fence or decorated with small pink flowers, it’s time to get creative! It’s also a great opportunity to see how colors attract different birds. For instance, hummingbirds are attracted to reds and pinks, while bluebirds are (you guessed it) drawn to blue.
To keep your experience as fun as possible, just be sure to read all the assembly instructions beforehand to make sure you have the proper tools. Also, it’s important to consider the durability of the materials. While cedar is perhaps the most sturdy, high-quality material, it’s also the most expensive. However, plywood is also an excellent option. Finally, determine what species of birds you’d like to see. For instance, bird feeders with smaller holed entrances will attract smaller birds like wrens, whereas birdhouses with more open spaces will bring in larger birds like sparrows. Whatever you choose, we hope you enjoy creating your birdhouse — and we hope the birds enjoy it just as much!
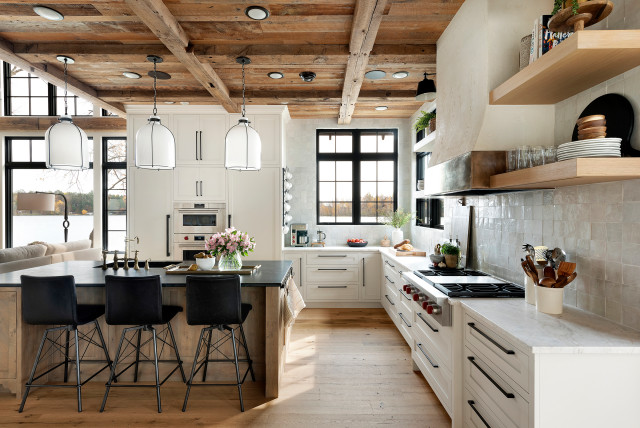
Cooking at your lake house can be a sheer pleasure if your kitchen is functional and well organized. But it can quickly become an annoyance if you’re forever short on space and you’ve let clutter get out of control and take over every square inch. If you’re constantly searching for more space in your kitchen—or even the proper cooking utensils—these brilliant storage solutions will instantly simplify your life and free up that coveted counter space we all crave. For most of us, our kitchens are the favorite gathering spot in the house—the heart of our homes. So, take the challenge this year, and tidy up this most beloved hangout to make your cooking and entertaining endeavors at the lake an absolute joy.
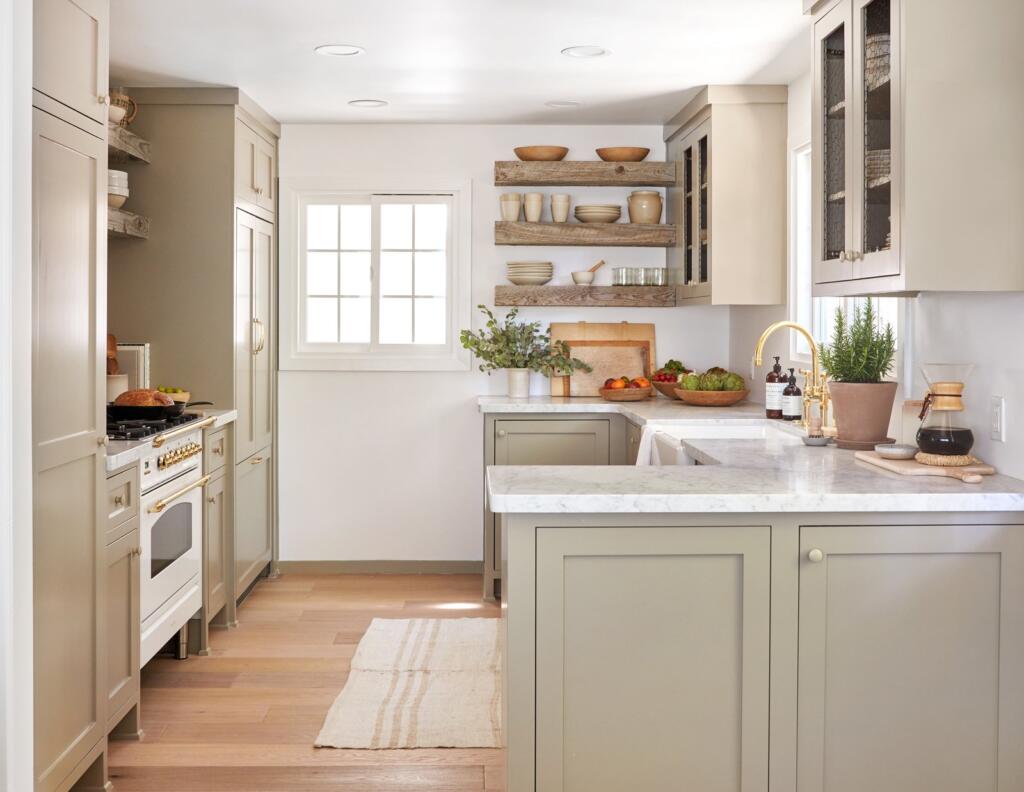
In this newly renovated lakeside home, a formerly dark-wood kitchen made the space appear closed in and dreary. Insufficient counter space and outdated cabinets only made the problem worse. After a fresh facelift, this little jewel of a kitchen feels bright, airy, and full of storage opportunities. The addition of rustic wood-beam open shelving on the walls—over the stovetop and on an empty wall next to the window—along with chicken wire installed on the cabinet fronts creates more storage space and makes the room feel open and breezy. A tip? Keep open shelf space neatly arranged with beautiful dishware and glasses that align with the kitchen’s overall color palette.
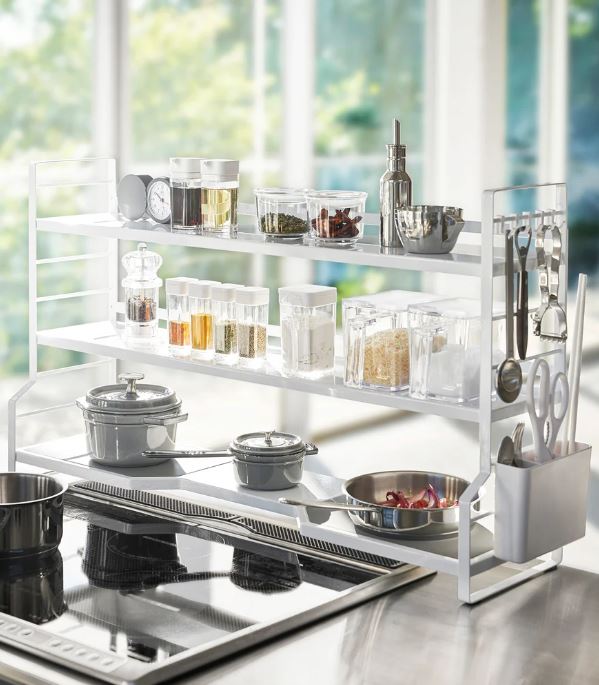
When you run out of horizontal space, go vertical with a handy tower countertop freestanding pot rack. This portable vertical shelving will enhance the useable space around your stovetop or anywhere you need some extra storage space atop your existing kitchen counters. This one is designed to hold all your vital kitchen tools, spices, and other basic cooking essentials. Handy hooks on the side store your hanging utensils within easy reach. Equipped with three spacious shelves, it also features gray pads on the bottom shelf that can double as trivets for hot pans fresh off the stove.
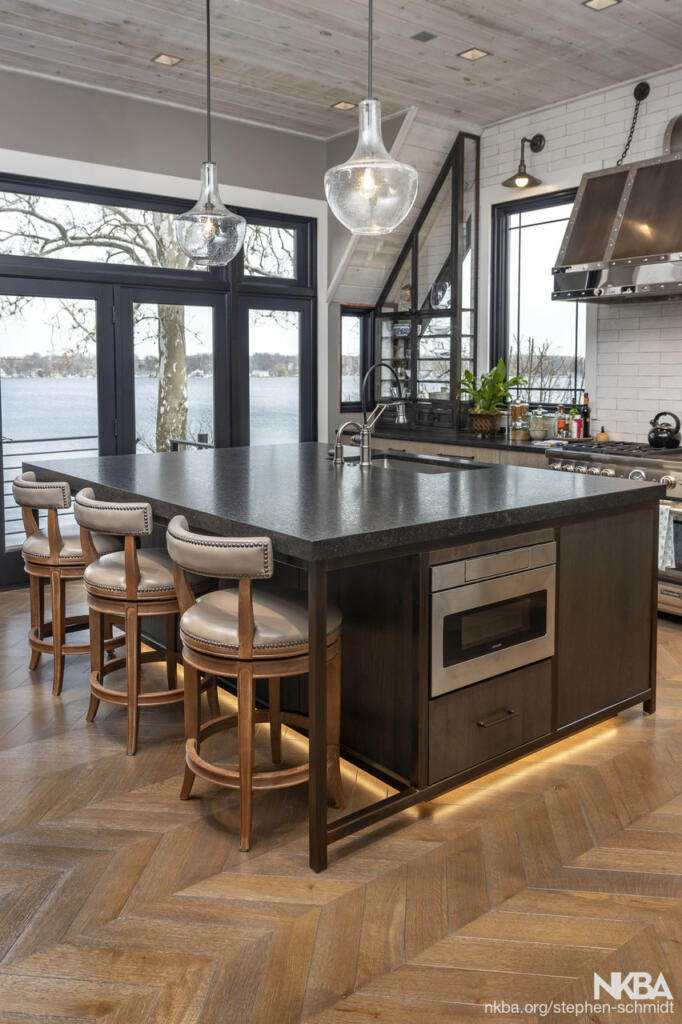
Maximize the functionality of your kitchen island by incorporating prep space, seating, and storage. Cabinets and drawers on the working side of your island make cooking a breeze and are within easy reach for the chef. On the seating side of your island, make room for some open shelving to store cookbooks, tableware, or other appealing kitchen items you don’t mind having on display. In addition, installing glass-front cabinets is also an innovative way to open up your space visually. They instantly create a light and airy sense of spaciousness you can’t get from solid-front cabinetry.
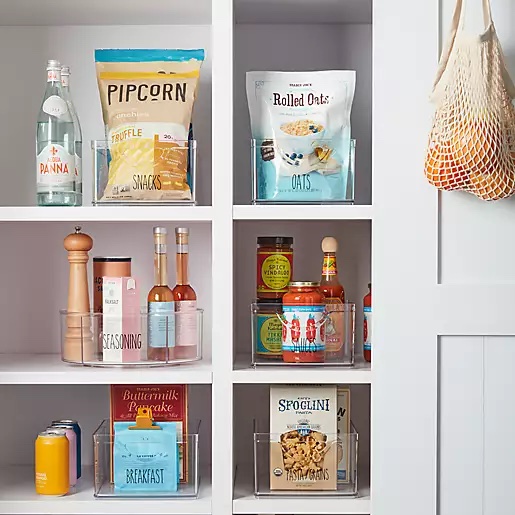
Corral your spices and oils with a miniature lazy Susan along with some clear storage bins to organize your pantry in a snap. All from Squared Away ä, this divided cabinet turntable and stackable cabinet organizers are both made of shatter-resistant plastic, ensuring long-lasting use. Ideal for a lake house, where cabinet space is often limited to essentials, these transparent storage solutions will keep your items orderly and in clear view—a beautiful sight indeed. And don’t forget to add them to the cabinet below your sink to store dish detergent and other cleaning products.
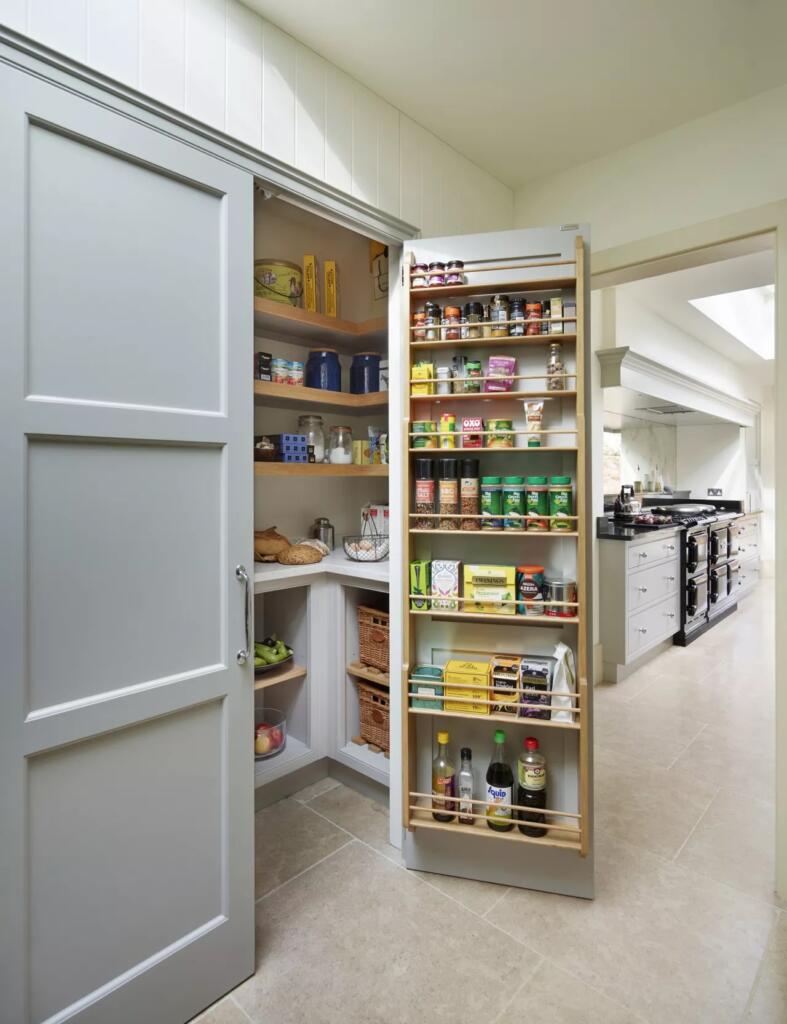
Take advantage of every square inch in your kitchen by installing a hinge-mounted shelving unit inside the pantry doors. These clever organizers can store spices, oils, and other baking goods to save space inside the pantry for larger, bulkier items. With an endless array of styles to choose from, you’re bound to find one that fits your needs, taste, and dimensions. For example, check out this one we found on Etsy that includes a full-size spice rack with baskets below for onions, potatoes, and awkward items like foil and plastic wrap.
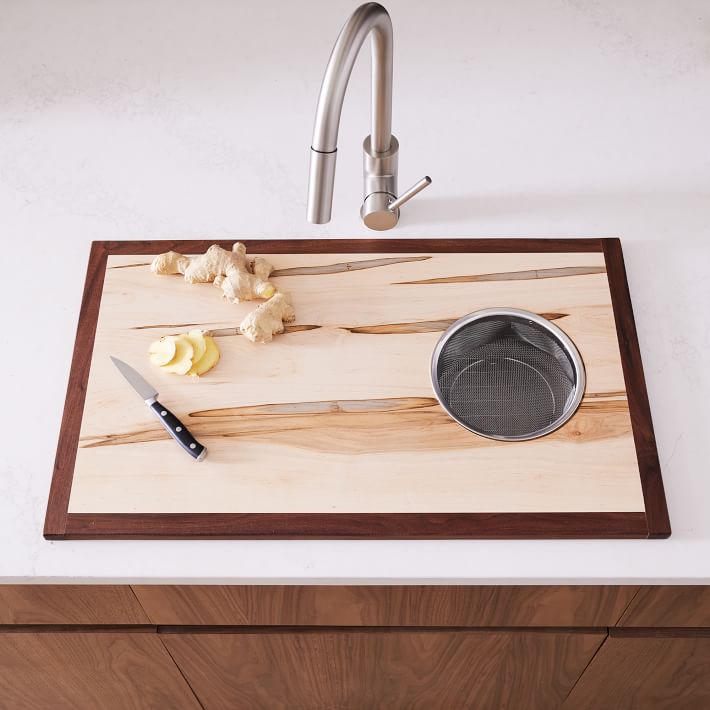
Bring function and a touch of elegance to your counter space with this sleekly designed over-the-sink cutting board. Created by StoneWon Designs Co., the board is handmade from thick American wood that has been coated and waxed with a vegan-friendly mixture made from mineral oil, beeswax, and coconut oils. Available from West Elm in mahogany, ambrosia maple, and walnut, this clever kitchen necessity features a built-in mesh strainer that’s perfect for prepping fruits and veggies. Choose from 30-inch and 36-inch widths, depending on the size of your kitchen sink. After use, wash it clean and store it in an easy-to-reach kitchen cabinet, preferably right below your sink. Beautifully crafted and brilliant!
Magnetic Attraction
Photo courtesy of Food 52 via Architectural Digest
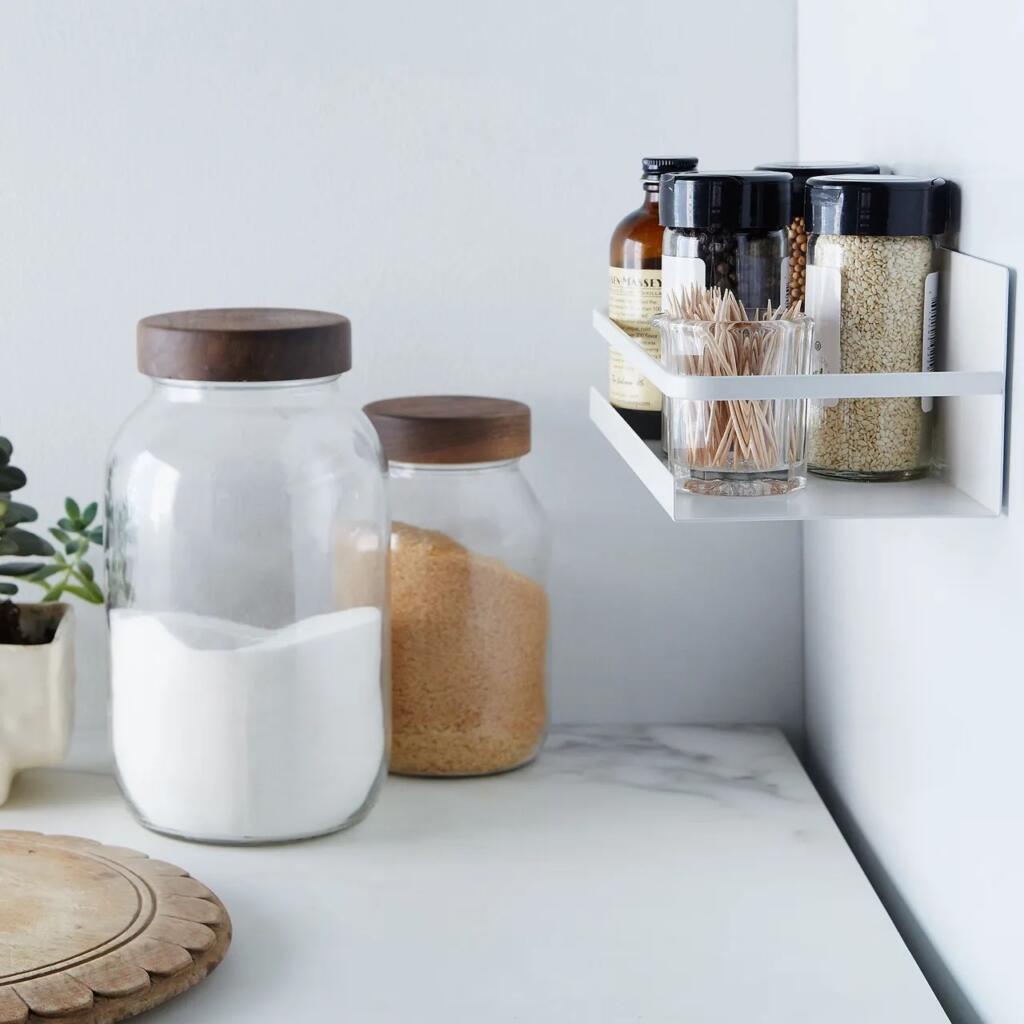
An ingenious space-saving solution to be sure, this steel magnetic spice rack can attach right to the side of your refrigerator—or any other metal surface. This stream-lined Japanese design by Yamazaki can hold up to five spice jars, depending on their size. Perfect for smaller lakeside cabins, this magnificent and versatile little gem will keep your most-used spices within quick and easy reach. The shelf measures 4 inches deep by 10 inches wide and can be wiped clean with a damp cloth.
For more clever kitchen storage ideas to create that luxurious space you never knew you had, check out these smart kitchen solutions. From all of us at Lake Homes, cheers to a carefree—and clutter-free—life on the lake!
After everything we’ve been through these past couple of years, we could all use a fresh start—and so could our homes. Just as personal rejuvenation is therapeutic for mind, body, and soul, so is it for the dwellings we live in. If your lake home could use a little pick-me-up, here are some simple upkeep tips that pack a powerful punch and make your rooms look and feel renewed.
We all dread household chores but love the feeling and satisfaction we get from a clean home. After all, it makes no sense to spend a fortune on our homes and all the furnishings if we don’t keep them clean. The payoff is well worth it, so let’s face it—we can’t avoid this unpleasant task. But it doesn’t have to be as unbearable as you think if you plan ahead and implement some handy gadgets that make cleaning a breeze.
Consider investing in hi-tech housekeeping tools such as a robot vacuum, a carpet spot cleaner, and an electric mop to make tasks go quicker and seem virtually effortless. Keeping floors, furniture, baseboards, ceiling fans, and surfaces dirt and dust-free—and washing windows regularly—makes all the difference in the world in how you and others perceive the look and feel of your home. Plus, if you keep things clean regularly, you won’t have to put as much effort into it each time.
Also, make a schedule and stick to it. Break up chores in simple, easy-to-digest increments, so they won’t be such a pain and take up an entire day. If you’re not doing it all yourself, make it a family project and delegate jobs each week. For truly huge tasks, don’t be afraid to call in a professional.
Removing visual clutter from your life is a beautiful way to keep your home looking smart, stylish, and organized. Also, as many of us are downsizing to smaller places these days, it’s the perfect time to take inventory of our belongings and get rid of things we no longer want in our lives. The minimalist look continues to trend today—so less is more.
In the kitchen especially, keep countertop clutter to a minimum and arrange the daily objects you use efficiently and within easy reach. Group items on trays and in canisters to keep things looking clean and orderly. Don’t forget to edit and arrange your pantry, cabinets, and drawers neatly—even though their contents are hidden from sight. Most of us accumulate clutter in those very places, including our closets, and later dread the thought of clearing them out.
We all know how difficult it is to part with our personal possessions, so be mindful and practical about the process. Consider gifting or donating things you no longer need—or have a yard sale. Without all that baggage, we tend to feel lighter, freer, and more at peace in our surroundings.
Our lake homes are our sanctuaries, so make it a priority to maintain what you already have. Keep your beloved rugs and plush carpets clean and odor-free, replace any worn rugs, patch holes in the wall, polish bathroom and kitchen fixtures, replace cracked tiles, and regularly clean grout on all your tile surfaces. If your rooms look tired and outdated, give them a fresh facelift with new fixtures, hardware, and lighting.
Don’t forget to maintain your lake home’s exterior features as well. For example, clean your gutters to direct water away from your house, seal your driveway to prevent cracks and preserve your pavement, and touch up your home’s exterior paint if you notice any chipping or peeling.
By keeping up with these essential maintenance tips, you can avoid living in a house that looks and feels neglected and instead enjoy a well-dressed home that feels fresh, clean, and cared for.
There is nothing like a fresh coat of paint to change the complexion of any room. So don’t be afraid to introduce a splash of color to your kitchen with painted cabinetry, an island base, or even your wooden floors. Paint will instantly transform your rooms and dramatically change the mood with a simple color change.
If your bright white walls look sad and dull, there’s no better way to revive them than with a brilliant new coat of your favorite hue. To create an eye-catching focal point, consider painting an accent wall in a darker, more richly pigmented tone that will make a striking contrast to the adjacent walls while still complementing the style of your interior.
Let’s confess, we all have them—flattened pillows, ratty towels, and old worn-out sheets that are either stained or torn. And the sad truth is, nothing makes bedrooms and bathrooms look more unkempt than having these less-than-luxurious items in plain view. However, you can elevate your spaces instantly simply by replacing them with plush, luxurious bed linens, fluffy towels and bathmats, and plump new pillows—either down-filled or a down alternative. Also, consider using two duvets to get a more sumptuous plumped-up look. You can stuff two duvets into one duvet cover or simply layer them one on top of the other over your bed.
For more tips on how to freshen up and rejuvenate your home, click here. From all of us at Lake Homes Lifestyles—here’s to a beautifully renewed 2022!
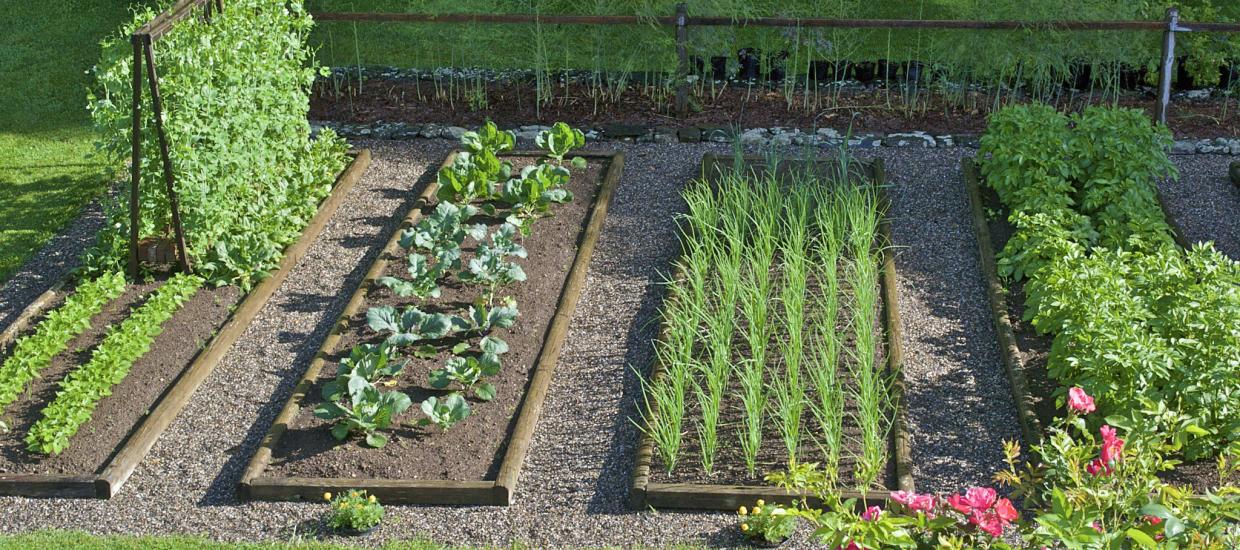
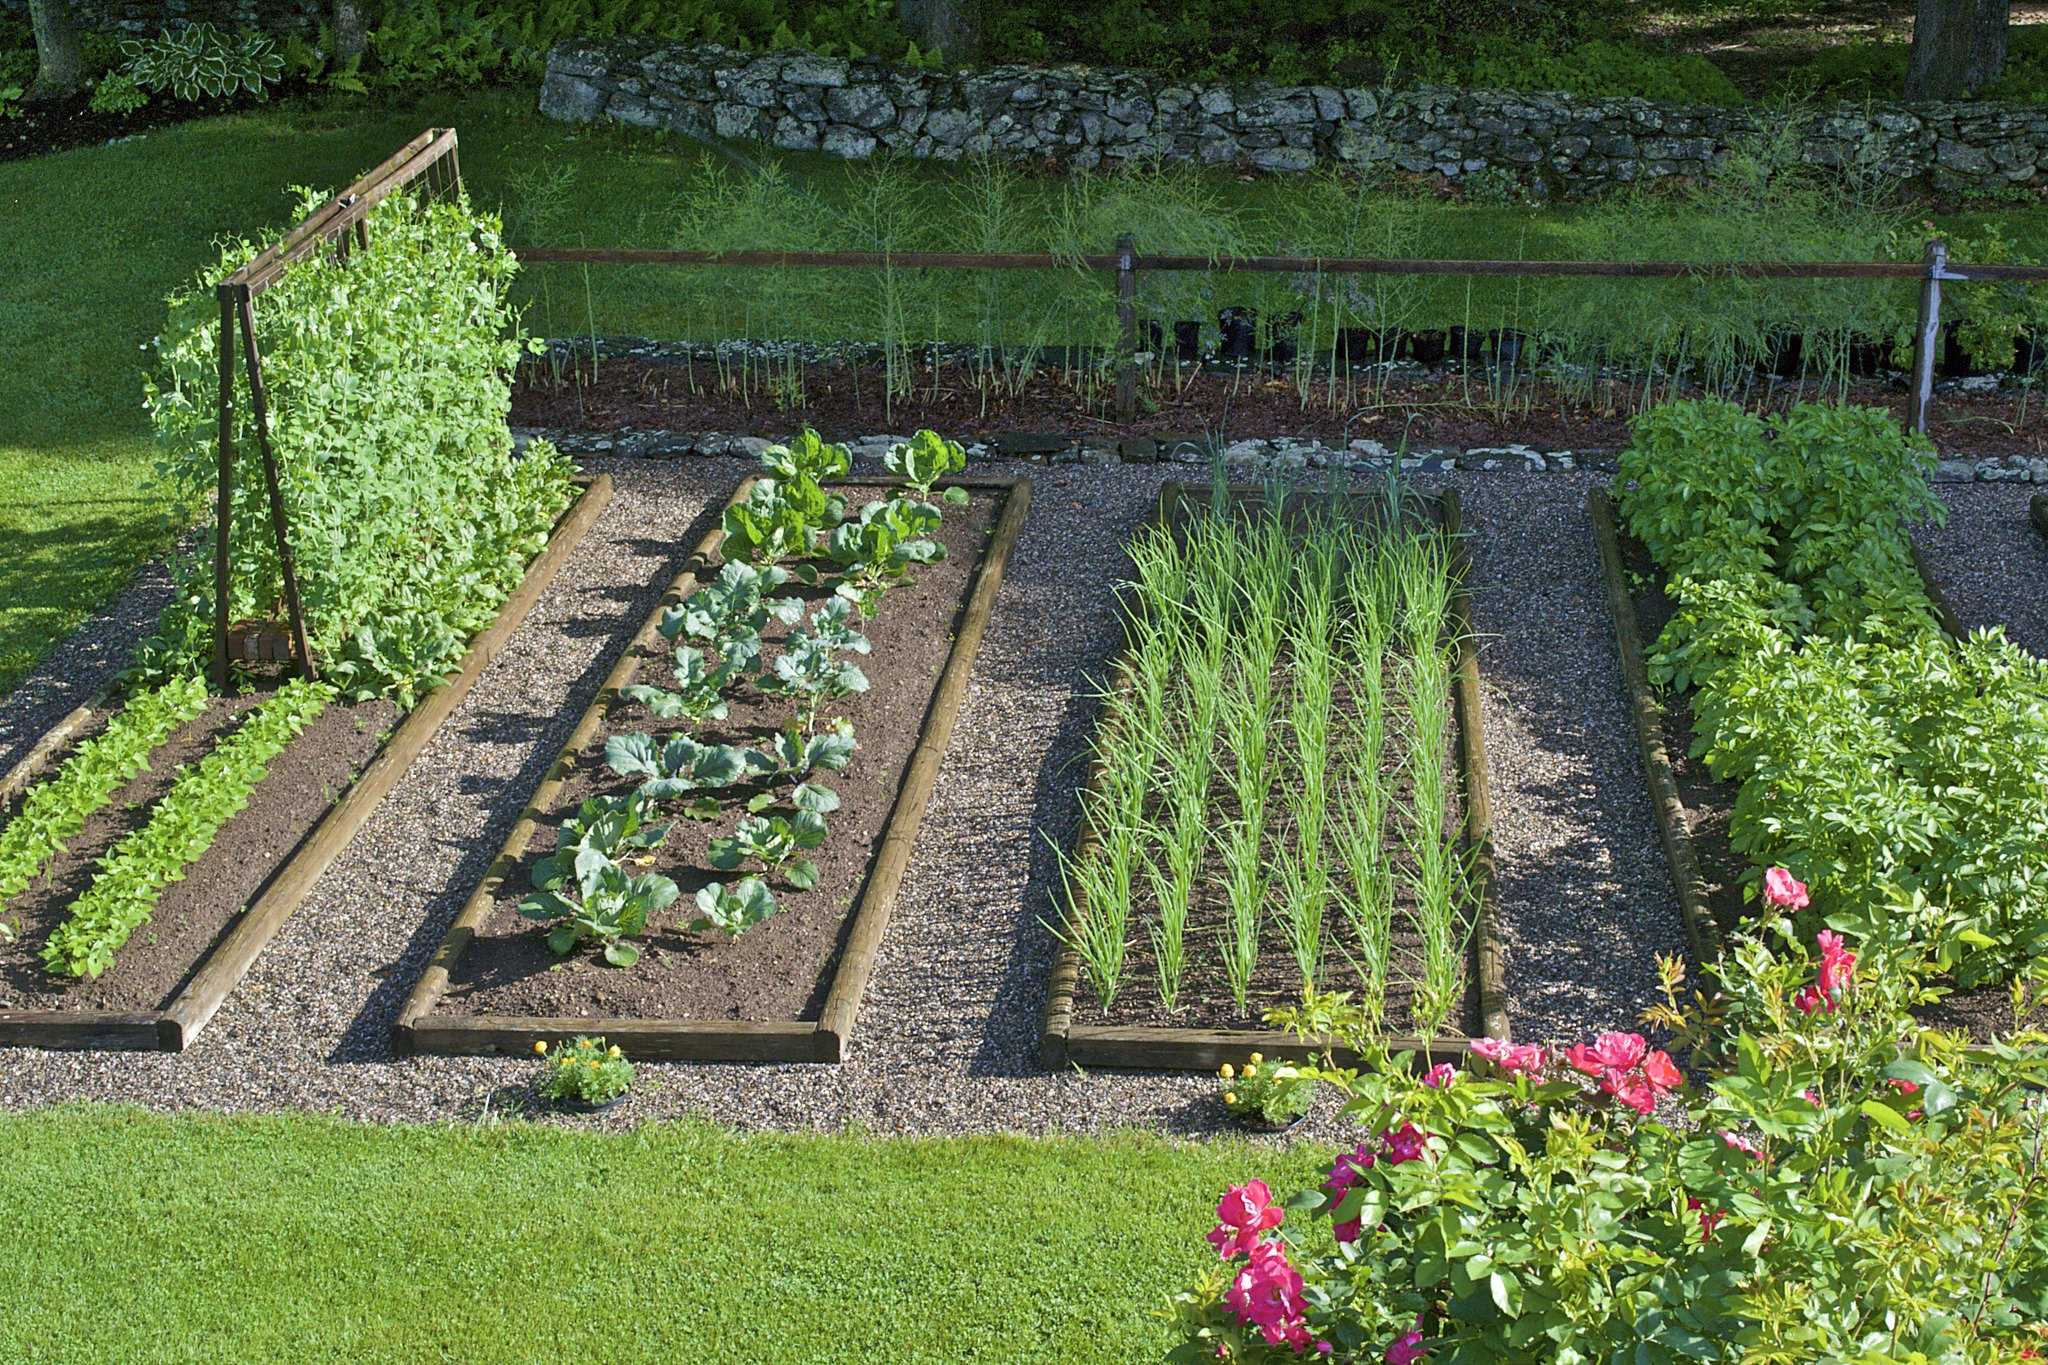
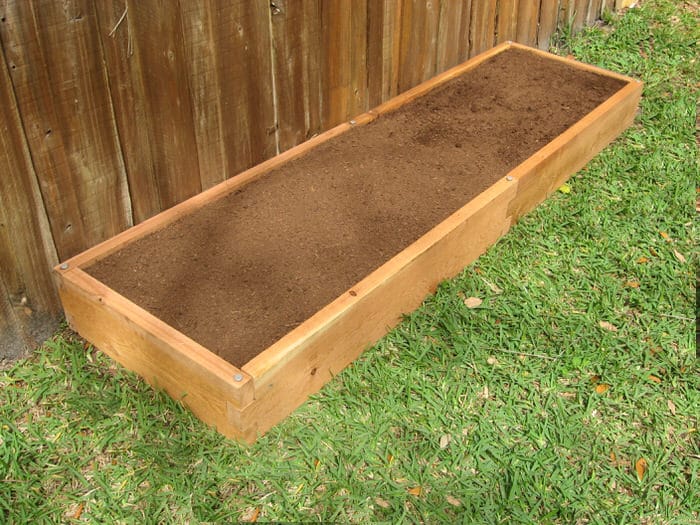
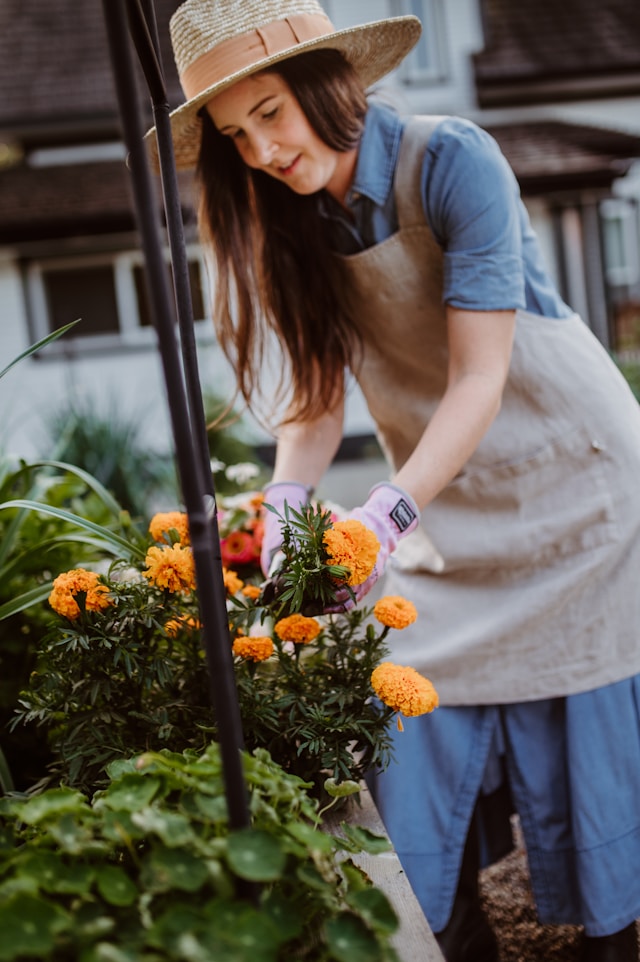
A garden bed is an excellent way to add both aesthetic appeal and gardening ease to your backyard. In this style, soil is raised above ground and enclosed in some way, typically by a wooden frame. It’s a great way of working around less-than-ideal soil conditions in your backyard. Plus, you can choose the location of your plot, offering great flexibility. For the eager gardener, garden beds also warm up more quickly in spring, so you can start your planting earlier. Overall, garden beds require less maintenance in the long run — you can keep them mulched all year, which reduces weeds, you’ll spend less time in a smaller garden, and this manageable look creates a sense of organization in your backyard.
If you’ve decided to make garden beds at your lake house, follow these steps!
Just like planting a garden on regular soil, you’ll need to consider all the elements before laying down roots. First off, sun exposure and soil health are key, so you’ll want to ensure that you pick a spot for your garden bed that covers these basics. Keep in mind that your garden will need 8 hours of sun in the summer, so be sure to scope out a plot uncovered by shady trees. If needed, you can get a soil test from your local Cooperative Extension Office to obtain a fuller understanding of what’s going on beneath the surface. This may be especially important if your lake house is an older building with paint on the exterior, in which chemical damage is a risk.
Once you’ve determined the location in your yard, the next step is to choose the frame size. Of course, this decision will vary based on the space you have in your backyard. But regardless of yard acreage, the most important rule of thumb is to be mindful of width. Essentially, you want to be able to reach every plant in your garden without stepping on other crops in the way. In general, 5 feet wide is ideal. If it’s against a fence or wall and you’re unable to reach both sides, aim for less than 2.5 feet wide.
There’s not one way to make a raised garden bed. They come in all different styles, types, and materials — it just depends on your preference, and what looks best in your backyard! Although you can use bricks, steel, or stone pieces to create your frame, the easiest material for beginners is untreated wood. For example, cedar is a widely available and popular material, known for its unique pinkish-red color and ability to thwart insects and decay. But whatever you do, be sure to stay away from treated wood. The infused chemicals could potentially seep into your plant bed and compromise your roots. For the actual construction piece, YouTube tutorials can be a helpful place to start, as well as step-by-step online guides from home improvement retailers.
One of the great benefits of garden beds is their independence from the rest of your yard. If you’re not satisfied with the soil in your backyard — perhaps soil contamination is an issue in your town, or the level of moisture isn’t right — a garden bed is an opportunity to start fresh. To keep your soils separate, the next step is to lay landscaping fabric along the edges of your garden bed. This water-permeable piece of cloth keeps the soil in your garden bed separate from the soil in your yard. Additionally, landscaping fabric discourages weeds and stabilizes soil temperature — a great benefit for helping your plants flourish!
To fill in the garden bed, you’ll want a good mixture of soil and compost. According to the blog Homestead and Chill, the target recipe is 40% soil, 40% compost, and 20% aeration. Next, you may have to do a little math. First, calculate the volume of your garden bed (multiply width by length by depth), then convert the amount to cubic yards to determine how much soil you need (check out this gardener’s calculator for more help). Finally, the fun part comes next — you can start planting! If you need tips on how to choose the best plants for your gardening zone, take a look at some of our previous blog posts. We cover tips about gardening in all zones of the country!
If you enjoy this article, be sure to join our newsletter for weekly article updates! SIGN UP
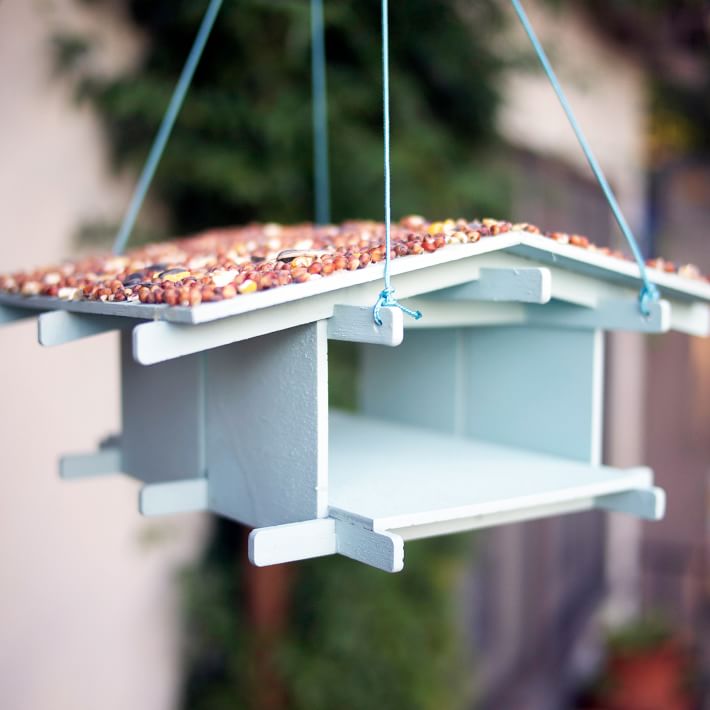
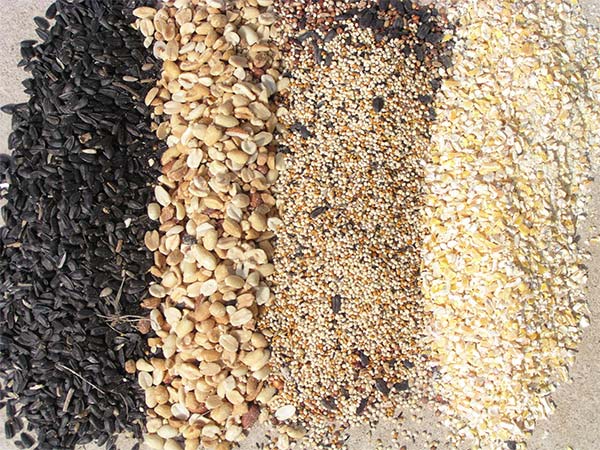
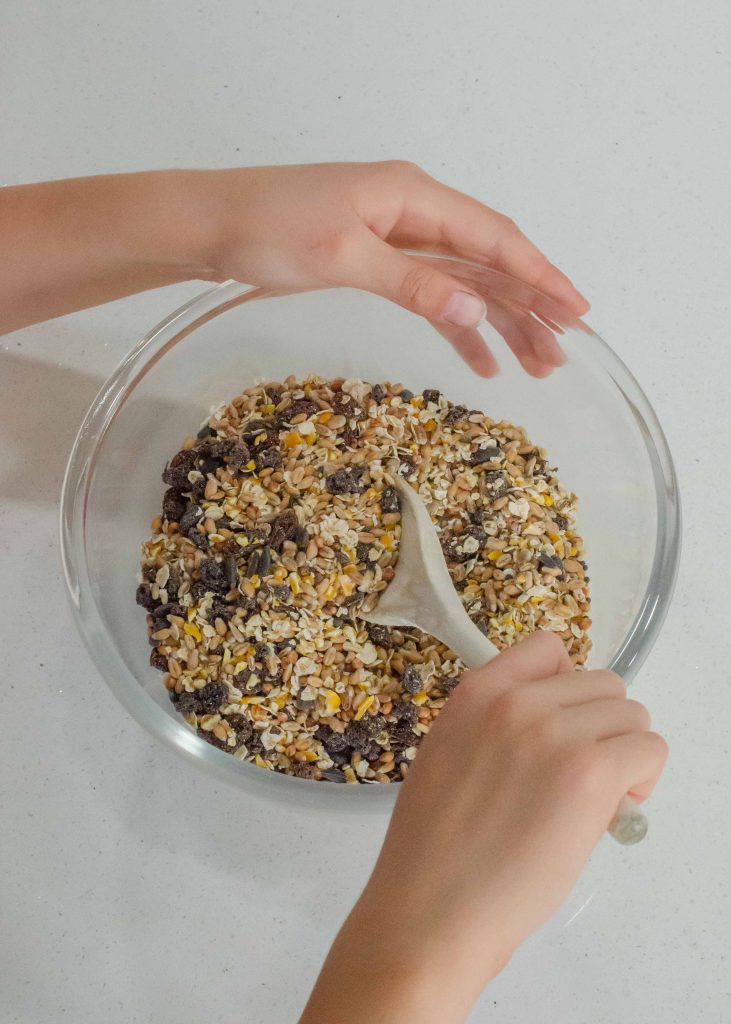
In summertime, when food is abundant, birds are more likely to scavenge for their own meals. However, resources are scarce during the cooler months. So, this season, birds could use a little assistance finding a reliable source of food. Installing a bird feeder in your backyard is a great way to attract birds to your lake home and enjoy birdwatching on a regular basis. But when it comes to filling those feeders, things get trickier. If you decide to make your own bird seed (a fun craft project for everyone), how do you know what the “dos” and “don’ts” are? Which types of seed will attract a wide range of birds? At Lake Homes, we’re here to help. Check out these tips for creating DIY bird seed this winter!
Essential Ingredients
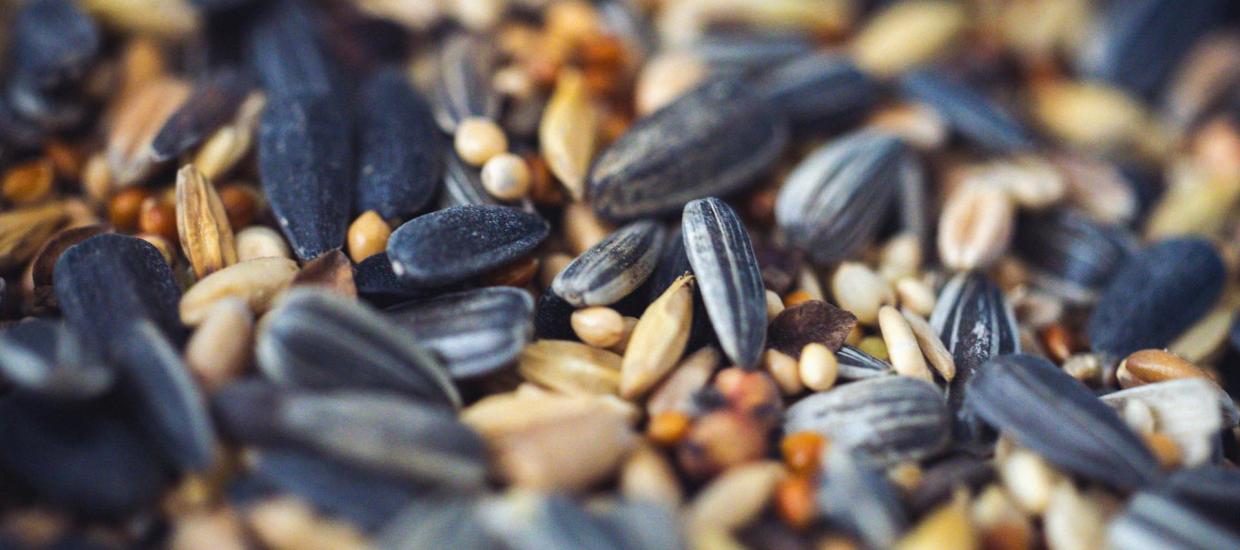
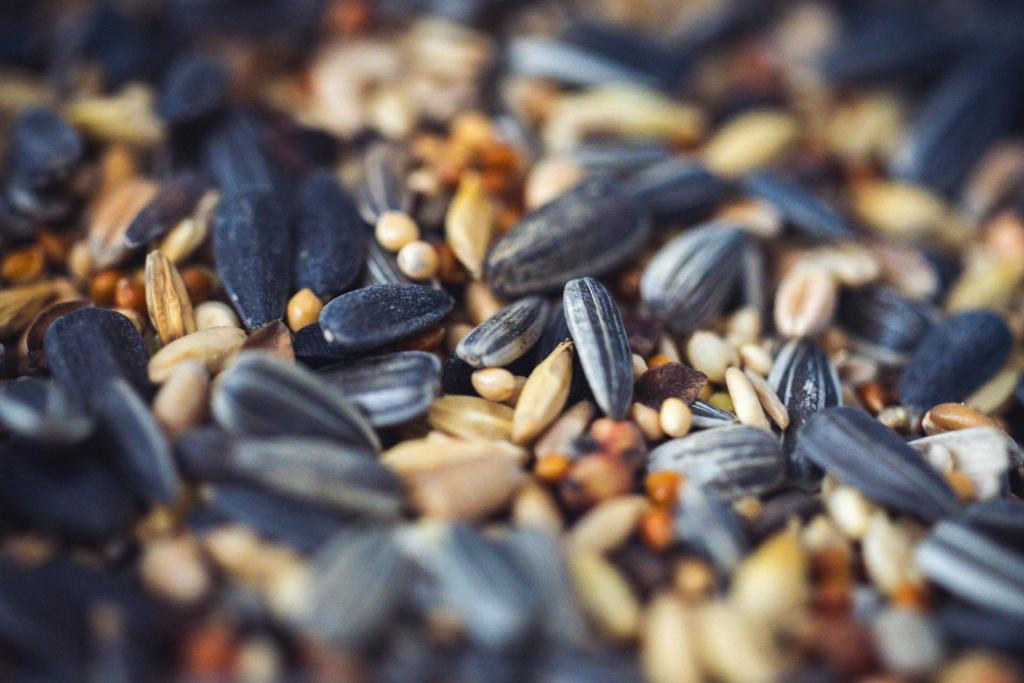
The key to creating a delicious homemade birdseed recipe is including nutritious ingredients that birds need in their diet. Luckily, these essential components are inexpensive! You can usually find them in bulk at most grocery stores. For instance, peanuts are beloved by birds and provide them with enough protein for their diet. Besides peanuts, any good birdseed mix will include sunflower seeds. Whether hulled or in the shell, these seeds are highly nutritious. Specifically, black oil sunflower seeds have high-fat content, as well as protein and fiber, which is perfect for birds.
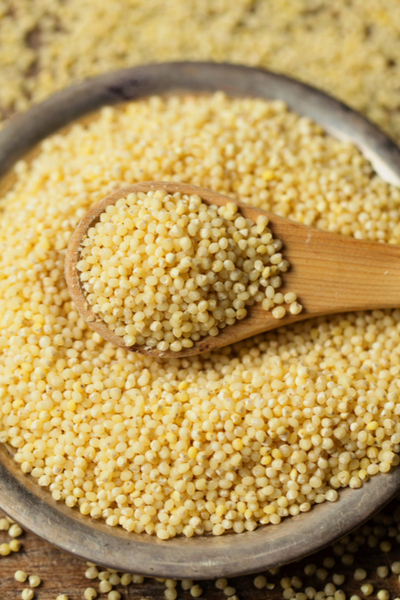
While key ingredients like peanuts and sunflower seeds may be the stars of the show, supplemental ingredients are necessary to round out the nutritional value of your DIY bird seed. First off, white millet (as opposed to red millet) is an excellent source of protein, calcium, magnesium, oil, and phosphorus. Similar to white millet, cracked corn is a great high-protein ingredient. As opposed to whole corn, cracked corn is easier for both small and large birds to consume. Just be sure to use limited amounts! Too much cracked corn can absorb moisture and dry out your other ingredients. Finally, an ingredient often excluded from store-bought mixes is dried fruit. A handful of raisins (white or red) can attract a host of birds to your backyard who might not otherwise hang around.
As one might expect, the essential ingredients (e.g., peanuts and sunflower seeds) should be prioritized in these DIY bird seed recipes. For a standard recipe option, include one cup of peanuts and sunflower seeds and ½ cup of extra ingredients. This ratio excludes dry fruit, in which a little bit (just a handful) goes a long way.
Ingredients to Avoid
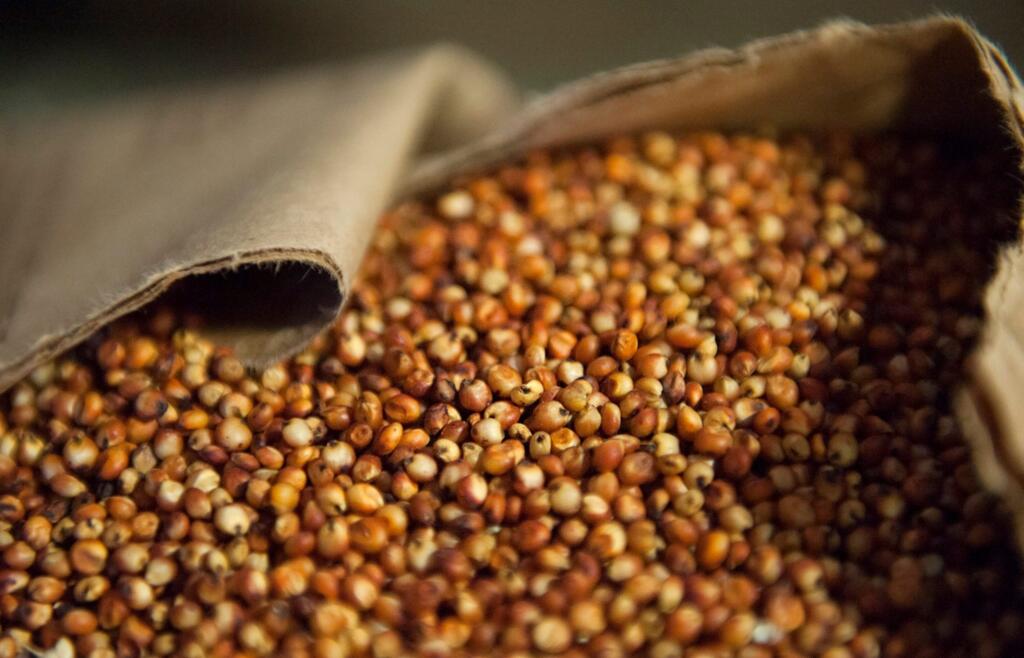
Although birds are known to devour a host of seed-like ingredients, there are several that you’ll need to avoid when creating your own DIY bird seed. Among them is milo, also known as sorgum, a filler grain. This large, reddish seed with a round shape is less appealing to most birds. A few select species, such as doves, enjoy eating milo, but including it in your recipe will likely deter the majority of birds from visiting your backyard. Canary seed, grass seed, oats, wheat, and sticks are other ingredients to avoid. One of the benefits of creating DIY bird seed is that you can avoid these “filler” ingredients that are often included in cheaper store-bought mixes. In fact, so many mixes contain more milo than other, healthier, and more appealing ingredients. Making your own birdseed will ensure that birds are attracted to the food you’re offering!
With these tips, your backyard is bound to be a hotspot for birds this winter!