A Guide to Septic Tanks at Your Lake House

If your lake home is not on a municipal sewer plant, you’re probably familiar with septic tanks. If you’re new to this topic, we’re here to help. Septic systems collect wastewater in domestic residences and are considered a simple OSSF (on-site sewage facility). At a lake home, septic tank upkeep is more crucial due to water contamination risks. To help you remain an informed lake homeowner, we consulted experts to answer frequent questions you may have about septic tanks. 

What are the Best Types of Septic Tanks?

Septic systems – EPA.

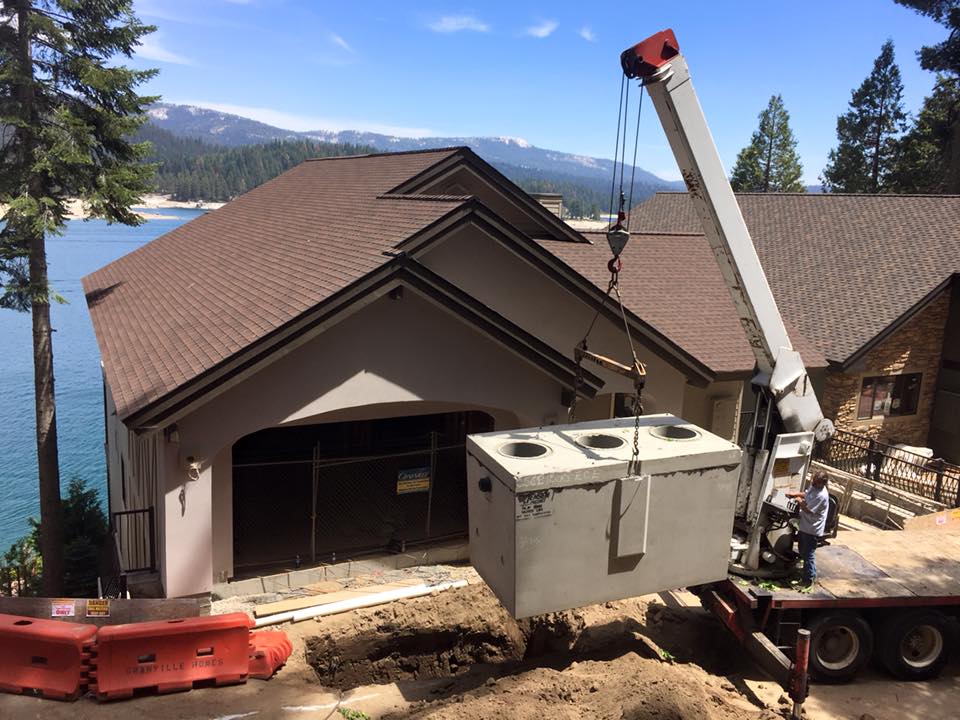
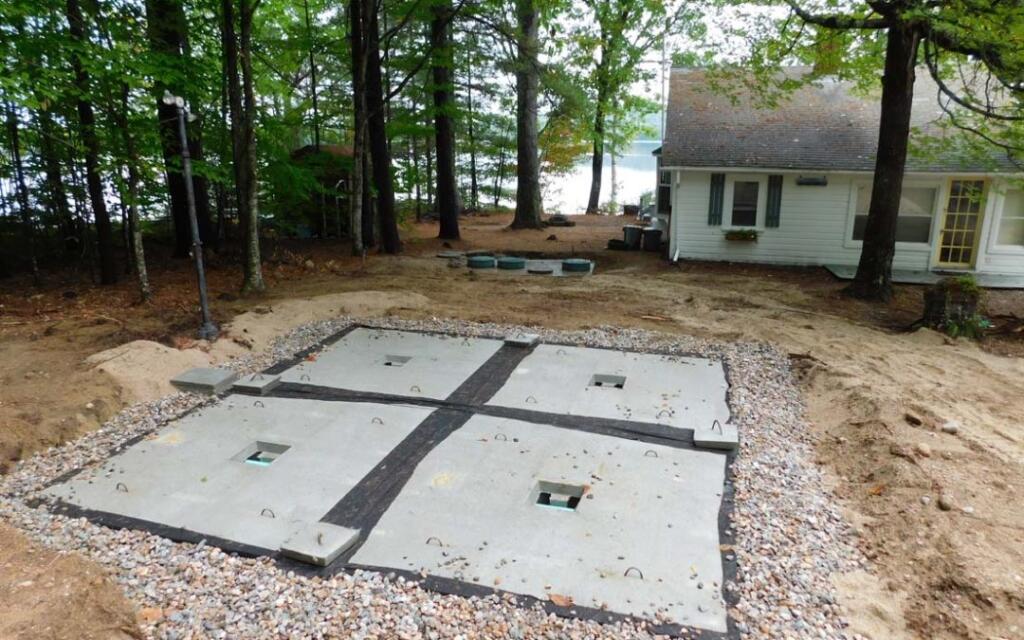
There are two types of septic tanks — concrete and plastic. The concrete tank’s durability makes it the ideal choice. Plastic tanks are the default when the installation company can’t access the site with heavy concrete delivery equipment. “This can be due to trees, fences, power lines, property lines, steep lots, and landscaping,” explains Jeanie Lentz of Lentz Wastewater, whose company covers Lake Norman and the Piedmont region of North Carolina. 

Beyond these two categories, nine different systems exist. You can visit the Environmental Protection Agency website for full descriptions of each type of septic tank. According to Justin Edwards, a septic tank installation contractor from Michigan, chamber systems are best for a lake house. “These are popular near rivers and lakes where excess water is common,” he explains. 

If your lake house’s septic tank isn’t a concrete chamber system, no need to worry. “Ultimately,” says Jeanie Lentz, “the best type of system is a system that’s installed appropriately by a licensed installer and properly maintained by the homeowner.” As such, proper maintenance is more important than the type of septic tank.

What Types of Clearance are Best?

Photo courtesy of bigboredrilling.com.

Your required clearance from a body of water depends on the state in which you’re located. However, the average distance that local ordinances mandate is 50 feet from springs, lakes, or water streams and 100 feet from any public water supply. To be safe, Mitch Turner from Septic Masters LLC recommends 100 feet of clearance for lake properties. Be sure to check local regulations in your lake area. 

How Often Should You Check the Tank?

Septic inspection – YouTube.

Mitch Turner advises checking your tank every three years. This can change depending on other factors, such as how many people live in the home and how often you use it. For instance, a house with a family of five members would need more regular maintenance than a household of two. Further, if you live permanently on the lake, you’d need to check the septic more often than if your lake house is a vacation home.

Another consideration with your septic system is proximity to the water. If you’re living next to a lot of water overflow, Justin Edwards says it would be beneficial to check and empty the tank annually. “It’s very important to clean septic tanks routinely. Otherwise, all the toxins will build up and kill the bacteria that is responsible for breaking down the waste in the first place,” he says.

You may also notice other clues that tell you it’s time for tank inspection. For instance, if you see wet spots, hear gurgling, or detect a bad odor, hire a professional to check your septic system.

How Much do Septic Tanks Cost?

Depending on the type of system, the cost of septic tanks can vary greatly. On average, it’s safe to assume you’ll be between $400-$800 out of pocket. This spend is not much different from a residential home unless your property requires you to invest in a less conventional septic tank. 

However, keep in mind that this cost represents the tank itself, not including the installation process. For more insight, Home Advisor posts the national 2020 average total costs. According to this report, you can expect to pay around $6,216. 

Is Septic Tank Maintenance Different at a Lake House?

septic-system-awwa
Photo courtesy of AWWA.

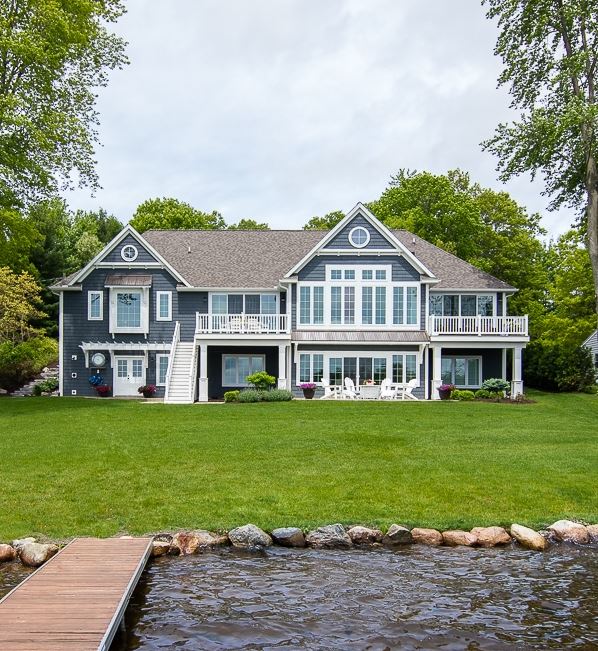
At a lake house, more is at stake. “Maintaining water quality is the primary concern with any water-adjacent sanitary sewage system,” says Jesse Silkoff, founder and co-president of MyRoofing Pal. Lake homeowners have a responsibility to the nearby body of water.

Despite the higher call of duty, there should be no difference in your behavior at a residential home versus a lake home. For instance, in both houses, you would not pour chemicals down the drain, use the garbage disposal, or park near the septic tank. “The biggest difference would be how often you perform maintenance on it since you’ll want to clean and empty lake home septic tanks more regularly,” says Justin Edwards. 

Even then, there isn’t a one-size-fits-all approach for septic tank maintenance at a lake home. The type and cost of maintenance depend on the topography, presence of bedrock, the height of the water table, and type of soil. For instance, a North Carolina lake house is likely more rocky and elevated than a Wisconsin home

There are multiple considerations when deciding on the type of system and its maintenance. Septic systems are often necessary for the lake homeowner due to the often rural locations of many lakes. Consult a local septic tank expert for personalized advice on the topic and remember to consider the septic system when buying, selling, or building your next lake home. 

What is Wabi-Sabi Design and Why it’s Perfect for a Lake Home

Photo courtesy of Mademoiselle Claudine via The Spruce.

In recent years, concepts from various countries have become trendy in U.S. interior design like the Swedish idea of hygge, meaning comfort and coziness, which has grown in popularity. From further east, the Japanese concept of wabi-sabi has made its way into U.S. architecture and interior decor. Before diving headfirst into this trend, it’s important to understand its meaning and cultural context. For wabi-sabi specifically, this meaning happens to be aligned with the lake lifestyle. Let’s take a deep dive into this concept and why it’s perfect for a lake home. 

What is Wabi-Sabi?

Photo courtesy of Joelle Magazine.

Although the trend is relatively new, the concept is rooted in ancient Japanese culture. Specifically, it comes from Buddhist tea ceremonies where the tea masters used simple, rustic, and irregularly shaped utensils. When you break the word down, “Wabi” refers to understated elegance that is often found in nature. “Sabi” is a celebration of the imperfections that come with aging. Wabi-sabi describes something humble, authentic, and beautifully imperfect. In other words, it’s appreciating the way something is rather than how it should be

Wabi-Sabi in Design

Photo courtesy of My Modern Met.

In keeping with this definition, wabi-sabi design is typically asymmetrical, modest, and intimate. A classic example of these characteristics is kintsugi, the Japanese art of mending cracked pottery with gold and silver resin. Instead of trying to hide the ceramics’ flaws, this technique celebrates them. 

Photo courtesy of Wallsauce.com.

In 1994, Leonard Koren’s book Wabi-Sabi for Artists, Designers, Poets, and Philosophers garnered more widespread attention. The work of architects like Tadao Ando made wabi-sabi into a lauded design trend. For the interior decorator, wabi-sabi design techniques include mixing and matching, embracing and repurposing old items, artisanal decor, and homemade projects. However, just because it’s an eclectic style doesn’t mean it’s full of clutter. A wabi-sabi space should also be highly organized and peaceful.

The Appeal of Wabi-Sabi

Photo courtesy of DECOR8.

In a world where the latest trends are aiming for perfection and newness, wabi-sabi is refreshing. Helen White, design lead at House Of, says, “I think the main appeal of this style is that it appeals to the unpretentious and whimsical among us. There is so much beauty in the weather-beaten, cracks, and bumps in items as there are in meticulously crafted, smooth edges.” Further, this style offers permission to pick decor that simply brings you joy, even if it doesn’t match a specific aesthetic. Instead of showcasing a particular trend, wabi-sabi design introduces the people who live there. 

Invoking Wabi-Sabi at Your Lake House

Photo courtesy of dwell.com.

Wabi-sabi is evident in nature. Flora and fauna are not engineered to look a certain way– they simply are what they are, even as they age. At the lake, you’re surrounded by wabi-sabi. More broadly, the idea of leaving the city behind and retreating to nature with your loved ones is in itself, wabi-sabi. Since the lake lifestyle already adopts this concept, why not reflect it in your decor?

Photo courtesy of theuppers.com.

Jeneva Aaron, founder, and CEO of The House Wire, describes, “Wabi-sabi design is also about bringing nature inside your house. This is very much possible when designing a lake house… I believe the wabi-sabi concept is used in most lake house designs because of the natural effect. People are now more into fulfillment over materialism.” In practice, you may incorporate earthy tones and organic materials into your decor, such as driftwood. The bottom line is that it should reflect something you genuinely love, even if it’s not in vogue. After all, lake homes should be welcoming, and a wabi-sabi style expresses that sense of warmth.

What do you think? Would you consider incorporating wabi-sabi into your lake house decor?

Sustainable Scapes: Environmentally Friendly Landscaping Solutions

Photo courtesy of The Lily Pad Cottage.

Imagine your dream landscape in the backyard of your lake house. Maybe the freshly cut grass is a vibrant shade of green, your flowers and shrubs are perfectly manicured, and a sprinkler is installed to keep everything looking fresh. However, this vision of a perfect green space may not actually be sustainable. Andrew Gabries, the owner of Go Green Lawn and Pest Control, warns, “A yard that looks good but isn’t healthy is difficult to maintain.” Despite the green grass appeal, it’s best to design an environmentally friendly landscape. Fortunately, there are several solutions to creating a beautiful — and eco-friendly — backyard at your lake house.

Reduce Water Use

Photo courtesy of Evergreen Turf.

Despite long showers and multiple dishwasher runs, most residential water usage is concentrated outside the home. According to the Environmental Protection Agency, a typical American household uses 320 gallons of water per day. Further, 30% of this amount is used for outdoor purposes like landscaping. In dry climates like the Southwest, this number increases to 60%. Simply put, this common practice is wasteful.

In contrast to popular opinion, you don’t need to water grass daily. By watering less, utilizing hardscapes, and planting artificial grass, you can reduce the amount of water waste at your home. At the end of the day, even though bright green grass might look ideal, grass with slight brown tones is healthier. 

Choose Native Plants

Planting non-native flowers and shrubs may add a fun, exotic flair to your garden. However, they are not likely to flourish without manually engineering the environment. This is not helpful for environmentally friendly landscaping. Pablo Solomon, environmentalism leader and science consultant for the U.S. Department of Education, advises, “Whenever possible, use local natural plants and trees in your landscaping. This will reduce watering and dependence on herbicides or pesticides.” For example, lupines and willowherbs are native to Lake George in New York, while crown beards and evening primroses will grow naturally at Lake Lanier in Georgia. If you aren’t sure which plants are native to your lake area, the National Wildlife Federation created an interactive Native Plant Finder tool to help.

Reconsider the Lawnmower

Photo courtesy of The Wall Street Journal.

Although many lake homeowners have a standard gas lawn mower on hand at their properties, these tools emit fuels that can be toxic to the environment. Further, at a lake property, landscaper Steve Ambrose comments, “These fuels can easily float in the air and into the lake as vapor, even if you are far above the water.” Luckily, there are several environmentally-friendly alternatives to the traditional gas lawnmower. Solomon advises gardeners to “use hand tools if your time and health allow. You not only help the environment but stay in shape as well.” 

However, if you don’t have the time or physical capabilities for hand tools, electric mowers are another great environmentally friendly solution. Ambrose adds, “Electric maintenance equipment saves on fossil fuels and pollution, but also cuts down enormously on noise pollution.” You may even consider investing in an automatic electric mower. With this tool that essentially functions as a Roomba for your landscape, there’s no need to expend energy. It’s also best to mow the lawn at midday, just after the morning dew has set in, and the grass can dry and heal throughout the day before nighttime. 

Don’t Spoil the Soil

Many gardeners add chemicals to their soil to foster plant growth. However, these chemicals are rarely necessary and negatively impact the environment. If you’re unsure, you can test the soil in your backyard to see if chemicals are needed. If it turns out that your soil needs some fertilizer, opt for a natural choice such as adding mulch to plant beds. Ambrose comments, “I would stick to entirely organic naturally occurring fertilizers and see if the soil that is directly next to the lake can go unfertilized.” Gabries compares a landscape to your own food intake as a human: “The more organic products you consume, the better the results tend to be.”

Why Go Green?

Photo courtesy of bluegrasslawn.com.

For any homeowner, choosing environmentally friendly landscaping techniques benefits wildlife, reduces air and soil pollution, and creates less work for you as a gardener. However, lake homeowners specifically have a greater calling to go green. Ambrose explains, “Lakeside properties are a lot harder to be environmentally friendly with, but the responsibility is far greater. Usually, a house on a lake has water access, but the water actually belongs to the state. You will need to be careful to be a good citizen.” So, next time you think about turning on the sprinkler or the gas lawn mower, keep in mind that a perfectly polished lawn doesn’t always equate to sustainability. When it comes to landscaping, aim for natural beauty. Your plants will thank you. 

A Guide to Plant Hardiness at Your Lake Home: Zones 1-3

Photo courtesy of Country Gardens Magazine.

If you have a garden at your lake house, you’re probably familiar with the Plant Hardiness Zones. Designed by the U.S. Department of Agriculture, this guide separates the country into zones based on average annual minimum winter temperature. Each zone is split by 10 degrees and has its unique features, such as the first and last frost date and length of seasons. This helpful tool clarifies which plants will thrive in your garden. For example, if you’re a gardener in zones 1-3, the Plant Hardiness Zones will warn you against planting a peach tree in your garden, which wouldn’t flourish outside the southernmost zones.

Image courtesy of Gilmour.com.

If you’ve been browsing the Lake Homes blog in the last few months, you may have caught the first two articles in our series on gardening zones. While the first two covered zones 7-9 and zones 4-6, we’re now turning the spotlight on the coldest areas of the U.S. — zones 1-3.

Region Characteristics

In zones 1-3, the average annual minimum temperature is between -60 degrees and -30 degrees Fahrenheit with zone 1 being the coldest. Most of zone 1 is located in Alaska, where the tundra climate can be especially harsh for gardening. In zones 2 and 3, which include the northernmost United States and high altitude areas, these low temperatures also present a challenge for gardeners. Due to the unforgiving weather, it’s crucial to consult the Plant Hardiness Zones to determine which plants are most likely to survive the winter in your garden. Aside from temperature, these regions also tend to have low moisture and high winds, creating more barriers to plant survival.

Main Takeaways

Due to the harsh features of these regions, northern gardeners’ planting window is shorter than those in other zones. Kevin Espiritu, the founder of Epic Gardening, clarifies, “Gardeners in zones 1-3 have about 2 months to plant, and that’s it.” If you’re living in these zones, it’s crucial to take advantage of this brief time. Luckily, certain types of gardening can help. Scott Fanello, a writer for Total Gardener, advises those in zones 1-3 to master cold-frame gardening. With this simple structure that utilizes insulation and solar energy, you can create a microclimate for your plants. He also recommends building a greenhouse at your lake home if you have the money and time. Despite these challenges, life in zones 1-3 isn’t all bad. Espiritu notes that one advantage to growing plants in Alaska is their long summers (almost 20 hours per day of sunlight), causing gardeners in this region to break records in terms of large vegetables. 

Plants to Pick

Due to the harsh weather conditions, the best plants to choose in zones 1-3 are tough ones that can survive droughts. It’s also best to select native plants that are already adapted to the climate. Thankfully, several plants are hardy enough to thrive in this cold, dry weather. Nikki McAteer, marketing director of Perfect Plants Nursery, comments, “Only a handful of perennial plants will grow outside and come back year after year. Planting annuals is a great solution to these punishing temperatures.”

In contrast to perennials that need more maintenance, annuals are less of a commitment. Most vegetables are grown as annuals, so plants like beans, broccoli, potatoes, and tomatoes have a good chance of survival in zones 1-3. Fanello recommends focusing on fast-growing annuals in particular. Some examples include salad greens and herbs like basil, oregano, and rosemary. Overall, it’s helpful to pick plants with a short growing season so they’ll mature and be ready for harvest in the 2-month window that these zones offer.

Despite the harsh weather in zones 1-3, northern gardeners are quite savvy when it comes to working with what they have. If you own a lake house in these zones, we hope these tips help your garden flourish. It’s also a great idea to connect with other gardeners in your zone through meetups, Facebook groups, and local farmer’s markets. Plus, with all the available vegetable options in these northern zones, you’ll always have something to add to your homemade salad!

A Guide to Plant Hardiness at Your Lake Home: Zones 7-9

If you have a garden at your lake house, you’ll know that there are several important factors to consider when planting something new. First and foremost, plants have certain temperatures that cause them to thrive and others that cause them to wither. For example, you might find palm trees near a lake in Florida — these plants flourish in warm climates, but they would not withstand northern winters. To determine how to plant by certain climates, gardeners rely on the Plant Hardiness Zones as their foundation.

USDA plant hardiness zone map
Photo courtesy of United States Department of Agriculture.

Based on the average annual minimum temperature, there are nine different zones in the United States. Each zone is an average of 10 degrees Fahrenheit difference than the previous one. For instance, Alabama lies in Zone 8, where the temperature can drop as low as 10 to 20 degrees in extreme conditions. By contrast, parts of Minnesota and Nebraska are in Zone 3, where the coldest winters can hit -30 to -40 degrees. While the Plant Hardiness Zones do not tell the whole story of a climate, they do serve as an important tool for both seasoned and newbie gardeners. The Zones are so integral that they deserve a three-article series from Lake Homes.

First, we’ll be taking a look at the warmer climates in Zones 7-9.

Continue reading “A Guide to Plant Hardiness at Your Lake Home: Zones 7-9”

Weatherproof Your Decks and Docks for Longer Life

Building a deck or dock costs thousands of dollars, why not build it to last?

Though the process of weatherproofing can be costly and time consuming, it can save you in semi-frequent repairs and even reconstruction in the future.

Benefits of weatherproofing

Aside from perhaps an open flame, water is the most dangerous element your wooden structures can be exposed to.

By weatherproofing your deck or boat dock, you can ensure that building materials are protected from the elements as well as organic matter that can weaken the stability of your structure.

applying wood sealant

Rain water and other moisture can sink into the wood if not sealed properly, causing the material to rot away over time.

Additionally, moisture rich wood tends to mold, which is dangerous to both the integrity of the material and yours and your guests’ health.

Unsealed or non-weatherproof structures are also vulnerable to dry rot  caused by certain fungi. These organisms cause wood to become spongey in composition and therefore, unstable.

Weatherproofing also helps to maintained the aesthetic of your dock or backyard deck by preserving its color and polish.

Disadvantages of weatherproofing

The biggest drawback to weatherproofing your wooden structures is that the process is not a one-time investment.

Most experts recommend resealing decks and docks annually, which means homeowners are looking at a reoccurring maintenance cost.

According to Home Advisor,  higher-end structures can cost upwards of $1800 a year to maintain; however, the article also sites the average person spends around $831 sealing or weatherproofing a deck.

In areas where there is frequent rain or high humidity, homeowners may be looking at repeating this process multiple times a year.  This is especially true in areas such at the lake where structures are regularly subjected to large amounts of water.

Additionally, homeowners should note that clear sealants may need to be reapplied more often than colored ones.

Weatherproofing materials

When it comes to the materials recommended for weatherproofing your boat dock or deck, determine whether you want to use a waterproof stain or sealant, or if you want to bypass normal wood for a synthetic building material.

As previously stated, if buyers chose the first option, a sealant or stain of some kind, they run the risk of costly, annual reapplication. However, this is the more affordable option, especially for smaller or preexisting structures.

A single quart of sealant can cost anywhere from about $8 to more than $50, depending on the brand. For the higher-end material, an amount this size can cover about 240 square feet.

The average deck is approximately 300 to 400 square feet.

The second option would be to build your structure with a non-wood material, such as composite decking.

These boards are made of both plastic and wood fibers, mixed with a number of other additives such as pigments and UV inhibitors. This mixture is then heated to form a sturdy building material that is flame resistance, easier to maintain and fades less easily.

Low-end composite board costs about $4 per square foot, but can exceed $7 per square foot for higher end, more aesthetically pleasing material.

Though the start up cost can be expensive, this product’s longevity paired with reduced maintenance obligations make it an increasingly appealing alternative.

Springtime Front Door Makeovers You’ll Love

Spring is a time to renew, refresh and revive your lake home. Give your front door a face lift with these fresh and fun ideas!

Pick a Color, Any Color

A fresh coat of paint can do wonders for any space, but instead of just touching up the scuffs on your front door, consider painting it an entirely new color.

Lake homes often serve as summer homes, so why not add bright pop of color to your vacation spot?

Green Front Door and window frame

Popular lake-themed colors include vibrant blues and bright greens, which are reminiscent of the lakescape. Many homeowners also opt for a sunny yellow color to greet guests as they arrive for a day on the water.

These colors are not only aesthetically pleasing, they can influence how your guests feel.

According to a previous LakeHomes.com article, yellow promotes feelings of joy, happiness and positive energy. Similarly, green can also energize a room, as well as promote feelings of togetherness when used in communal spaces.

Blue is a calming color, which promotes relaxation and serenity.

Primary lake home residents can also benefit from a freshly painted front door, but might consider choosing a more season-neutral color such as red or muted earth tones.

Complete your front porch re-fresh by tying in your new front door color with accents such as a patterned porch swing cushion or door mat that features it.

Add Texture and Depth

For a front door that truly makes a statement, try adding stripes or a chevron pattern to the mix.

For beach homes and other waterfront retreats, try painting alternating color and white stripes running vertically up and down your door. Or add a single, thick “Charlie Brown” chevron strip to near the bottom of it.

If your door is paneled or has a glass window, consider framing each section with an accent color different from the main one. This will add dimension to the otherwise flat surface.

Painting the frame around the door a different color than the door itself will also helped to add depth to your doorstep.

After the paint has dried, accessorize the space with a new knocker or door handle.

Finish it all off by adding raised metal, or vinyl applique address numbers or a greeting message like “hello” or “welcome.”

A Door for all Seasons

Of course, painting isn’t for everyone. For homeowners who choose to leave their front doors their original color, adding a seasonal wreath can help make their homes look more festive and inviting.

Though some can be pretty extravagant, making a Spring wreath doesn’t have to be a difficult undertaking.

For your base, start with a basic grapevine wreath. These wreaths are the ones that look like wooden vines all entangled in a circle and can be found at Walmart and your local craft stores.

Next, select a handful of large-bloom flowers and a few accent stems to intertwine with the vines. These items will often be found near where you got your base.

Trim the flower stems down to about five inches and insert them into various spaces on the base. Secure each flower by looping its stem through the open space a few times.

Floral Wreath with Sign

Repeat this action with the accent stems, and within minutes you have the perfect accessory for your front door!

Another simple wreath only takes hot glue, a wreath base, and a few flower buds.

Near the grapevine wreaths at your local craft store you can find wooden wreath bases, which feature pre-cut holes into which flowers can be inserted.

To complete this type of wreath, remove your flowers from their stems and hot glue them to the base, and that’s it!

Add something a little extra by hanging a greeting sign in the middle of the completed piece.