Austin Lake Home Living: Scenic & Serene

Photo courtesy of Dror Baldinger, FAIA Architectural Photography

This stunning home perches high above beautiful Lake Austin and epitomizes easy lake living for a couple seeking their lakeside dream home. Situated along the west bank on a steep 1.2-acre wooded lot, the dwelling was originally built in the 1950s as a rustic, hexagon-shaped waterfront cabin. In the 1970s, the structure was renovated with a small addition. Captured by the site’s exquisite location and scenic beauty, the new homeowners didn’t hesitate to purchase the property. In 2014, they called on Austin architect James LaRue of LaRue Architects and interior designer Laura Britt of Britt Design Group to assess the initial design concept and thoughtfully integrate a new modern aesthetic that would also pay homage to the home’s architectural heritage.

Modern Makeover

Photo courtesy of Dror Baldinger, FAIA Architectural Photography

Intrigued by the original construction of the building, the design team knew immediately they wanted to remove the 1970s addition yet keep the hexagon shape that was formerly the main living area. “The challenge was to intergrade a modern home design concept into the hexagon geometry while ensuring the final architecture became a cohesive building,” says LaRue. The site also had dramatic topography—environmental constraints due to its waterfront location and several large trees required to remain—so the design team had to address the heavily treed, steep lot that slopes down 120 feet from the back of the house to the shoreline. “The site constraints drive the entire design of this home,” says the architect, “and the finished result responds in a very beautiful way to those constraints and to its heritage.” The team collaborated with Classic Constructors during the build. 

Dogtrot Design

Photo courtesy of Dror Baldinger, FAIA Architectural Photography

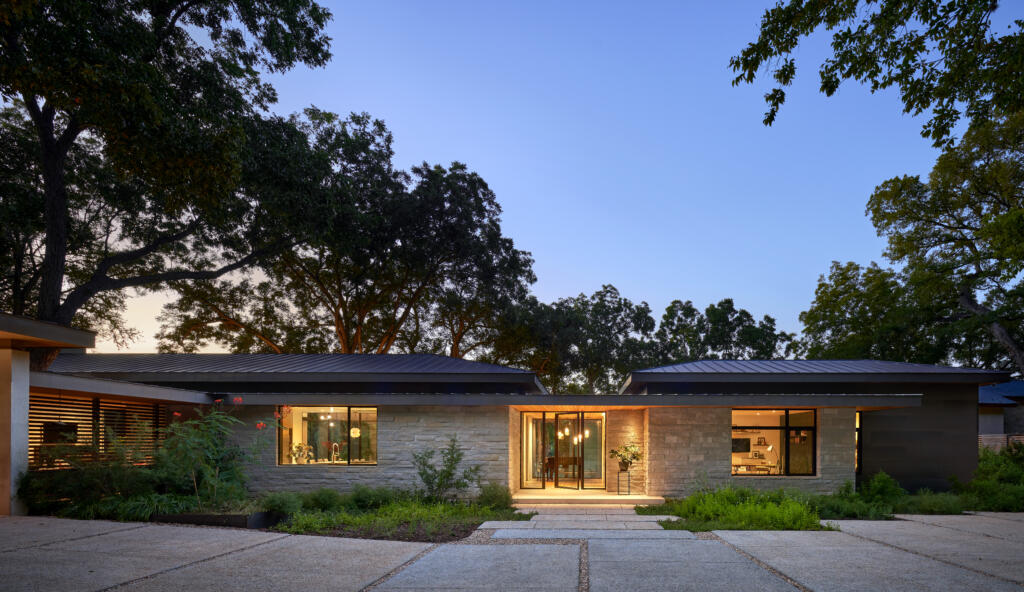
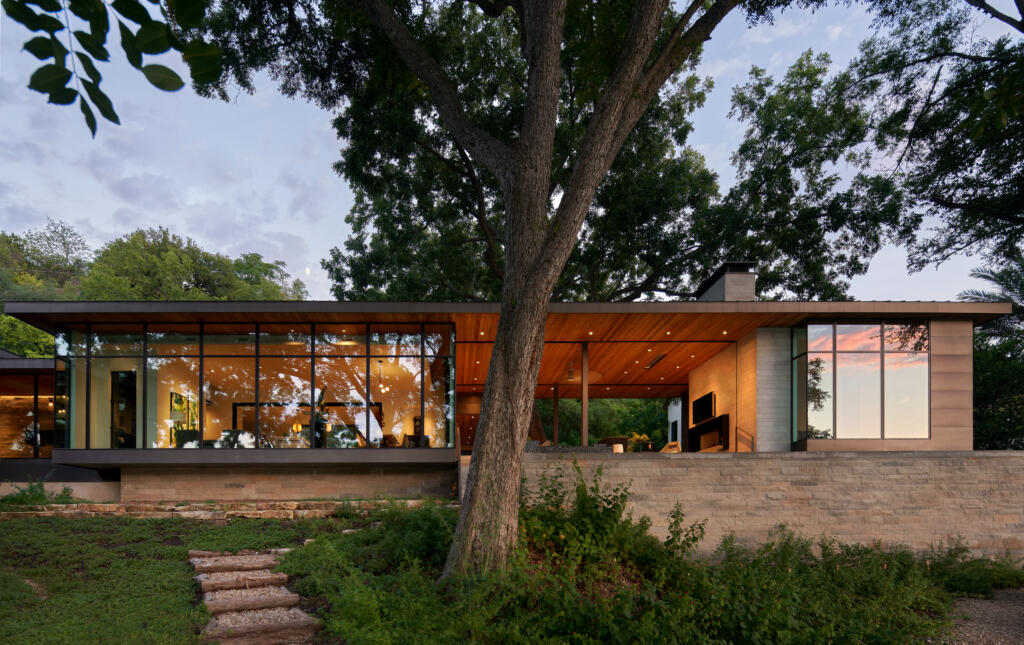
LaRue’s initial design concept was to convert the hexagon living space into the master bedroom suite with expansive lake views. “We then connected the hexagon building with a long, narrow form—or dogtrot—running parallel to the shoreline,” he explains. “This design concept allowed us to address the steep nature of the site, preserve the large pecan trees, and allow every space to have views of the lake,” he sums. The exterior materials include expansive glass windows and doors, metal panels, and limestone.

Eclectic Energy

Photo courtesy of Dror Baldinger, FAIA Architectural Photography

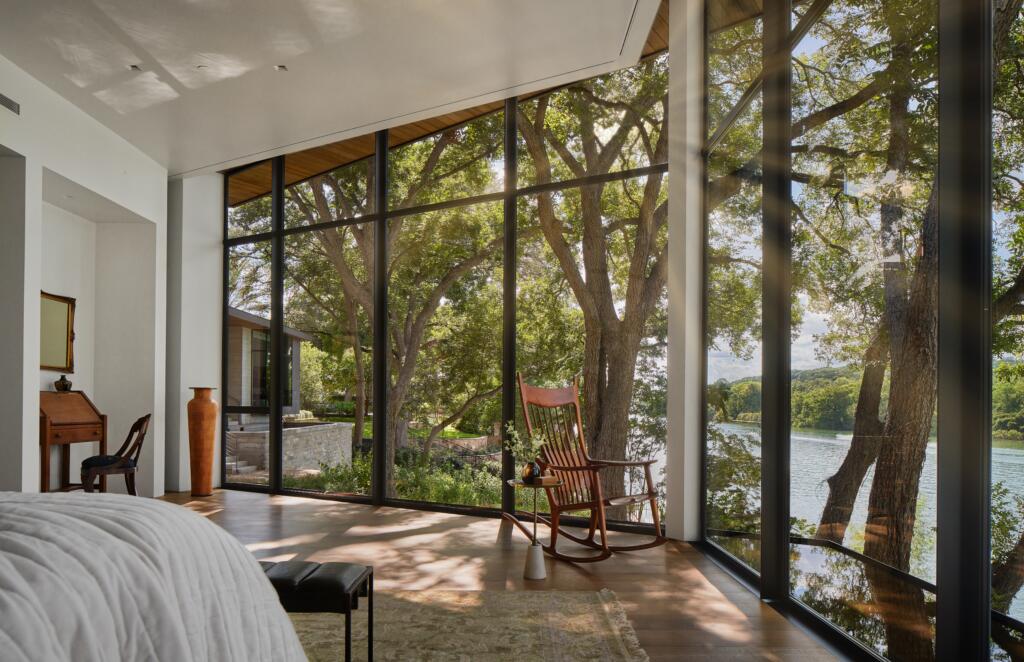
Dappled with natural sunlight, the new hexagon master suite boasts spectacular lakefront views. “A hand-woven wool rug and sumptuous bed linens bring an element of softness to balance the refined rusticity of antique wooden pieces,” says Britt, who worked closely with LaRue to ensure her interior design concepts would complement the home’s modern architectural style.

Gracious Guest Space

Photo courtesy of Dror Baldinger, FAIA Architectural Photography

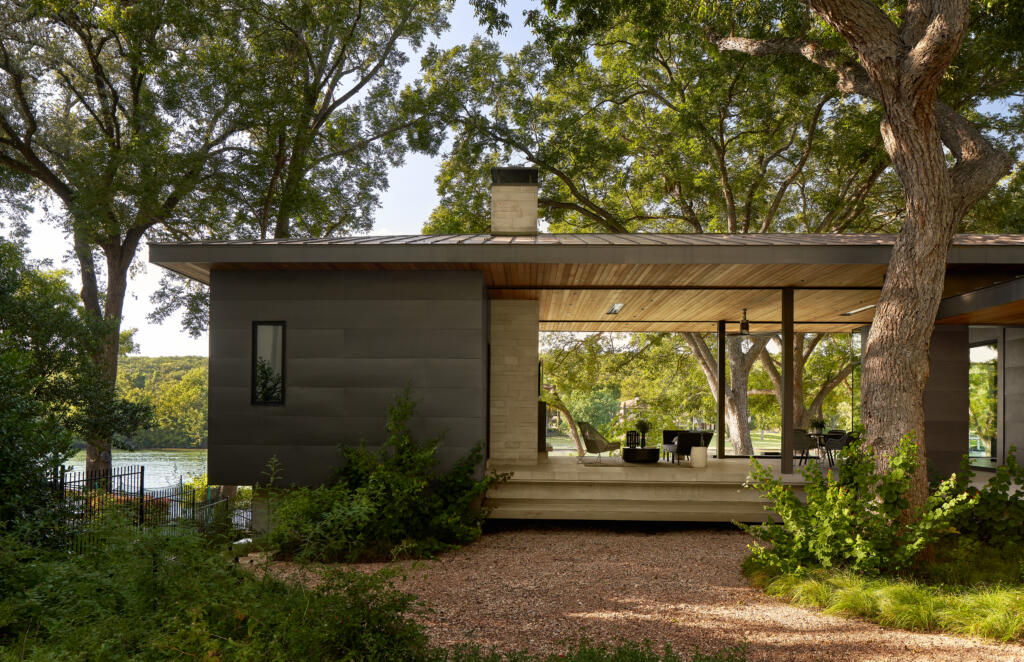
The new four-bedroom house is constructed in a long single-story L-shape with the private spaces anchored by the re-configured original structure on one end and a semi-detached guest suite on the far end of the horizontal design.

The spacious 4,100-square-foot Hill Country contemporary residence is now the owners’ primary dwelling. “The couple live an active lifestyle and love to travel but consider this their home base,” Britt explains. “They enjoy their living room space frequently, and their welcoming guest house is almost always in use.”

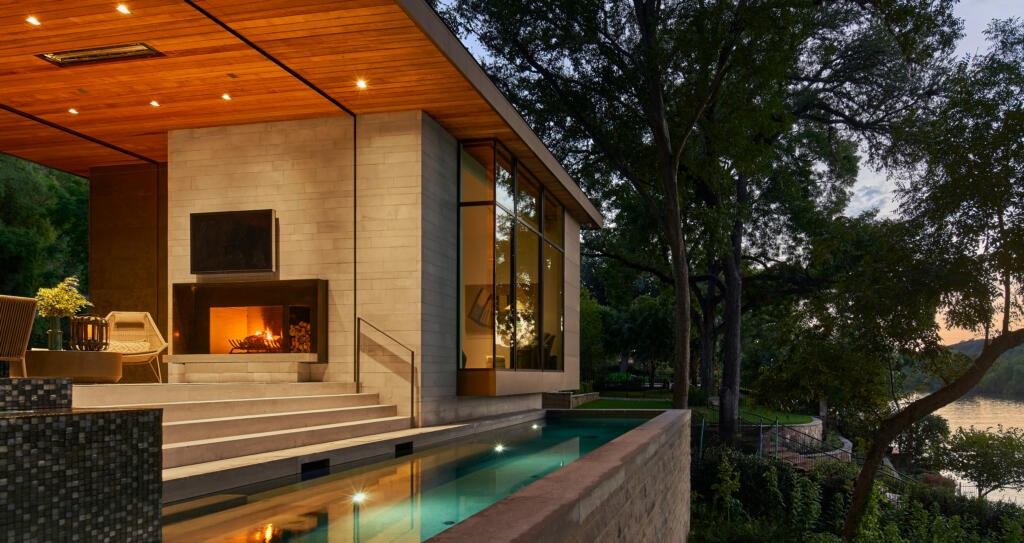
Effortless Ease: Indoor/Outdoor Access

Photo courtesy of Dror Baldinger, FAIA Architectural Photography

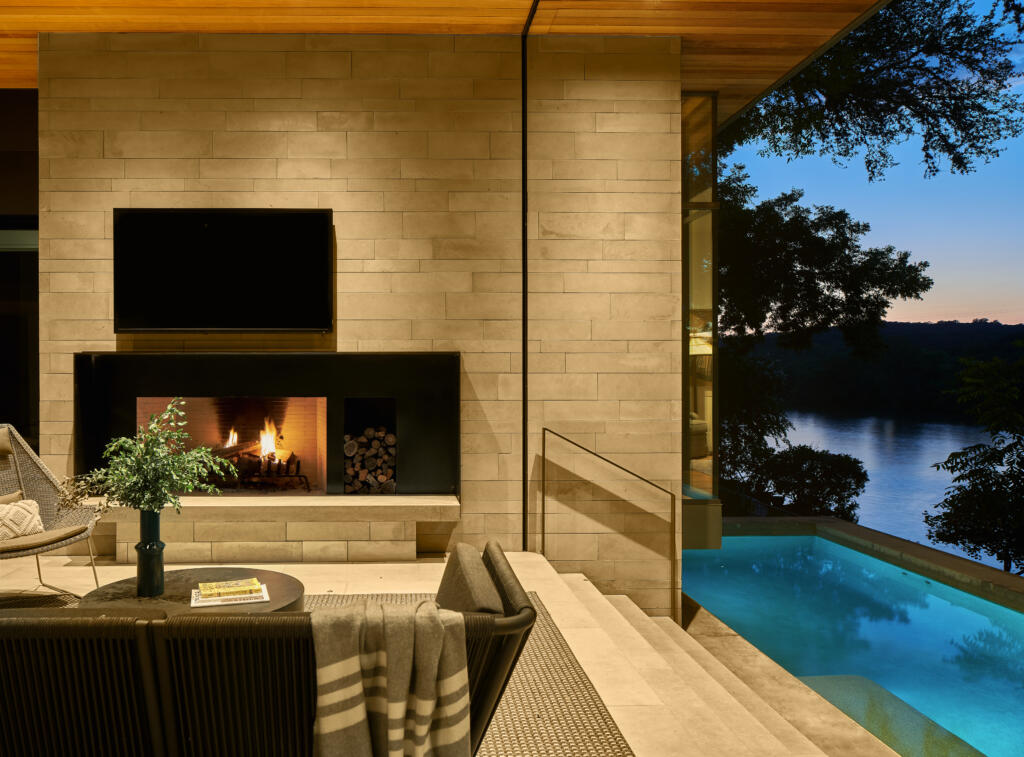
The newly designed house now has a strong connection to the outdoors, with large expanses of glass throughout. “The public spaces are aligned along the center of the building with views of the lake and joined together by the open dogtrot-style outdoor living space, which overlooks a beautiful pool as well as Lake Austin,” says LaRue. “The outdoor space has a generous roof overhead with a warm wood-clad ceiling that protects it from the scorching Texas heat and intense thunderstorms,” he notes. In addition, this all-seasons area features a bug screen, lounge furniture, and a grand fireplace that allows for cozy gatherings during the winter months.

Panoramic Punch

Photo courtesy of Dror Baldinger, FAIA Architectural Photography

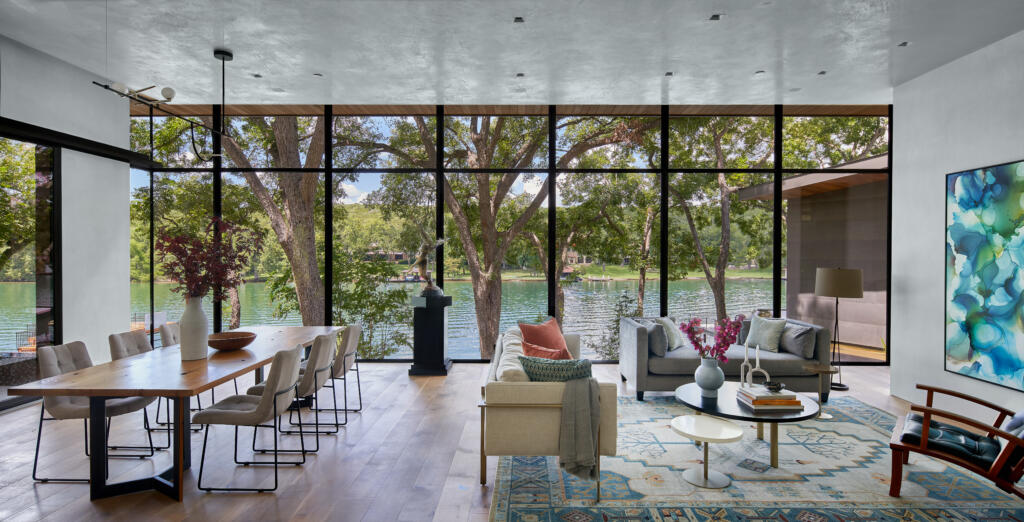
“This home is all about panoramic views to the lake and expansive sky,” says Britt, “so the color palette features a generous dose of soft blues and greens. The living room showcases an expansive wall of glass, and an art piece commissioned by Austin artist Andrea Pramuk is specifically detailed with saturated blues and sea green hues that are also echoed in the ‘Tree of Life’ rug that anchors the room,” she adds. The serene blue and green shades immediately connect you to the water and sky beyond, and peach accents in the rug and pillows complement the cool blues.

“This home is a study of restraint in design—the color palette and textiles are tranquil,” says the designer. “There is a little bit of texture, but it’s sleek. The steel, stone, and woods are smooth, almost glassy—and there’s a sense of movement and texture in the lighting. The textiles and hand-woven wool rug bring an inviting nubby touch to the living room.”

The furniture is intentionally elevated and not heavily upholstered to keep the space visually open and avoid obstructing the views. The settee has an open notched back to allow the light in as well as the lake view. In the adjacent dining room, a custom-built steel and wood table was crafted from reclaimed wood from the original site.

Elevated Style

Photo courtesy of Dror Baldinger, FAIA Architectural Photography

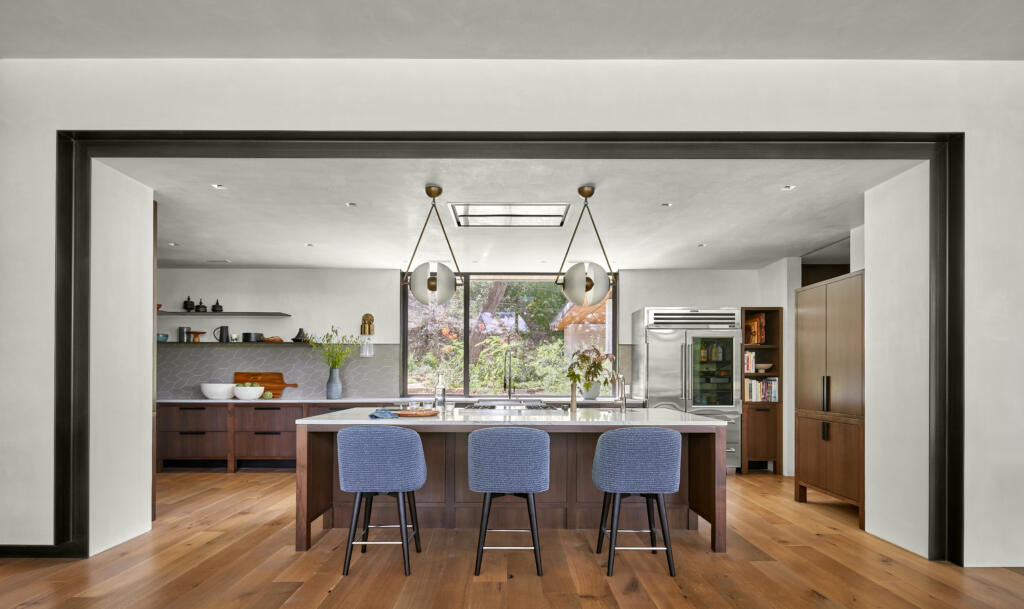
Custom cabinetry throughout the kitchen is designed to feel like beautifully detailed furniture pieces. “Elevating the cabinetry on wooden legs creates physical and visual space between the floor and cabinets,” says Britt. “A glass-front refrigerator adds to the sleek appeal of this unique kitchen, and a custom armoire stores coffee-making equipment.”

Grand Elegance

Photo courtesy of Dror Baldinger, FAIA Architectural Photography

Thoughtfully planned lighting plays an essential role throughout this home and provides a sculptural counterpoint to the minimalist modern architecture. Natural finishes and a subtle palette reflect the homeowners’ style and complement the tranquil scenery outside.

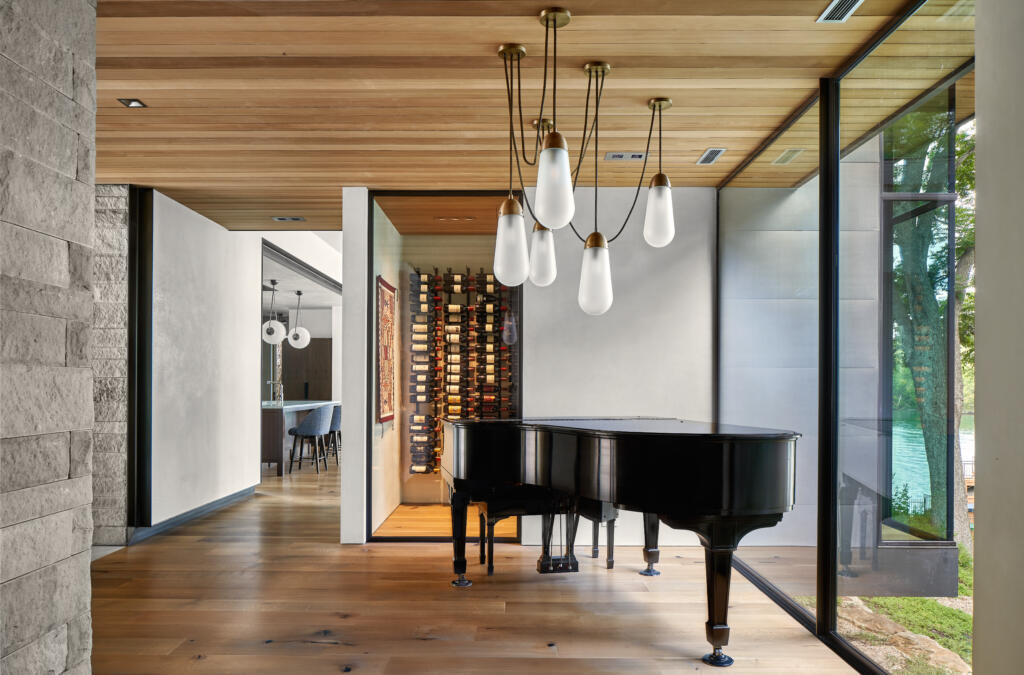
“The clients have a wonderful collection of art objects and furnishings they’ve collected from their travels around the world,” says Britt. “Weaving their personal story into the fabric of the overall design was a fun challenge. One important element to their story is their involvement in winemaking—they own a vineyard in Argentina, personally select the blends, and even custom-design the wine labels,” she adds. The entryway to their home features a Steinway grand piano and an impressive wine collection.

Decked-Out Dock

Photo courtesy of Dror Baldinger, FAIA Architectural Photography

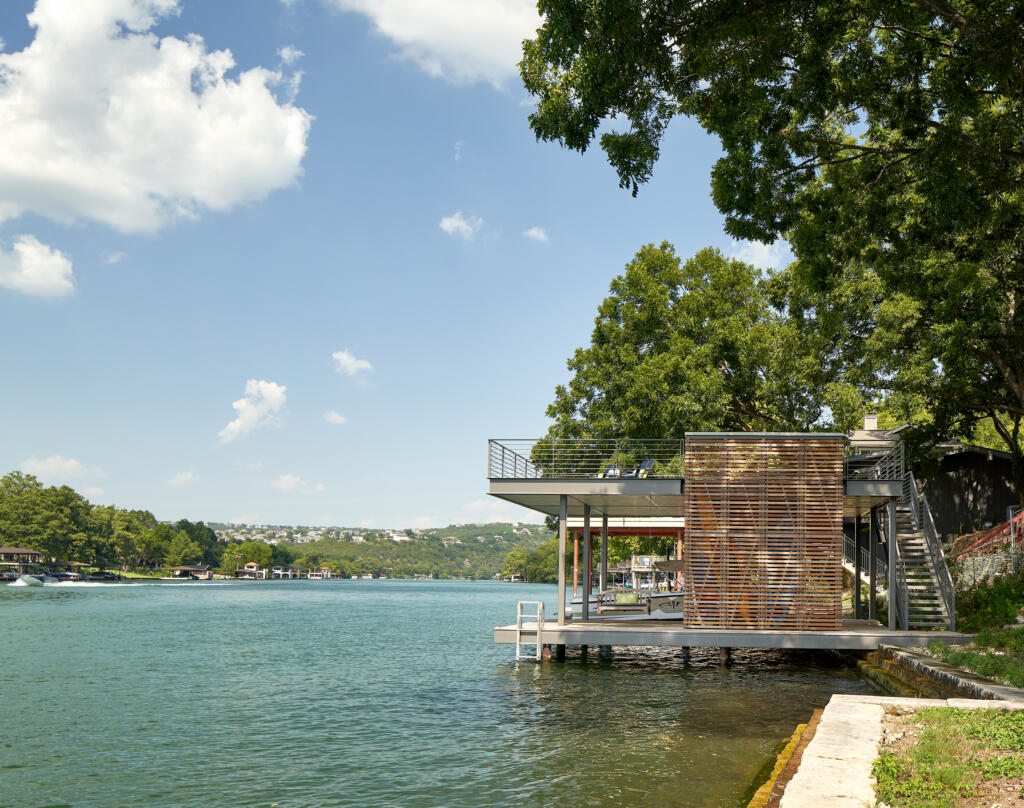
Designed by LaRue, the boathouse overlooks Lake Austin, offering yet another prime spot for these homeowners and their family and friends to take in the surrounding scenery. Perched high above the shoreline, the rooftop deck provides an ideal outdoor lounging area perfect for boat and bird watching.

Interested in the Lake Austin area? Visit Lake Homes Realty for more details and enjoy the lake life!

Remodel Your Basement for More Space at the Lake

When it comes time to do some lake home renovations, many homeowners consider improving the landscaping, updating the kitchen, and painting the walls.

But what about creating a new space for your family to enjoy, without having to add-on to the existing structure?

Look no further than your basement! Often, these spaces are used as overflow storage for old life jackets and knee-boards and are rarely utilized to their full potential, but these rooms provide a number of alternative options for use.

Though we may not have an exhaustive list of possibilities, this is a great starting place for getting ideas on just how you can remodel the basement at your lake home into a place the whole family can enjoy.

Additional roomsman working on drywall

Have you ever had too weekend guests at your lake home? The basement is a great space for adding extra rooms for just such occasions, and the best part: you don’t have to add-on to the existing structure.

If your basement space is unfinished, meaning it is not currently livable, Home Advisor estimates the cost of construction could range anywhere from $6,500 to about $18,500. Keep in mind though, price depends on the size of the space and extent of construction.

Construction for an unfinished basement includes such tasks as adding insulation, hanging drywall and installing electrical wiring and plumbing, for starters.

Remodeling your basement this way is often preferred because homeowners get to start with a blank canvas which requires little, to no, demolition.

Another option for adding additional rooms includes remodeling an already finished space, such as an unused game room.

TV/entertainment area

If your lake home has plenty of sleeping space, but is lacking in the indoor entertainment department, consider remodeling your basement into a second living room or media room.

Of course this means buying an extra sofa, TV and, possibly, a sound system, but creating this type of space in your basement is worth it to most homeowners.

Say it’s Sunday, and you’re hosting a football watch party at the lake. If your basement were a second living area or game room, the kids could go down and enjoy themselves while the adults have their own fun upstairs.

Or oppositely, remodel your basement into the man/lady cave of your dreams. Here in your lake home escape room, you can kick back, drink a cold one and enjoy living the lake life.

Investing in a projector system can also transform your basement from casual second living area to your very own home theater! Add a popcorn machine and mini-fridge, and you’re ready for the next rainy day at the lake.

Office to the max

If you work from home, you might be accustomed to working in a closet-sized office space.

But by remodeling your basement, you can build the home office of your dreams.

One option is to make the entire space into your office. With the whole room to yourself, you can consider lining the walls with bookshelves to create your own library. Or invest in a large table, and use the space as a meeting or conference area. How cool would it be to bring your clients to a beautiful lakeside meeting place?

If you have chosen to add multiple rooms in your basement, section off a space for your office. Provide for yourself a roomy amount of space, big enough for a desk, arm chair/sitting space, and shelving.

Painting the walls of your office a creamy latte color and adding deep colored leather and wooden furniture will produce a cozy, sophisticated atmosphere to your new work area.

Second Residence

Another idea for how to utilize your basement space is to turn it into a in-law suite for family weekends at the lake.

Many couples might agree that having a separated in-law suite downstairs, away from their own rooms, could be beneficial after spending the day out in the sun and out on the water.

Not only does this serve to give you and your spouse some often needed space, but providing this type of lodging may help to make your in-laws feel more comfortable and welcome.

It goes to show that you have put thought into the time they will be spending with you.

While your in-laws are away, or if they do not visit often, consider renting out your remodeled basement as an apartment or weekend vacation space.

Creating a 2 bedroom 1 bath apartment, complete with a living room and kitchen, is a great way to bring in profit from your home while serving as a home for another family. This can also help offset costs of maintaining your lake home in the off-season.

Repairing a Hole in Drywall

man repairing drywall on ceiling

Holes in drywall can be repaired fairly easily, with a minimal amount of equipment and work. Most homeowners can accomplish this with just a few tools.

Drywall is also referred to as plasterboard, wallboard or sheetrock.

Follow these steps in order to repair and conceal drywall holes of all different sizes.

Repairing a Large Hole: 4 to 6 Inches

You can get ready-made patches for drywall. These are available in different home supply centers and hardware stores.

Most offer a “peel-and-stick” type and most patches also have metal backing for additional strength.

If the hole was caused by door knob or other high-speed object, a patch can certainly hide it. However, it may not be strong enough to hold up if there is another impact. If that is the case, then you will need to get a new piece of drywall.

To install a drywall patch, follow these steps.

  1. First, clean the edges around the hole. Trim away any loose or frayed pieces using a utility knife.
  2. Shape or cut the patch carefully in order to fit your hole. Be sure to leave a border of extra backing around the patch in order to attach it to the wall that surrounds the hole.
  3. Clean and then dry the hole, to allow for maximum adhesion. If there are any greasy areas, you can clean them with some tri-sodium phosphate, found in the paint section of a hardware store. You can also just use soapy, warm water. Get the drywall damp enough to clean, but not soaking wet.
  4. Apply the patch to the wall, and smooth out the taped edges with a putty knife.
  5. Use a wide blade putty tool in order to spread a very thin layer of compound over the area.
  6. After it is dry, gently sand the patch to blend it into the wall and repaint.

Repairing Medium-sized Holes: 2 to 4 inches

If the hole is small, you may not need to use a patch. Instead, you can just use some joint compound, also found at a hardware store.

To apply:

  1. Clean up the area using a utility knife, and then trim away or press back any loose bits that are hanging down.
  2. Wet the repair area using a spray bottle. This will help the compound stick to the wall. This step can be skipped if you are using a non-water-based compound.
  3. Once your wall is clean and just a bit damp, apply a good amount of the compound onto a putty knife. Using a wider putty knife will produce a smoother result. Fill the hole and make sure there aren’t any gaps. It’s fine it it sticks out a little – that’s what the next step is for.
  4. Smooth out the compound using a putty knife. Hold the blade at roughly a 30 degree angle from the drywall, and pull it towards you in just one steady motion.
  5. Sand gently afterward, and repaint the section of wall if necessary.

Repairing Small Holes: Less than 2 inches

Smaller holes are very easy to repair, and can be unnoticeable if done correctly. You can use either non-shrink drywall compound or spackle.

  1. Clean up the area that needs to be repaired. Trim away the edges.
  2. Wet the area very lightly.
  3. Using a liberal quantity of the compound or spackle and a putty knife, cover the small hole and fill it in.
  4. Ensure that you smooth out the edges to blend it to the wall.
  5. Sand it down and paint over as needed.


Short on Existing-Home Options? 4 Reasons to Buy New

Buying a home in some markets is like being in a gladiator ring. Multiple rounds of showings and getting into — and losing — bidding wars can leave you feeling defeated.

If you’re growing weary of wading through an increasingly shrinking inventory of resales, there’s another possibility worth considering: buying new construction.

Although the pace of new construction has lagged demand in recent years, total housing starts are projected to increase by 6.1 percent in 2016 compared with 2015, says Stephen Melman, director of economic services for the National Association of Home Builders.

home under construction

Much of that gain is likely to come from the single-family sector, which is expected to grow 11.3 percent. Also, new single-family home sales are forecast to rise 13.6 percent this year to 571,000, Melman says.

Tired of sitting on the sidelines when it comes to buying a home? Here are four smart reasons to invest in new construction:

1. You get to customize your home

Not all of us are blessed with an interior designer’s touch.

With a new home, you pick from expert-selected features, floor plan, housing lot, community and more, so you don’t have to agonize over an extensive remodel to get the house of your dreams.

Margaret Garry and her husband, Stephen Hawkins, recently built a new home on Austin’s bustling east side.

They decided the upfront investment made more sense than spending excess time and money to constantly fix an older home, Garry says. To stay within budget, though, they avoided unnecessary upgrades that would have added thousands to their final price tag.

“When we tried to determine what options to include in our house, we started off by listing everything we wanted, and we came in about $20,000 over budget,” Garry says.

To save money, they ultimately pared down extras that they didn’t need, such as an optional living room fireplace and a utility sink in the laundry room.

2. You might get builder incentives

Believe it or not, there’s a bit of flexibility in the negotiation process with a builder.

Although some things won’t change, such as lot premiums or the price of adding certain designer upgrades, builders will sweeten the deal with money-saving incentives to close a sale, Melman says.

For instance, some builders offer to pay closing costs or loan fees, absorb financing points, or provide options or upgrades for free or reduced cost, he says.

If you don’t see incentives advertised, ask about them. Don’t assume that they’re not available.

3. You likely will get a builder warranty

Most new homes typically come with a builder warranty to cover common post-construction issues that the builder is responsible for correcting, so you don’t have to pay out of your pocket for those fixes, says Craig LeMessurier, senior director of corporate communications at KB Home, one of the nation’s largest homebuilders.

“Resales don’t come with a warranty,” says LeMessurier, whose company offers a 10-year building warranty on new homes.

When you talk to sales associates at new-home communities, ask what that builder’s warranty does and doesn’t cover so there are no surprises later, LeMessurier says.

4. You can finance through the builder — or any lender you choose

Some builders provide a one-stop shop for you to build and finance through them directly or via a preferred lender.

For instance, Garry and her husband chose the latter route because the affiliated lender offered them significant closing-cost assistance that other lenders couldn’t match.

A few things to keep in mind about new-construction financing: Some lenders offering new-home loans might also require higher down payments, an excellent credit score and consistent payment history.

Additionally, if you get outside financing, your lender will check your builder’s credit and background to assess its level of risk in case the builder bails on the contract.

*    *    *

Deborah Kearns is a staff writer at NerdWallet, a personal finance website. Email:mailto:dkearns@nerdwallet.com?trk=nw-wire_553_249938_24742. Twitter: @debbie_kearns.

This article was written by NerdWallet and was originally published by Redfin.

NerdWallet is a Lake Homes Realty / LakeHomes.com content partner providing real estate news and commentary. Its content is produced independently of Lake Homes Realty and LakeHomes.com.

How to Finish Renovation Projects On Time

Finishing renovation projects can be quite a hassle, especially when the project is going over the scheduled time you have allocated for it.

Remember when you got the bright idea to do the renovation and you were excited? Once the project begins, it turns into a whole other game.

Here are ways to ensure that the project finishes on time:

construction workers inspecting a home under constructionSchedule Inspections

Before you move ahead with any project, schedule any type of inspection that could reveal future problems. For instance, have your home checked for termites and asbestosis.

If you tear down a wall and run into either of those, you’re going to have much bigger problems on your hands than finishing on time.

Extra Materials

Making sure that you have enough materials for the job is crucial to the completion of the project.

One time-saving tip is to buy more than you need. This is to ensure that if an accident happens where a piece of the material breaks or is rendered useless, you will not waste time making trips to the hardware store.

Keep this extra materials in a secure place where they won’t be damaged. In some cases, you may be able to return anything that goes unused to the hardware store for a refund, just make sure to hold on to your receipt!

Scheduling

This will come as common sense to most, but make sure to schedule workers in a logical order.

For instance, it will be a waste of everyone’s time if the drywall laborers show up before the electrician has had a chance to do his job.

Hire the Right Contractor…

One way to avoid many DIY mistakes is to simply hire a contractor. If you take this route, make sure you do your research, and find an experienced contractor.

You can also ask for a portfolio of previous work and references from prospective hires.

Call these past clients, and ask questions such as: “Was he and his employees professional, on time, and on budget?” “Were you happy with your overall experience and would you use this contractor again?”

…But Don’t Be Afraid to Fire the Contractor

If you find that the contractor is not holding up to their end of the deal, do not be afraid to fire them.

You can find a different contractor to pick up where they left off, but again you will need to perform your due diligence before hiring.

If you find that you have to let the contractor go, then meet with another contractor and explain your situation. They will usually give you a free estimate and consultation on what it will take to complete the project.